Hi, I am Ashis Paul a passionate content publisher And Writer . I have been Creating informative Content for three years of experience. I have been creating informative content for many days. Also, I have expertise on SEO and content marketing. I love to create better content and ensure that every piece of content I create, helps businesses to reach their goal through effective publishing.
There are many ways to paint tire letters, but some methods are better than others. The best way to paint tire letters is by using a stencil and spray paint. This method is quick and easy, and it produces clean, crisp lines. First, you need to find a stencil that fits your tires. Next, tape the stencil in place on the tire. Then, use spray paint to fill in the stencil.
Be sure to use several thin coats of paint so that the letters don’t run or bleed. Finally, remove the stencil and enjoy your new tires. One of the best ways to add a personal touch to your car is by painting the tire letters. This can be a great way to show off your personality and style. It can also be a fun way to change the look of your car.
Table of Contents
Here are some tips on how to best paint your tire letters
1. Choose the right paint. You’ll want to use high-quality paint that is designed for use on tires. This will ensure that the paint will last and won’t peel off easily.
2. Prep the surface. Make sure you clean the tires thoroughly before you start painting. This will help the paint adhere better and give you a more even finish.
3. Use painter’s tape. To get clean, straight lines, use painter’s tape to mask off the area around each letter. This will give you crisp, sharp lines when you’re finished painting.
4. Paint in thin coats. Don’t try to cover everything in one thick coat of paint – it will take forever to dry and could end up looking uneven. Thin coats will dry faster and give you a more consistent finish.
5. Let it dry completely. Once you’ve finished painting, make sure you let the paint dry completely before driving or washing your car. This can take several hours, so be patient!
Spray Paint Tire Letters
If you want to add some personality to your car, one way to do it is by painting your tires. This can be a fun DIY project, and it’s a great way to show off your style. One thing to keep in mind is that you’ll need to use spray paint specifically designed for tires.
You can find this at most auto parts stores. Make sure to clean your tires thoroughly before beginning, and then just follow the instructions on the can of tire paint. You can get really creative with this project, so have fun with it! Experiment with different colors and patterns until you find something you love.
Credit: tredwear.com
What Kind of Paint Will Stick to Rubber Tires?
There are a few different types of paint that can stick to rubber tires, but the most common and recommended type is latex paint. Latex paint is a water-based paint that is easy to apply and dries quickly. It also has a strong bond with rubber, so it won’t peel or chip off easily. If you’re looking for a durable and long-lasting paint job on your rubber tires, latex is the way to go.
How Do You Color Tires With Letters?
One of the most popular ways to customize your car or truck is to add a unique touch with colored tires. You can use just about any color you want, but how do you actually go about coloring tires with letters? Here’s a quick guide on how to do it. The first step is to clean the tire thoroughly. This means using a degreaser and scrub brush to remove any built-up grime and dirt. Once the tire is clean, you’ll need to sand it down so that the paint will have something to adhere to.
Start with coarse sandpaper and work your way up to finer grits until the surface is smooth. Now it’s time for painting! You can either use spray paint designed specifically for tires or regular automotive paint.
If you go with regular paint, make sure to use several thin coats so that it doesn’t crack or peel over time from flexing. Once the paint is dry, you can add whatever design you want with stencils and more paint. Just be creative – there are no wrong answers here!
Let the newly painted tires dry completely before driving on them. This will help ensure that the design lasts as long as possible without chipping or fading away prematurely.
How Long Will Tire Paint Last?
Tire paint is a great way to add some personality to your car and make it really stand out from the crowd. But how long does tire paint last? And is it worth the hassle?
Generally, tire paint will last for around 3-4 months without any major issues. However, if you live in an area with a lot of harsh sunlight or heavy rain, then the lifespan of your tire paint may be reduced. Ultimately, it really depends on how well you take care of your tires and how often you drive.
If you do decide to go ahead and paint your tires, then make sure to use a high-quality product that is specifically designed for this purpose. Also, be sure to prep the surface of your tires properly before painting them – this will help the paint adhere better and last longer.
How Do I Make My Tyre Letters White?
If you’re looking to make your TYRE letters white, there are a few things you can do. One option is to use white lettering paint. You can find this at most hardware stores. Another option is to use vinyl decals or stickers. You can find these online or at most craft stores.
Conclusion
One of the best ways to paint tire letters is to use a stencil. You can purchase these at most auto parts stores. Be sure to clean the tires thoroughly before applying any paint. Apply the paint in thin coats, allowing each coat to dry completely before applying the next.
Tires are one of the most important parts of your car, and making sure they look good is important to a lot of people. One way to make your tires stand out is to use raised white letter tire paint. This type of paint can really make your tires pop and give them a unique look.
Raised white letter tire paint is also easy to apply and can be done in just a few minutes. If you’re looking for a way to make your tires look great, then raised white letter tire paint is definitely something you should consider.
Whether you’re looking to add a personal touch to your car or make it more visible on the road, raised white letter tire paint is a great option. This type of paint is applied to the sidewall of the tire and can be either brushed on or sprayed on. It’s important to note that raised white letter tire paint is not permanent, so it will need to be reapplied periodically.
However, it’s a relatively inexpensive way to customize your car, and can really make it stand out from the crowd.
Table of Contents
Using Tire Ink Paint Pens
How to Paint White Letters on Tires Black
Are you looking to add a bit of customization to your car? Painting the white letters on your tires black is a simple way to do so. Here’s how:
1. Start by cleaning your tires with soap and water. This will help the paint adhere better.
2. Next, use painter’s tape to mask off the area around the letters. You don’t want to get paint on other parts of your tire!
3. Now it’s time to paint. Use a small brush or roller and apply black paint to the letters. Be sure to go over them several times so that the color is nice and even.
4. Let the paint dry for 24 hours before driving on your tires again. And that’s it!
Credit: tredwear.com
What to Use to Paint White Letters on Tires?
One of the most popular ways to customize the look of your car or truck is by painting white letters on the tires. This is a relatively simple and inexpensive way to give your vehicle a unique look, and it’s also a great way to show off your personality. But before you start painting those white letters on your tires, there are a few things you need to know.
First, you need to make sure that the surface of the tire is clean and free of any dirt or debris. The best way to do this is to use a mild soap and water solution, followed by thorough rinsing. Once the tire is clean, you’ll need to dry it completely before starting to paint.
Next, you’ll need to decide what type of paint you want to use for your project. There are specifically designed tire paints available at most auto parts stores, but you can also use regular enamel-based paints if you prefer. Just keep in mind that these types of paints will require several coats in order to achieve full coverage.
When applying the paint, be sure to work in small sections so that the paint doesn’t have a chance to dry before you’re finished with that section. Also, be sure to let each coat of paint dry completely before moving on to the next section or adding another coat. Depending on the type of paint you’re using, this process could take several hours (or even days)to complete.
Once you’ve finished painting all of the white letters onto your tires, be sure to let them cure for at least 24 hours before driving on them. This will give the paint plenty of time to set up and bond properly with the rubber surface. And that’s all there is to it!
How Do You Whiten a Raised Letter on a Tire?
If you have a raised letter on your tire and you want to whiten it, there are several things you can do. One option is to use a product like Armor All or Mother Back-to-Black. These products will help protect the rubber and keep the letters from fading.
Another option is to use white vinegar. Simply apply the vinegar to a cloth and rub it onto the letters. The acid in the vinegar will eat away at the dirt and grime, leaving your letters looking clean and bright.
How Long Do Paint Pens Last on Tires?
Paint pens are a great way to add some personalization to your car. They can be used on tires, windows, and even the body of the car. But how long do paint pens last?
Paint pens are made with an oil-based paint that is specifically designed for use on automotive surfaces. This type of paint is durable and will last for several years without fading or chipping. When used on tires, paint pens will typically last for the life of the tire.
That means they will stay looking good until you need to replace the tire. If you want to remove the paint pen markings from your tires, you can do so with a little bit of rubbing alcohol.
So, if you’re looking for a way to add some personality to your car, paint pens are a great option. Just be sure to follow the manufacturer’s instructions carefully so that you don’t damage your tires.
What Kind of Paint Will Stick to Rubber Tires?
There are a few different types of paint that will stick to rubber tires. One is latex-based paint, which is commonly used for household projects.
Another option is acrylic paint, which is a little more durable and can be found at most hardware stores. For the best results, it’s important to clean the tires before painting them. This will help the paint adhere better and last longer.
Conclusion
If you’re looking to add a personal touch to your car, consider raised white letter tire paint. This type of paint is easy to apply and can really make your car stand out from the crowd. Plus, it’s a great way to show off your personality. Just be sure to follow the instructions carefully so that you don’t end up with a messy result.
There are many benefits to radial tubeless tires over traditional tires. For one, they provide a smoother ride and better handling due to their low-profile design. They also offer superior traction and grip on wet or icy roads. Additionally, radial tubeless tires are more fuel efficient and have a longer lifespan than traditional tires.
Most riders are familiar with the standard tubeless tire, but fewer know about the radial tubeless tire. So, what is a radial tubeless tire? A radial tubeless tire is simply a tubeless tire that has been designed specifically for use on a motorcycle.
Unlike a standard tubeless tire, which has a round cross-section, a radial tubeless tire has an oval or elliptical cross-section. This gives the tire more contact with the ground, which results in better grip and handling. Radial tubeless tires also tend to be lighter than their standard counterparts, making them ideal for racing applications.
And because they don’t have inner tubes, there’s less risk of flats. If you’re looking for improved performance from your motorcycle, consider upgrading to radial tubeless tires. You won’t be disappointed!
Table of Contents
Credit: www.autoevolution.com
What is the Difference between Tubeless And Tubeless Radial Tires?
There are many benefits to tubeless radial tires over traditional tubed tires. Tubeless radial tires are more puncture resistant, have a longer tread life, and provide a smoother ride. They also offer better-handling characteristics and lower rolling resistance.
Is Radial the Same As Tubeless?
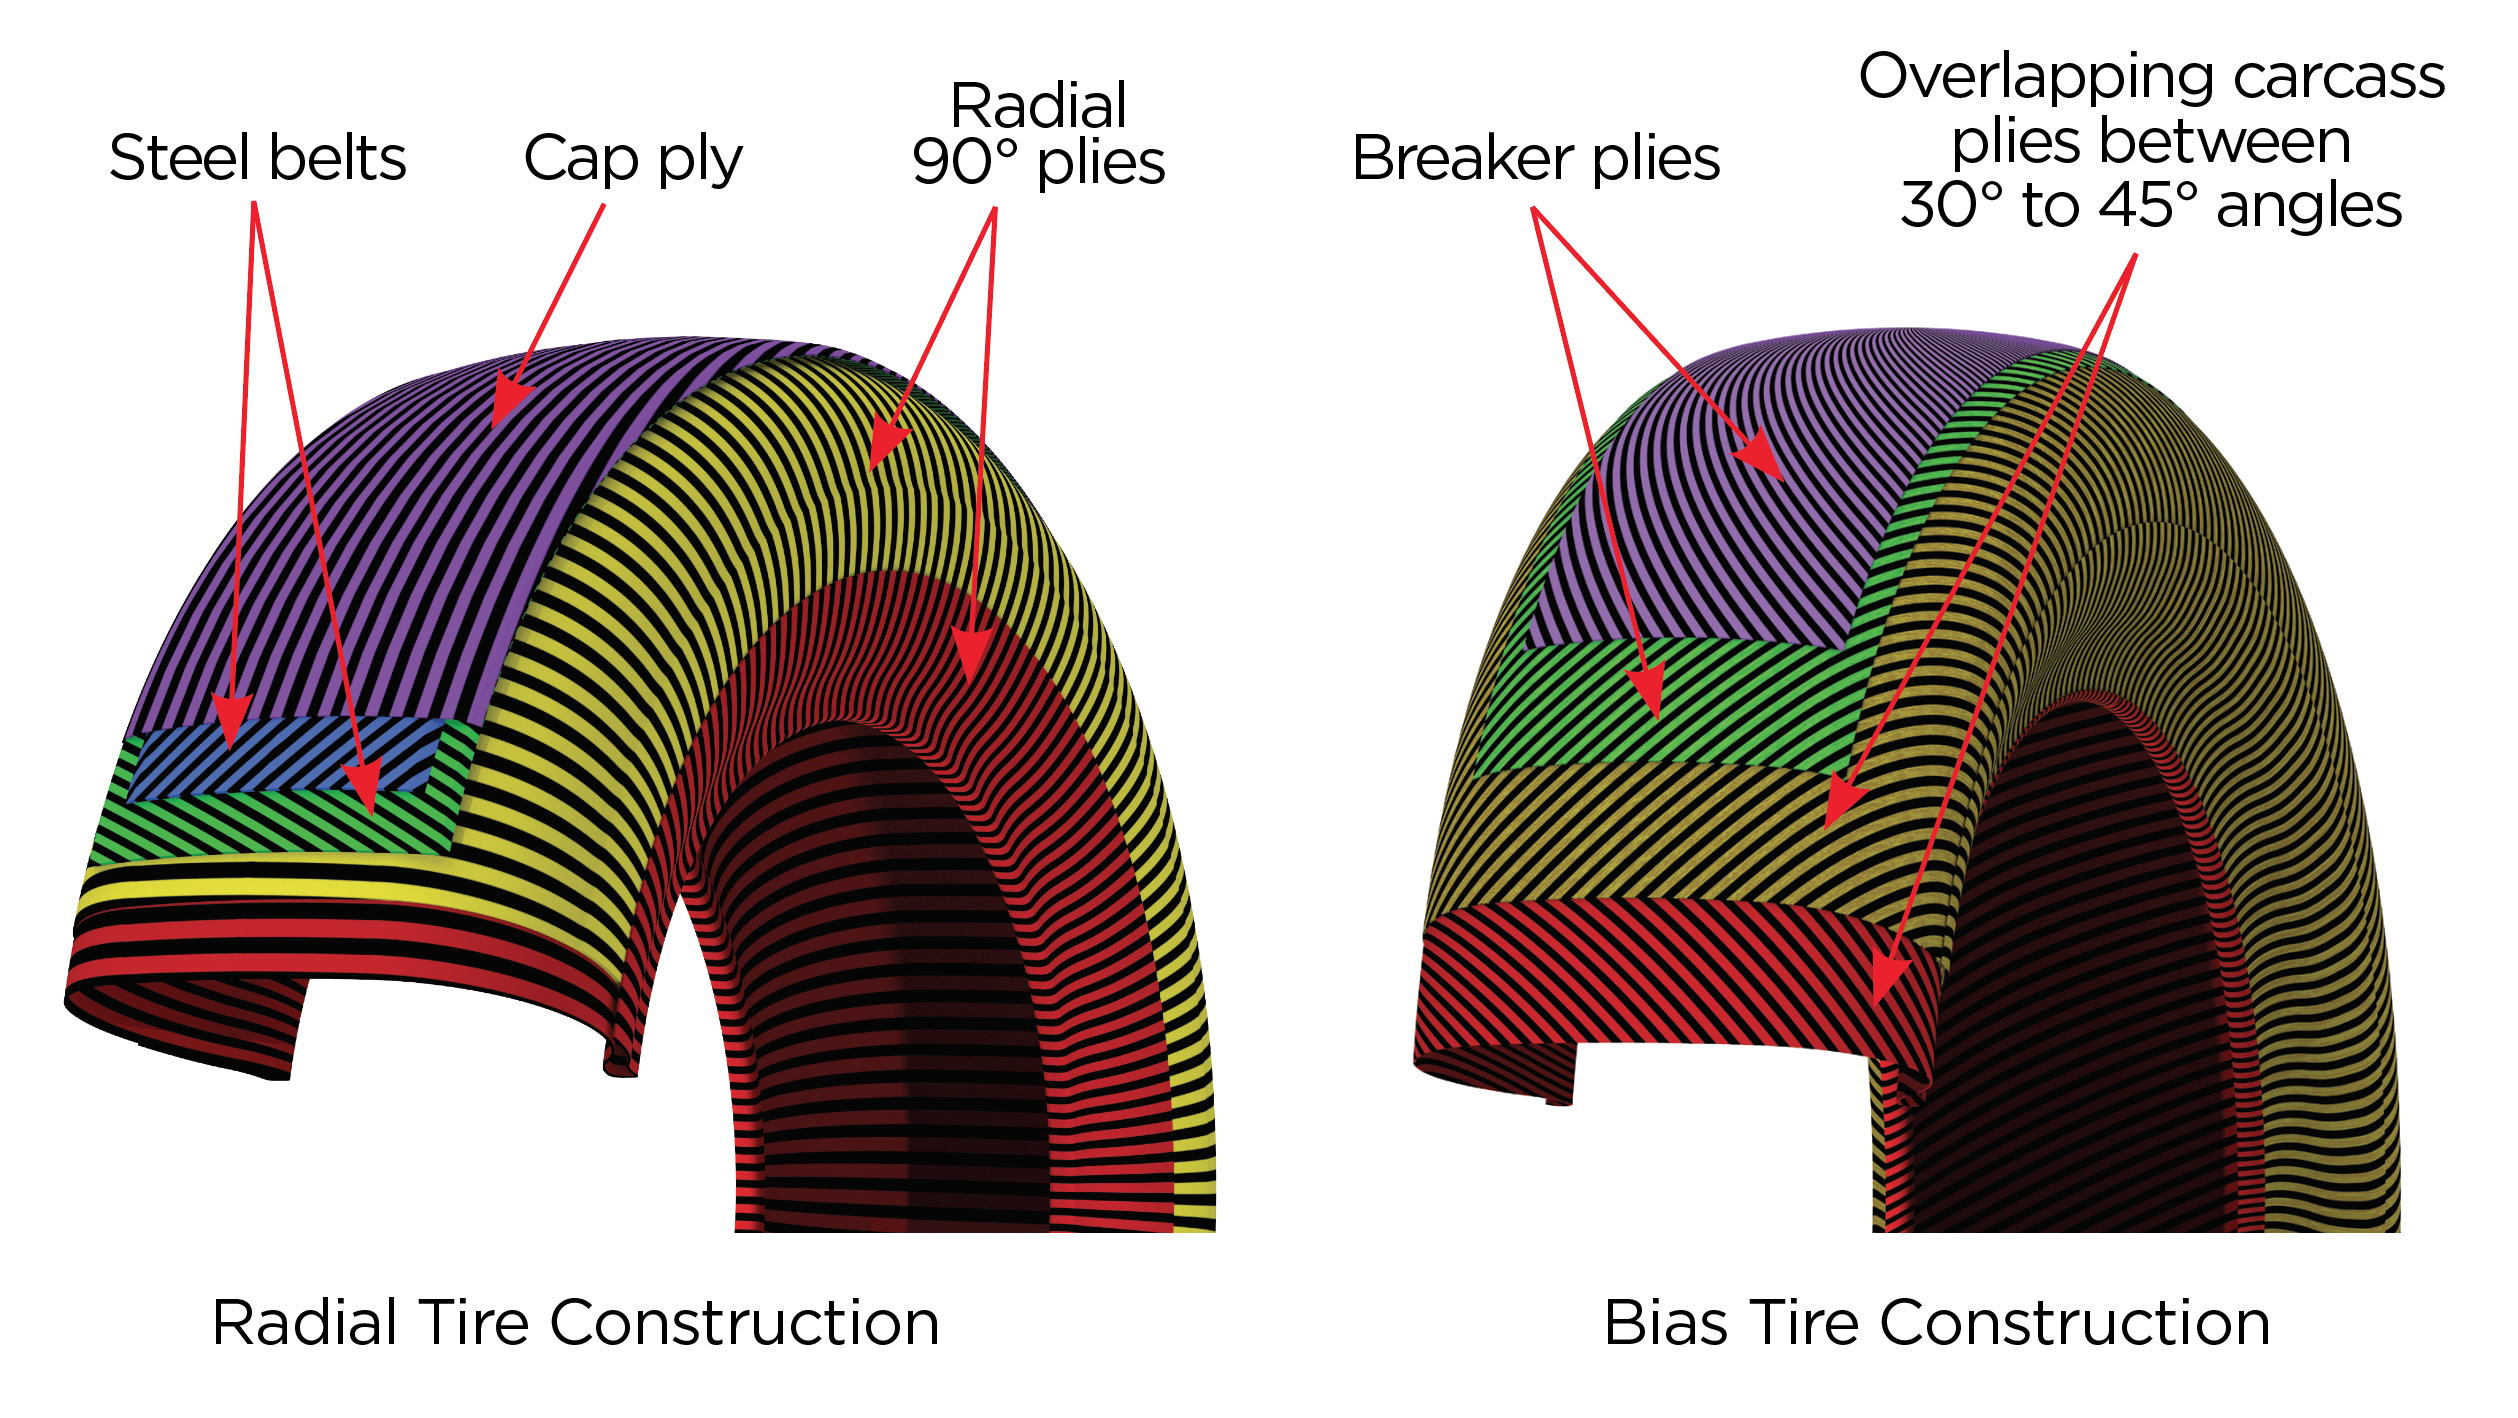
Radial and tubeless are not the same. Radial tires have a ply carcass that runs from bead to bead across the tread. The plies are at a 90-degree angle to the centerline of the tire. Tubeless tires don’t have any inner tubes; instead, they rely on airtight seals between the wheel rim and tire beads to hold air in the tire.
What Does Radial Mean on Tires?
Radial tires have revolutionized the tire industry since their introduction in the 1940s. Today, almost all passenger car tires and many truck tires are radial tires. What is a radial tire?
A radial tire has a carcass, or body, that runs radially – perpendicular to the direction of travel. The tread and sidewall elements are attached to the carcass via steel belts or nylon cord plies that run around the circumference of the tire (bias-ply tires have carcasses with fabric cords running diagonally).
Radial construction allows for a tire that can carry heavy loads without distortion at high speeds. Advantages of radial over bias-ply construction include:
1) Increased tread life due to reduced heat build-up.
2) Improved fuel economy because of reduced rolling resistance.
3) A smoother ride because radials flex less as they roll; and
4) Reduced likelihood of flats because punctures in the tread do not affect other parts of the tire as they would in a bias-ply design.
What is the Difference between a Radial Tire And a Regular Tire?
Radial tires are the most common type of tire on the market today. They are characterized by having a steel belt or ply radially oriented around the circumference of the tire. This design offers several advantages over traditional tires, which have their steel belts or plies running perpendicular to the tread (also known as bias-ply tires).
The main advantage of radial tires is that they offer better handling and stability than bias-ply tires. This is because radial tires can handle more weight at higher speeds without sacrificing traction or wear. Radial tires also tend to last longer than bias-ply tires, thanks to their stronger construction.
Another advantage of radial tires is that they provide a smoother ride. This is because the steel belts/plies are oriented in a way that allows them to flex and absorb shocks from the road surface more effectively. Bias-ply tires, on the other hand, transmit these shocks directly to the vehicle, resulting in a rougher ride.
Tubeless Tire | The Interesting Physics behind it
Does Radial Tubeless Mean Run Flat
Radial tubeless means that the tire has no inner tube and is mounted directly on the wheel. This type of tire is often used on off-road vehicles or race cars, as it can provide better grip and handling. Run flat tires are designed to keep the vehicle moving even if the tire has been punctured or otherwise damaged. While radial tubeless tires may not be able to run flat, they can still provide good performance in terms of grip and handling.
Radial Tubeless Tires Advantages
Radial tubeless tires have many advantages over traditional tires. They provide a smoother ride, improved handling, and reduced road noise. They are also more resistant to punctures and flats. Radial tubeless tires can be used on all types of vehicles, including cars, trucks, buses, and motorcycles.
Radial Tubeless Tires Price
Radial tubeless tires are definitely more expensive than your average tire. But with that said, they offer a lot of advantages that make them worth the extra money. For starters, radial tubeless tires provide better handling and traction thanks to their wider tread width.
They also deliver improved fuel economy due to their lower rolling resistance. And finally, they’re much more resistant to punctures and flats since there’s no tube to pinch or get punctured in the first place.
Radial Tubeless Tyre Puncture
Radial tubeless tires are those that have a radial carcass (the tire walls run perpendicular to the wheel rim) and do not require an inner tube. They are held onto the wheel by means of a bead that locks into the wheel rim. Punctures in radial tubeless tires are less common than in standard tires, but can still happen.
When they do, it is often difficult to repair them without specialized equipment. The best way to avoid punctures in radial tubeless tires is to ensure that they are properly inflated and to check them regularly for any signs of damage. If you do get a puncture, it is important to get it repaired as soon as possible to avoid further damage to the tire or wheel.
Conclusion
Radial tires are those in which the carcass or ply runs perpendicular to the bead seat. The first radials were made in 1946 but didn’t become popular until the 1960s. In a tubeless radial, there is no inner tube. The tire is mounted on the wheel rim and sealed with a rubber rim strip that fits into a groove on the wheel. Air pressure holds the tire against the rim and seals the bead seats.
We use numbers for a variety of things in our everyday lives. We use them to count, measure, and calculate. But did you know that numbers can also stand for letters?
In fact, there are a few different ways that numbers can represent letters. Let’s take a look at a few of the most common methods. One way that numbers can stand for letters is through the use of numerical codes.
There are many different numerical codes out there, but one of the most common is the ASCII code. With this code, each letter of the alphabet is assigned a number between 0 and 127. For example, the letter A is represented by the number 65, while the letter B is represented by 66, and so on.
There are a few different ways that numbers stand for letters. The most common is probably the use of numbers in place of words when spelling out something like a phone number or an address. But there are also other, more creative ways to use numbers to represent letters.
One example is using numbers as code words. A popular example of this is the military alphabet, where certain words are represented by their corresponding letter on the phonetic alphabet (e.g., “A” is Alpha, “B” is Bravo, etc.). This can be helpful in communications where clarity is important and you want to avoid any confusion over similar-sounding words.
Another way to use numbers to represent letters is with numerical symbols. This can be seen in some mathematical equations or formulas, where certain letters are replaced with symbols that represent them (e.g., the famous equation E=mc2). This can be a helpful way to make complex concepts easier to understand and visualize.
So, as you can see, there are a few different ways that numbers stand for letters. Which method you use will depend on your specific needs and purposes. Whether you’re trying to communicate clearly or just want to make things simpler, using numbers in place of letters can be a helpful tool!
Table of Contents
What do the small letters & numbers on a $2 bill stand for? Explainer video
Secret Code Numbers to Letters
If you’re looking for a way to create secret code numbers to letters, there are a few different methods you can use. One popular method is known as the Caesar Cipher, which was used by Julius Caesar to encode his military messages. To use this cipher, you simply shift each letter of your message by a certain number.
For example, if you shift all the letters by 3, A would become D, B would become E, and so on. Another popular method is called the Atbash Cipher, which was used in ancient times to encrypt Hebrew text. To use this cipher, you simply reverse the order of the alphabet (so A becomes Z, B becomes Y, etc).
There are also more complex ciphers that you can use if you want to create truly secure codes. These include the Vigenere Cipher and the Enigma Machine. However, unless you have a lot of experience with cryptography, it’s probably best to stick to simpler methods like the ones mentioned above.
Credit: www.alibaba.com
What Numbers Can Represent Letters?
There are a few different ways that numbers can represent letters. The most common is probably the telephone keypad, where the number 2 corresponds to the letter A, 3 to B, and so on. This is known as the ITU E.161 standard.
Another common way is called ASCII code. In this system, the number 97 corresponds to the letter a, 98 to b, and so on. This system is used for computer character encoding.
Finally, there’s also Braille, which is a system of raised dots that can be read by touch. Each dot configuration corresponds to a letter of the alphabet (and often multiple letters).
What Numbers Can Replace Letters?
There are many numbers that can replace letters, but the most common ones are 1 and 0. These numbers are often used in place of letters because they look similar to some letters, and they can also be used to create words by themselves. For example, “I” can be replaced with 1, and “O” can be replaced with 0.
What Does Each Number Stand for in Letters?
There are a few different ways that people represent numbers with letters. The most common is probably the numerical system, which uses the digits 0 through 9 to stand for numbers. However, there are also other systems, such as the alphabetical system and the Roman numeral system.
In the numerical system, each digit stands for a specific number. For example, the number 12 can be represented as 1 ten and 2 ones, or 10 twos and 2 ones. In this system, the numbers 0 through 9 all have specific meanings.
The alphabetical system is similar to the numerical system, but instead of using digits, it uses letters of the alphabet. In this system, A stands for 1, B stands for 2, C stands for 3, and so on up to Z, which represents 26. So, in this system, 12 would be represented as L2 (1+2), or LL (2+2).
The Roman numeral system is a bit different from both of these other systems. In this system, certain combinations of letters are used to represent numbers. For example, I represents 1; II represents 2; III represents 3; IV represents 4; V represents 5; VI represents 6; VII represents 7; VIII represents 8; IX represents 9; X represents 10; XIrepresent 11, and XII represents 12.
So in this system, the number 12 would be represented as XII(10+2).
What Number Means the Letter A?
The number A means the first letter in the alphabet. It is also used to represent a unit of measurement.
Conclusion
The blog post discusses how numbers can stand for letters in mathematical equations. For example, the number 3 can represent the letter A, and the number 4 can represent the letter B. This is helpful when solving math problems because it allows you to work with variables instead of concrete numbers.
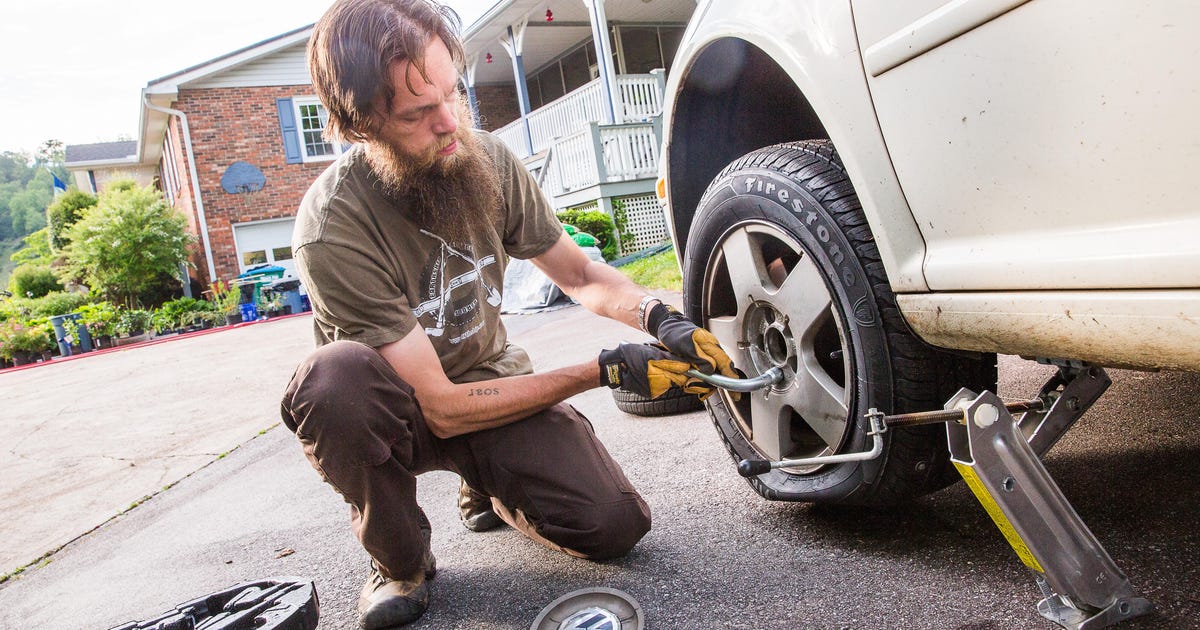
Most people know how to change a tire, but there are a few things you need in order to do so. First, you need a lug wrench. This is a special wrench that is used to loosen the lug nuts on your wheel. You also need a jack. This will be used to lift your car up so that you can remove the wheel and put on the new one. Finally, you need a spare tire.
This is the tire that you will put on in place of the flat one. If you’ve ever been stranded on the side of the road with a flat tire, you know how frustrating it can be. Fortunately, changing a tire is a relatively easy process that anyone can learn. All you need is a few simple tools and a little bit of know-how.
First, you’ll need to find a safe place to park your car. Once you’re safely off the road, put your car in park and engage the emergency brake. Then, locate your jack and lug wrench.
Most cars will have these stored in the trunk or under the backseat. Next, you’ll want to loosen the lug nuts on your wheel before jacking up the car. This will make it easier to remove the wheel later on.
Once the lug nuts are loose, use your jack to lift up the car until the flat tire is clear of the ground. Now it’s time to remove the old tire and install the new one. First, take off the remaining lug nuts and pull the flat tire away from the vehicle.
Next, line up the new tire with the bolt holes on the wheel and hand-tighten each lug nut onto its respective bolt thread. Finally, use your Lug wrench to fully tighten each lugnut, then lower your car back down to the ground. And that’s it!
You’re now ready to hit the road again.
Table of Contents
How to Change a Tire | Change a flat car tire step by step
How to Change a Tire
If you’re a driver, it’s important to know how to change a tire. After all, you never know when you might get a flat. Here’s a step-by-step guide on how to change a tire:
1. Pull over to a safe spot and put your car in park. Be sure to turn on your hazard lights so other drivers will know you’re stopped.
2. Loosen the lug nuts with a wrench before you jack up the car. You’ll want to do this while the tire is still on the ground so you don’t have to struggle with it later.
3. Jack up the car and place the jack under the frame or body (never under the axle!). Once the car is lifted off the ground, remove the lug nuts and take off the tire.
4. Put on the new tire and hand-tighten each of the lug nuts before lowering the car back down to the ground. Once all four tires are back on solid ground, use your wrench to fully tighten each of them until they’re snug but not too tight (you don’t want them coming loose while you’re driving).
5. That’s it!
How to Change a Tire Fast
If you’re stranded on the side of the road with a flat tire, you’ll want to know how to change it fast. Here’s a step-by-step guide to help you get back on the road quickly.
1. Pull over to a safe location and turn on your hazard lights.
2. Loosen the lug nuts on your flat tire with a wrench before you jack up the car. This will make it easier to remove them later.
3. Place the jack under the frame of your car and raise it until the flat tire is lifted off the ground.
4. Remove the lug nuts and flat tire, then replace it with your spare tire. Be sure to hand-tighten each lug nut before lowering your car back down onto all four tires.
Finally, use your wrench to fully tighten each lug nut in place.
How to Change a Flat Tire
If you’re a driver, it’s important to know how to change a flat tire. Whether you’re on the side of the road or in your own driveway, changing a flat tire is a relatively easy process that anyone can learn. Here’s a step-by-step guide on how to change a flat tire:
1. Start by getting your car off the road and into a safe location. If you’re on the side of the road, try to park as far off to the side as possible.
2. Once you’re in a safe location, turn on your hazard lights so that other drivers will be aware of your situation.
3. Next, locate your jack and spare tire and place them near your flat tire. Most cars will have these stored in the trunk area.
4. Now it’s time to loosen the lug nuts that are holding your flat tire in place. You’ll need to use a wrench for this – most cars will have one stored with the jack and spare tire. Once all of the lug nuts are loosened, you can go ahead and remove them completely by hand.
5. With the lug nuts removed, you should now be able to lift your flat tire off of its wheels. using the jack (if necessary). Be careful when doing this – once lifted, lower the flat tire gently down so that it’s resting on something soft (like grass). This will prevent damage to either your car or tires while they’re not attached!
6. Now it’s time to put on your spare tire! First line up the holes on your spare tire with those on the wheelbase, then start screwing in each lug nut by hand before tightening them fully with a wrench – again, most cars will have one stored nearby.
Make sure each lug nut is tight before moving on to the next one; otherwise, y our spare could come loose while driving. Also, remember to lower y our car back down onto all four tires before removing the jack completely!
How to Change a Tire Printable
If you’ve ever been stranded on the side of the road with a flat tire, you know how frustrating it can be. Changing a tire is not difficult, but it can be time-consuming and messy. Here’s a step-by-step guide to changing a tire, so you can get back on the road as quickly as possible.
1. Park your car in a safe location and turn on your hazard lights. If you’re on the side of the road, make sure to park as far off the road as possible.
2. Loosen the lug nuts on your wheel with a wrench before you jack up the car. You’ll need to use quite a bit of force, so don’t be afraid to really lean into it.
3. Place your jack under the car at one of the designated jacking points (usually near the doors or frame). Pump the jack until the wheel is lifted off the ground.
4. Remove the lug nuts and then pull off the old tire. Be careful not to drop it—the tires are heavy!
5. Put your new tire on by lining up the holes with those on the wheelbase. Push it onto place and hand-tighten each lug nut until they’re all snug but not too tight—you don’t want to strip them! You’ll tighten them fully once everything is back in place. Use your wrench to lower your car back down until all four tires are touching the solid ground again.
6. Remove your jack from under the car.
7. Tighten each lug nut clockwise with your wrench until they’re all snug. 8Test drive your car slowly at first to make sure everything feels normal before driving at regular speed again. And that’s it!
Credit: www.broadwaycredit.com
What Equipment Do You Need to Change a Tire?
If you have a flat tire, it’s important to know how to change it. Here’s what you’ll need:
A jack – A lug wrench (sometimes called a tire iron)
A spare tire that is in good condition First, use the jack to lift the car up so that the flat tire is off the ground. Then, use the lug wrench to loosen the bolts that are holding the tire on. Once the bolts are loose, you can remove the tire and put on the spare. Finally, use the lug wrench to tighten the bolts back up.
What are the Steps to Changing a Tire?
When it comes to changing a tire, there are a few things you’ll need to do in order to get the job done right. Here are the steps you’ll need to take:
1. Park your car on a level surface and set the parking brake. This will help to keep your car from moving while you’re changing the tire.
2. Loosen the lug nuts on the wheel that you’ll be changing with a wrench. You’ll want to do this before you jack up your car, as it will make it easier to remove the wheel later on.
3. Place a jack under your car and raise it until the flat tire is off of the ground. Make sure that the jack is placed securely before continuing.
4. Remove the lug nuts and then remove the flat tire from your car. Take care not to lose any of the lug nuts in the process!
5. Put the new tire on your car, making sure that it’s positioned properly before putting any weight on it. Screw on all of the lug nuts by hand at first, just enough so that they’re secure but can still be turned easily with a wrench.
6. Use your wrench to tighten each lug nut until it’s snug against the wheel – don’t overdo it, or you could strip them!
7. Lower your car back down to the ground and give each lug nut another quarter-turn with your wrench for good measure
8. Test drive your car slowly at first, making sure that everything feels normal If all goes well, you’re ready to re-enter traffic.
10. Thanks for following these simple steps, you should now have a spare tire that’s ready to go if (or when)you ever need it!
What Do You Need to Replace a Flat Tire?
If you have a flat tire, you will need to replace it with a new one. You will need a few things to do this:
A jack-A lug wrench – A spare tire -Wheel chocks (optional) First, you will want to make sure that your vehicle is in a safe location. You don’t want to be changing your tire on the side of the road where cars are speeding by.
If you have wheel chocks, you can put them behind your wheels so that your car doesn’t roll while you’re changing the tire. Next, use your jack to lift up your car so that the flat tire is off the ground. Then, use your lug wrench to remove the lug nuts from the wheel.
Be careful not to lose them! Once the lug nuts are off, pull the wheel off and set it aside. Now take your spare tire and line it up with the hole where the old tire was.
Put on the lug nuts (again, being careful not to lose any) and tighten them until they’re snug. Lower your car back down to the ground and give each of the lug nuts another turn to make sure they’re tight enough.
Can I Change a Tire by Myself?
Most people can easily change a tire by themselves if they have the proper tools and knowledge. It’s always best to consult your car’s owner’s manual before attempting to do any work on your car. To change a tire, you’ll need a few things: a jack, a lug wrench, and either another person to help or some heavy-duty stands to prop up the car. Once you have those things, you can follow these steps:
1. Park your car in a safe place away from traffic. Make sure your parking brake is engaged and put blocks behind the back tires to prevent the car from rolling while it’s raised up.
2. Find the jack point on your car – this is usually indicated in the owner’s manual or near the base of each door sill. Place the jack under this point and start raising the car until the flat tire is slightly off the ground.
3. Use your lug wrench to loosen each lug nut on the wheel (but don’t remove them yet). You may need to use all of your body weight to get enough leverage – if so, stand on one end of the wrench while you turn it with your hands on the other end.
4. Now that all of the lug nuts are loose, remove them by hand and set them aside somewhere safe – you don’t want to lose them! Carefully take off the flat tire and set it aside as well. Grab hold of your spare tire (which should be properly inflated) and line up its holes with those on the wheel rim.
Push it onto the rim until it’s seated correctly, then replace each lug nut one at a time, tightening them down firmly with your wrench but being careful not to over-tighten (again, refer to your owner manual for torque specifications).
Conclusion
If you find yourself with a flat tire, don’t worry! Changing a tire is a relatively easy process that anyone can do. All you need is a working jack, lug wrench, and spare tire. Here’s a step-by-step guide to changing your tire:
1. Find a safe place to stop. If you’re on the side of the road, make sure to pull over as far as possible and turn on your hazard lights.
2. Loosen the lug nuts before jacking up the car. Use your lug wrench to loosen the nuts, but don’t take them all the way off just yet.
3. Jack up the car and remove the flat tire. Place your jack under the frame of the car (consult your owner’s manual for specific locations) and lift until the flat tire is clear of the ground. Then, use your hands to remove the wheel completely.
4. Install the spare tire and lower the car back down. Put your spare tire on in place of the flat one, making sure that it is properly seated on The hub.
Once it’s in place, use your lug wrench to screw on The lug nuts, tightening them as much as possible by hand before using The wrench to finish tightening them. Finally, lower The car back down to The ground.
Most people don’t know how to grind rubber tires, but it’s actually not that difficult. First, you need to find a suitable place to do the grinding. You’ll need a large, flat surface that’s firm enough to support the weight of the tire. A concrete floor is ideal. Next, you need to secure the tire so it doesn’t move around while you’re working on it.
Collect used rubber tires from cars or trucks
If you can’t find any used tires, you can purchase new ones from a tire retailer
Use a power drill to make holes in the center of the rubber tires
The number of holes will depend on how many times you’re grinding at once
Place the tire on a metal grate over an open fire
Allow the tire to catch fire and then use a metal pole to push it around, grinding the rubber into smaller pieces
Once the tire is fully ground, remove it from the fire and allow it to cool before handling it further
If you’re looking to shred tires, there are a few options available to you. One is to use a tire shredder, which is a machine that is specifically designed to shred tires. These can be expensive, however, so another option is to use an industrial-grade chipper or wood chipper.
This will require some modifications to the chipper, such as removing the teeth on the cutting blades and replacing them with blunt plates. But with a little bit of work, you can turn an ordinary chipper into a tire-shredding machine. Once you have your tire shredder or modified chipper set up, simply feed the tires into it and let it do its job.
In no time at all, you’ll have a pile of shredded tires that can be used for various purposes, such as filling in potholes or creating traction in icy conditions. So if you need to get rid of some old tires, don’t just throw them away – recycle them by shredding them first.
How Do I Turn My Tires into Rubber Mulch?
One of the best ways to recycle old tires is to turn them into rubber mulch. Rubber mulch is a versatile material that can be used in a variety of settings, from playgrounds to gardens. While it might seem like a daunting task, turning tires into rubber mulch is actually quite simple. Here’s how to do it:
1. Start by collecting old tires. You can often find tires for free at local garages or tire shops. If you can’t find any for free, you can purchase them from a scrapyard or online retailer.
2. Once you have your tires, clean them thoroughly with soap and water. Be sure to remove any dirt, grime, or debris that may be on the surface of the tire.
3. Next, use a power drill fitted with a metal cutting blade to make several evenly-spaced cuts around the circumference of each tire. These cuts will help the tire shred more easily later on.
4. Once your tires are cut, place them in a heavy-duty shredder or chipper/shredder combo machine. Run the machine until all of the tires have been completely shredded into small pieces (you may need to do this in batches depending on the size of your machine).
5. The final step is to spread the shredded rubber mulch onto your desired surface area. For best results, use a layer that’s about 2-3 inches deep.
Can I Shred My Own Tires?
Yes, you can shred your own tires, but there are a few things to keep in mind. First, you’ll need to make sure that the tires are dry and clean before shredding them. Otherwise, the shredded tire pieces could clog up your machine. Second, you’ll need to choose the right type of shredder for the job.
A standard office paper shredder won’t be able to handle large tire chunks – you’ll need a more industrial-strength model for that. Finally, keep in mind that shredded tires can be sharp, so use caution when handling them and dispose of them properly when you’re finished.
How Much Does a Tire Shredder Cost?
A tire shredder is a machine that helps with recycling tires. The cost of a tire shredder depends on its size and features. Some small, personal ones can be bought for around $300. Larger, industrial models can cost upwards of $30,000.
Credit: tirerecyclingmachines.com
Homemade Tire Shredder
A homemade tire shredder can be a great way to recycle your old tires. If you have a lot of old tires that you need to get rid of, a shredder can help you do it quickly and easily. Here’s how to build your own tire shredder.
First, you’ll need a few supplies. You’ll need a strong cutting blade, like a circular saw blade or an angle grinder with a cutoff wheel. You’ll also need something to attach the blade to – either a drill or an impact driver will work. And finally, you’ll need some sort of stand or platform to put the whole thing on so you can safely operate it.
Once you have your supplies, start by attaching the cutting blade to your drill or impact driver. Then, set up your stand or platform next to a stack of old tires. Start by cutting through one side of the tire nearest the edge of the platform – be careful not to cut yourself! Continue slicing through all of the tires in the stack until they’re all cut in half. Now comes the fun part – shredding them up!
Start by feeding one half of a tire onto the cutting blade and spinning it around rapidly. The centrifugal force will cause the tire halves to fly apart into smaller and smaller pieces. Keep going until all of the tires are shredded up into small pieces that are easy to dispose of or recycle. And there you have it – your very own homemade tire shredder!
Conclusion
If you’re looking for a way to grind rubber tires, there are a few methods you can use. One is to use a chipper shredder, which will quickly reduce the tire into small pieces. Another option is to use a grinding wheel, which will take longer but will produce smaller pieces.
Finally, you can use an abrasive cutoff saw, which will create the smallest pieces but is also the most dangerous method. Whichever method you choose, be sure to wear protective gear and follow all safety precautions.
Radial tires are those in which the ply cords that reinforce the carcass run perpendicular to the direction of travel. Bias-ply tires are those where the reinforcing cords crisscross each other at angles less than 90 degrees. The vast majority of passenger car and light truck tires sold in North America are radial ply construction. In addition, nearly all original equipment on new vehicles is now radial.
Bias-ply tires have been used on cars and trucks for decades, but radial tires are now standard. So what’s the difference? Bias ply tires have crisscrossing layers of fabric that run diagonally from one bead to the other.
The cords in a bias ply tire are not parallel to each other like they are in a radial tire. Bias-ply tires were designed for use on older vehicles with narrower wheel wells. Radial tires have layers of cord that run perpendicular to the tread, from one bead to the other.
The cords are reinforced with steel or Kevlar belts running around the circumference of the tire. Radial tires offer better handling, longer wear, and a smoother ride than bias-ply tires.
Credit: americanatire.com
Table of Contents
Are Radial Tires Better Than Bias Ply?
Radial tires are those in which the cords that make up the tire’s body run perpendicular to the direction of travel. Bias-ply tires, on the other hand, have cords that crisscross at angles less than 90 degrees. Radial tires offer a number of advantages over bias ply tires.
First, because the cords in radial tires are oriented in a more uniform manner, they flex less as the tire rotates. This results in a smoother ride and less tread squirm. In addition, radial tires dissipate heat better than bias ply tires, resulting in cooler running temperatures and longer tread life.
Finally, radial construction provides superior traction and handling characteristics due to its stiffer sidewall. So are radial tires better than bias ply? For most applications, yes. Radials offer a smoother ride, longer tread life, and better traction and handling.
What is a Major Disadvantage of a Bias Ply Tire?
A major disadvantage of a bias ply tire is that it can cause the vehicle to handle poorly. The reason for this is that the bias ply tire does not have as much contact with the road as a radial tire does. This can lead to the vehicle feeling like it is sliding around on the road, which can be dangerous. Another disadvantage of the bias ply tire is that it tends to wear out more quickly than a radial tire.
Are Modern Tires Radial Or Bias Ply?
Radial tires are those in which the cords that make up the plies run perpendicular to the direction of travel. Radials offer a number of advantages over bias-ply tires, chief among them being longer tread life, better fuel economy, and a smoother ride.
Bias-ply tires are those in which the cords that make up the plies run at an angle to the direction of travel. Bias-ply tires were once standard equipment on all passenger cars but have largely been replaced by radial tires in recent years.
Can You Run Bias Tires on Highway?
Bias tires are not meant for highway use. The reason is that bias tires have a shorter tread life than radial tires, so they don’t last as long when used on the highway. Bias tires also have a higher rolling resistance, which means they use more fuel.
What is the difference between Radial and Bias tires? | Michelin
Bias Ply Vs Radial Drag Tires
Bias ply vs radial tires is a topic that has been debated for years by racers and car enthusiasts. There are pros and cons to both types of tires, and it really depends on your driving style and needs as to which type is best for you. Bias ply tires have been around the longest and were originally used on all cars.
They are made of two or more layers of fabric that crisscross at an angle, with the plies running from one side of the tire to the other. Bias ply tires tend to be cheaper than radial tires, but they don’t last as long and don’t handle as well. Radial drag tires are newer than bias ply tires and were originally developed for use on aircraft.
They are made of one layer of fabric that runs around the circumference of the tire, with steel or nylon belts running radially across the tread. Radial tires offer better handling, longer life, and resistance to flats, but they can be more expensive than bias-ply tires.
Are Bias Ply Tires Safe
The short answer is yes, bias ply tires are safe. The longer answer is that while they may be safe, there are some potential drawbacks to consider. Bias ply tires have been around for decades and were once the standard in the tire industry.
Today, most passenger vehicles come equipped with radial tires, which are considered superior in terms of performance and safety. However, bias ply tires are still used on some heavy-duty trucks and other commercial vehicles. One potential drawback of bias ply tires is that they can generate more heat than radial tires.
This can lead to premature wear and tear on the treads. Additionally, because they’re not as stiff as radial tires, they may provide less handling precision and stability at high speeds. Overall, however, if you’re driving a vehicle that’s designed for bias-ply tires, they should provide adequate performance and safety.
Radial Vs Bias Tires Motorcycle
Radial tires were first introduced in the late 1970s for use on passenger cars. In the 1980s, radial tire technology was adapted for use on motorcycles. Radial tires are now standard equipment on most motorcycles.
Bias-ply tires are still used on some older motorcycles and scooters. The main difference between radial and bias-ply tires is the way in which the carcass (the fabric body of the tire) is constructed. In a radial tire, the carcass plies (the layers of fabric) run radially across the width of the tire from bead to bead.
The beads are the metal or synthetic rings that fit into the wheel rim to hold the tire in place. In a bias-ply tire, the carcass plies run diagonally across the width of the tire from bead to bead. The biggest advantage of radial construction is that it allows for a much stiffer sidewall than bias-ply construction.
This gives radial tires better handling characteristics and resistance to “tire roll” under hard cornering forces. Radial construction also helps to dissipate heat build-up better than bias-ply tires, resulting in cooler running temperatures and longer tread life. And because they don’t flex as much as bias-ply tires, radials tend to provide a smoother ride as well.
Bias-ply tires have certain advantages over radials as well. They’re typically less expensive than radials, and they’re available in a wider range of sizes and load ratings (the amount of weight each tire can support). Bias-ply tires are also often used on off-road motorcycles because their stiff sidewalls resist punctures and provide good traction in mud and sand.
Radial And Bias Ply Tires Used Together
Bias ply tires have been around for much longer than radial tires, and were originally used on all vehicles. Bias-ply tires are made with cords that run diagonally from one bead to the other, at about a 30-degree angle. The tire’s tread is wrapped around these cords.
Radial tires were developed in the late 1950s and became popular in the 1970s. Radial tires have steel or fiberglass belts running around the circumference of the tire parallel to the ground, with the tread wrapped around them. Most modern passenger vehicles come equipped with radial tires as standard equipment because they offer numerous advantages over bias ply tires.
Radial tires provide better handling, a smoother ride, and longer tread life than bias ply tires. However, there are still some applications where bias ply tires may be preferable to radials. Some off-road vehicles such as 4x4s use bias-ply mud terrain or all-terrain truck (ATV)tires for their extra traction and durability in rough conditions.
These same qualities make bias ply trucking tires popular for long-haul trucks that travel great distances over varied road surfaces carrying heavy loads.
Conclusion
The debate between radial and bias ply tires has been around for a while. Radial tires are newer technology and offer superior handling, but they can be more expensive. Bias ply tires are the older technology and don’t handle them as well, but they’re usually cheaper.
So, which is the better option? It really depends on your needs and budget. If you’re looking for the best performance possible, radial tires are the way to go. But if you’re just looking for a good tire at a lower price, bias-ply tires may be a better option.
There is much debate about whether white lettering on tires should be in or out. Many people feel that it makes the tire look more aesthetically pleasing, while others believe that it serves no purpose other than to make the tire look dirty. There are pros and cons to both sides of the argument, and ultimately it comes down to personal preference.
There’s no right or wrong answer when it comes to white lettering on tires – it’s purely a matter of personal preference. Some people love the look of crisp, clean white lettering against a black tire, while others prefer the more subtle look of all-black tires.
Ultimately, it’s up to you to decide whether you want your tires to have white lettering or not. If you do choose to go with white lettering, just be sure to keep an eye on the letters and touch them up as needed so they always look their best.
Table of Contents
Black or White Outline Letters on Tires??? – Cooper Tires
BFGoodrich Ko2 White Letters in Or Out
If you’re considering running BFG KO2s on your rig, one of the first decisions you’ll have to make is whether or not to go with white lettering. There are pros and cons to each option, so it’s important to weigh your options before making a decision. On the plus side, white lettering can give your truck a more aggressive look that really stands out from the crowd.
If you’re going for a head-turning build, white letters are definitely the way to go. Plus, they can be easier to clean than black letters since dirt and grime tend to show up less in light colors. However, there are also some downsides to white lettering.
For one thing, it can be harder to see in low light conditions – not ideal if you do a lot of driving at night. And if you live in an area with a lot of mud and dirt, those white letters can start looking pretty grimy pretty quickly. You’ll have to be extra diligent about keeping them clean if you go this route.
So, what’s the verdict? Ultimately, it’s up to you! If you like the look of white lettering and don’t mind putting in a little extra work to keep them clean, go for it! But if you prefer a simpler look or do most of your driving in low-light conditions, stick with black letters.
Credit: www.reddit.com
Are White Letter Tires Back in Style?
There’s no definitive answer to this question since “style” is subjective. However, white letter tires were popular in the 1970s and 1980s, so they may be seen as retro by some people. Others may simply prefer the aesthetic of white lettering on a tire. There’s no right or wrong answer, it’s just a matter of personal preference.
How Do They Put White Letters on Tires?
When it comes to putting white letters on tires, there are a few different methods that can be used. The most common method is to use stickers or decals. This is a quick and easy way to get the look that you want, but it does have some downsides.
Stickers can be difficult to apply evenly, and they can also peel off over time if they’re not applied correctly. Another option is to paint the letters on yourself. This gives you a bit more control over the final look of your tires, but it’s also more time-consuming and requires a bit more effort.
If you’re looking for a quick and easy way to put white letters on your tires, stickers or decals are probably the best option. However, if you want something that will last a bit longer and give you more control over the final outcome, painting the letters on yourself is probably the way to go. Whichever method you choose, make sure to take your time and do it right so that your tires look their best!
What Year Did White Letter Tires Come Out?
The first white letter tires were introduced in the early 1970s. These tires were made with a special material that resists heat and provided superior grip on dry or wet surfaces. The material used to make these tires were also used in race car tires.
Do All Tires Have White Lettering on One Side?
No, not all tires have white lettering on one side. In fact, many tires don’t have any lettering at all. Some tires have black lettering on both sides, while others have colored lettering on one side and no lettering on the other. There are even some tires that have white lettering on both sides! So it really depends on the tire you have.
Conclusion
There’s been some debate on whether or not white lettering on tires is cool or not. Some people think it looks clean and sleek, while others find it tacky and prefer the classic black wall tire. There are pros and cons to both sides, but ultimately it comes down to a matter of taste.
Robinson Goodyear Lawton Ok is a personal injury lawyer who represents clients who have been injured in accidents. He has represented clients in a variety of cases, including car accidents, slip and fall accidents, and medical malpractice.
He has recovered millions of dollars for his clients through settlements and verdicts. If you have been injured in an accident, call Robinson Goodyear Lawton Ok to schedule a free consultation.
Robinson Goodyear Lawton Ok is a full-service law firm that has been serving the community for over 50 years. We are proud to offer a wide range of legal services to our clients, including personal injury, family law, probate and estate planning, and more.
Our experienced team of attorneys is dedicated to providing each client with personalized attention and knowledgeable representation. If you need legal assistance in any of these areas, we encourage you to contact us today to schedule a consultation.
Table of Contents
Robinson Goodyear Lawton, Ok Pay
Robinson Goodyear is a personal injury lawyer in Lawton, Oklahoma. He has been practicing law for over 20 years and has represented clients in a wide variety of cases, including car accidents, slip and fall accidents, medical malpractice, and more. If you have been injured in an accident and are looking for a knowledgeable and experienced attorney to help you get the compensation you deserve, contact Robinson Goodyear today.
Credit: www.redfin.com
What is Robinson Goodyear Lawton Ok
Robinson Goodyear Lawton Oklahoma is a city located in the southwestern part of the state of Oklahoma. The population was 18,895 at the 2010 census. The city is part of the Lawton metropolitan statistical area.
The city was named after Major General Henry W. Lawton, who was killed in action during the Philippine-American War in 1899. It was originally settled as a stop on the Wichita Falls and Northwestern Railway and later became an agricultural center for cotton, wheat, and cattle. In 1940, Fort Sill was established just outside the city limits; this increased Lawton’s population dramatically and also provided a major economic boost to the area.
During World War II, several prisoners of war camps were set up in and around Lawton; one of these camps housed German prisoners of war captured during fighting in North Africa. Lawton has a humid subtropical climate (Köppen Cfa), with long, hot summers and cool winters. The average high temperature in July is 94 degrees Fahrenheit (34 degrees Celsius), while the average low temperature in January is 32 degrees Fahrenheit (0 degrees Celsius).
What are the Benefits of Robinson Goodyear Lawton Ok
There are many benefits to living in Robinson Goodyear Lawton Ok. The community is close-knit and friendly, the schools are excellent, and the cost of living is affordable. The city also offers a variety of amenities, including a park with walking trails, a golf course, and a swimming pool. In addition, there are plenty of activities for residents to enjoy, such as festivals and concerts.
How Can I Get Started With Robinson Goodyear Lawton Ok
There are many ways to get started with Robinson Goodyear Lawton Ok. You can contact the office directly, or you can find an attorney in your area who specializes in this type of law. You can also research online to find information about this type of law and how it may apply to your specific situation.
Goodyear’s Largest U.S. Plant Draws Talent From Across the Nation
Conclusion
Robinson, Goodyear, and Lawton are all small towns in Oklahoma. Each has its own unique history and culture. Robinson is known for its coal mining heritage, while Goodyear is a historic farming community. Lawton is the largest of the three towns and is home to Fort Sill, a major United States Army installation.
If you have a flat tire, it is important to know how to change it. Many people are unsure of how to do this, and end up calling a tow truck or waiting for help. Changing a tire is not difficult, but there are a few things you need to know before getting started. Here is a step by step guide on how to change a spare tire. If you’re like most people, you probably don’t think about your spare tire very often. But when you have a flat, it’s good to know how to change it. Here’s a quick overview of what you need to do:
1. Find a safe place to park. You’ll need to be able to access the underside of your car, so look for a level spot that’s not too close to traffic.
2. loosen the lug nuts. Use a wrench or socket to turn them counter clockwise until they’re loose enough to remove by hand.
3. Remove the flat tire and put on the spare. Place the jack under the frame of your car and raise it until the flat tire is off the ground.
Then, simply unscrew the lug nuts (by hand) and pull off the flat tire. Put the spare tire on in its place, screwing on the lug nuts (again, by hand) until they’re snug but not too tight. Lower your car back down to the ground once all four tires are in place again.
Table of Contents
How Much Does It Cost for Roadside Assistance to Change a Tire
If you’re a driver, chances are you’ve experienced a flat tire at some point. If you haven’t, consider yourself lucky. A flat tire is never fun, but luckily there’s roadside assistance to help when it happens. So, how much does it cost for roadside assistance to change a tire? The answer may surprise you. Most roadside assistance programs will change your tire for free.
That’s right, free! All you have to do is call them up and they’ll come out and help you change your tire. Of course, there are some exceptions. Some programs may charge a small fee if you need multiple tires changed or if your car is particularly difficult to work on.
But in general, changing a tire with roadside assistance won’t cost you a thing. So next time you get a flat, don’t stress about the cost of changing it. Just give your roadside assistance program a call and they’ll take care of the rest!
How Much Does a Tire Cost
The cost of a tire can vary greatly depending on the make and model of your vehicle. For example, a standard passenger car tire may only cost between $60 and $200, while a high performance or luxury vehicle tire can cost upwards of $1,000. Ultimately, the best way to determine how much a new tire will cost for your vehicle is to consult with your local automotive specialist or dealership.
Flat Tire Repair Come to You
If you’re like most people, the thought of dealing with a flat tire is enough to make you cringe. The good news is that there are now companies that will come to your location to repair or replace your flat tire for you. There are a few different options available when it comes to flat tire repair.
You can either have the company come to your location and repair the tire on site, or you can have them tow your vehicle to their shop to make the repairs. Either way, you’ll be back on the road in no time. The cost of flat tire repair will vary depending on the company you choose and the severity of the damage. However, it’s generally much cheaper than having to buy a new tire outright. So if you find yourself with a flat, don’t despair just give one of these companies a call and they’ll take care of everything for you.
Roadside Tire Change Near Me
If you’re ever stranded on the side of the road with a flat tire, you’re going to want to know how to change it. Fortunately, changing a tire is a relatively easy process that anyone can learn. Here’s a step by step guide on how to change a tire:
1. Pull over to a safe location and turn on your hazard lights.
2. Loosen the lug nuts on your flat tire with a lug wrench (but don’t remove them).
3. Place your jack under the frame of your car and raise it until the flat tire is lifted off the ground.
4. Remove the lug nuts and take off the flat tire.
5. Put on your spare tire and tighten the lug nuts by hand (until they’re snug). Then lower your car back down to the ground.
6. Use your lug wrench to finish tightening the lug nuts (they should be tight enough that you can’t budge them with just your hands).
7 Double check that everything is secure before driving off!
How Much Does It Cost to Have a Spare Tire Put On?
If you’re stranded on the side of the road with a flat tire, you may be wondering how much it will cost to have a spare tire put on. The good news is that in most cases, having a spare tire put on is relatively inexpensive. Here’s a look at what you can expect to pay for this service.
On average, having a spare tire put on by a tow truck or roadside assistance service will cost between $50 and $100. In some cases, you may be able to have the service come to you for free if you’re a member of an auto club like AAA. If you need to have the work done at a garage or dealership, the cost will likely be higher.
Expect to pay between $75 and $150 for this service. However, many garages and dealerships offer discounts or coupons that can help offset the cost. Ultimately, the best way to avoid paying for a costly spare tire change is to be prepared ahead of time. Make sure you have a spare tire in your trunk (or know how to change one yourself) so that you’re never caught off guard by a flat tire again!
How Much Does It Cost to Change 1 Tire?
If you’ve ever had a flat tire, you know that it’s not a fun experience. Changing a tire is something that most people can do on their own, but it’s still not an easy or quick task. So how much does it cost to change a tire?
The answer depends on a few factors, such as whether you need to buy a new tire or just patch up the old one. If you need to buy a new tire, prices can range from $50 to $200 depending on the quality of the tire. If you just need to patch up your old tire, you can expect to pay around $20 for the materials and about 30 minutes of your time.
Is It Worth to Remove Spare Tire?
Most people believe that removing the spare tire from their vehicle will save them money and time. However, this is not always the case. There are several factors to consider when deciding whether or not to remove the spare tire from your vehicle.
The first factor is the type of vehicle you drive. If you have a four wheel drive vehicle, it is highly recommended that you keep the spare tire on board. This is because a four wheel drive vehicle needs all four tires to be the same size in order to function properly.
If one of your tires goes flat, you will not be able to use your four wheel drive until you replace the flat tire with a new one that is the same size. Another factor to consider is where you live. If you live in an area with a lot of rough roads or terrain, it may be beneficial to keep the spare tire on board.
This way, if one of your tires gets damaged or goes flat, you will not have to worry about finding a place to change it out. It is also worth noting that some states require drivers to carry a spare tire in their vehicles. So, if you live in one of these states, it would behoove you to keep the spare tire in your car just in case.
The final factor to consider is how often you travel. If you are someone who takes long trips often or travels far distances regularly, it might be worth keeping the spare tire on board just in case something happens while you are away from home base. Having a flat tire can ruin plans and put a damper on vacations pretty quickly; no one wants that! All things considered, there are pros and cons to removing the spare tire from your car.
How To Change A Flat Tire Like A Boss
Can You Replace a Spare Tire?
If you have a flat tire, you may be able to replace it with a spare tire . Depending on the make and model of your vehicle, you may have a full size spare tire or a smaller, temporary spare tire. You can usually find information about what type of spare tire your vehicle has in the owner’s manual.
If you have a full size spare tire, it can be used just like any other tire on your vehicle. You can put it on the front or back of your car, and you don’t need to worry about inflating it to a certain pressure before driving just inflate it to the same pressure as your other tires. If you have a temporary spare tire, however, there are some things you need to keep in mind.
First of all, these tires are not meant for extended use they should only be used until you can get your regular tire repaired or replaced. Secondly, temporary spare tires must be inflated to a higher pressure than regular tires typically around 50 psi. Failure to do so could result in the tire exploding while you’re driving!
Frequently Asked Questions (FAQ)
How long Can I Drive On A Spare Tire?
Spare tires are designed for temporary use only. Drive on them for as little distance as possible, typically under 50 miles, and at reduced speeds.
Can I Replace A Flat Tire With Any Spare Tire?
It’s best to use the spare tire provided with your vehicle, as it matches your car’s specifications. Using an incorrect spare could affect handling and safety.
Do I Need To Buy A New Tire After Using The Spare?
Yes, it’s advisable to replace the flat tire with a new one as soon as possible. Spare tires are not intended for long-term use.
What If I Can’t Loosen The Lug Nuts?
Apply your body weight to the lug wrench or use a breaker bar for added leverage. If they still won’t budge, seek professional help.
Can I Change A Flat Tire On A Hill?
It’s safer to find a flat surface, but if you must change a tire on a hill, turn your wheels into the curb to prevent the car from rolling.
Conclusion
If you have a flat tire, it’s important to know how to change it. You don’t want to be stranded on the side of the road! Here’s what you need to know about changing a spare tire. First, you’ll need to find a safe place to pull over. Once you’ve stopped, turn on your hazard lights and put on your parking brake. Then, locate your spare tire and jack.
If you’re not sure where they are, consult your owner’s manual. Next, loosen the lug nuts on your flat tire with a wrench before raising the car with the jack. Once the car is high enough, remove the flat tire and put on the spare. Be sure to hand tighten the lug nuts before lowering the car back down. Finally, give each lug nut another twist with the wrench to make sure they’re secure.