- Home
- Archive: September, 2023

Why are My Winter Tires Slipping
If your winter tires are slipping, it may be because the tread is worn down. The best way to prevent this from happening is to have the tires rotated every 5,000 miles. You should also check the air pressure in your tires regularly to ensure they are properly inflated.
When it comes to winter driving, one of the most important things to consider is tire traction. Unfortunately, even the best winter tires can slip on icy or snow-covered roads. If you find yourself in a situation where your tires are slipping, there are a few things you can do to help regain traction.
The first thing to do is slow down. Speeding up when your tires are already slipping is only going to make the problem worse. Take your foot off the gas and gently apply the brakes until you come to a stop.
If possible, try to drive in tracks that have already been made by other vehicles. This will give your tires something to grip onto and help prevent them from slipping. If you must drive in fresh snow, go slowly and be prepared for potential sliding.
If your tires do start to slip, don’t panic! Gently turn the steering wheel in the direction you want to go and avoid sudden movements. Remember to stay calm and keep your foot off the gas pedal until you gain traction again.
With a little care and attention, you can avoid tire slippage this winter season!

Credit: icyroadsafety.com
Why are My Tires Sliding in the Snow?
When you are driving in the snow, your tires can slide for a number of reasons. First, if you have bald or worn-out tires, they will not have as much traction on the road and can slip. Second, if you are going too fast for conditions, your tires can lose grip on the road and start to slide.
Finally, if you make a sudden stop or turn, your tires can also lose traction and begin to slip. If your tires do start to slide in the snow, there are a few things you can do to try and regain control. First, gently let off the accelerator and maintain steering control.
If that doesn’t work, try lightly tapping your brakes. If neither of these work and you continue to slide, then it is best to just stay calm and wait until the car comes to a stop on its own. Once you have stopped sliding, you can then slowly accelerate and turn again.
Why are My New Tires Sliding?
If you’ve ever experienced your new tires sliding, you’re not alone. It’s a common problem that can be caused by a number of factors. Here are some of the most common reasons why new tires may slide:
1. The tread on new tires is often smoother than what you’re used to. This can cause them to slip more easily, especially in wet or icy conditions.2. New tires may not have as much grip as old ones because they haven’t been “worn in” yet.
The rubber compound on new tires is often harder, which can make them less grippy.3. Your car may be out of alignment, which can cause the tires to slip when cornering or braking hard. This is especially likely if you’ve just had your car serviced or had new tires installed.
4. If your car has front-wheel drive, the weight distribution will be different with new tires (especially if they’re wider than the old ones). This can cause the front wheels to lose traction more easily and make the car feel like it wants to push forward when braking hard.
Do Winter Tires Slide?
Winter tires are designed to provide traction in cold weather and on icy or snow-covered roads. They typically have a deeper tread than summer or all-season tires, and they may be made from a softer rubber compound that remains flexible at lower temperatures. Some winter tires also have metal or carbon studs that can help provide grip on icy surfaces.
So, do winter tires slide? It depends. On dry pavement, winter tires will generally provide the same level of traction as summer or all-season tires.
But on slippery surfaces like ice or packed snow, winter tires can offer significantly better traction and control.
How Do You Stop a Tire from Slipping?
When a tire slips, it means that the tire is no longer able to grip the road surface. This can happen for a number of reasons, but most commonly it is because the tire is too dry or too slick. There are a few things you can do to try and stop a tire from slipping:
1. Increase the tire pressure – This will help to increase the contact area between the tire and the road, giving more grip.2. Reduce the speed – When you are going faster, there is less time for the tires to grip the road. Slowing down gives them more time to grab hold.
3. Avoid sudden movements – Sudden turns or braking can cause the tires to lose traction and slip. Try to make smooth, gradual movements instead.4. Use sand or salt – If you are driving on icy roads, spreading sand or salt on them can help give your tires more traction.
Why You Shouldn't Run Winter Tires All Year – With Proof!
Car Feels Like Slipping When Turning
If your car feels like it is slipping when you turn, there are a few potential causes. It could be something as simple as low tire pressure or worn-out brakes. However, it could also be a sign of a more serious problem, such as transmission issues.
If you notice that your car is slipping when you turn, the first thing you should do is check the tire pressure. If the tires are low, they may not have enough traction to grip the road properly. You can use a tire gauge to check the pressure and inflate the tires as needed.
If the tires are properly inflated but your car is still slipping when turning, then it’s time to inspect the brakes. Brakes can wear out over time and may need to be replaced. If your brake pads are worn down, they will need to be replaced.
However, if your brake rotors are worn out, then you will need to have them resurfaced or replaced entirely.Finally, if neither of these solutions fixes the problem, then it’s likely that there is an issue with your transmission. Transmission problems can be difficult to diagnose and repair on your own, so it’s best to take your car to a mechanic for further inspection.
Tires Slipping When Accelerating in Rain
Tires slipping when accelerating in rain can be a scary experience. It can happen unexpectedly and often with little warning. When it does occur, it’s important to keep a level head and follow some simple steps to help get your car back under control.
First, if you feel your tires slipping, ease off the accelerator and slow down. You don’t want to make the situation worse by continuing to speed up. Once you’ve slowed down enough, gently turn the steering wheel in the direction you want to go.
This will help transfer weight to the front or rear wheels that have more traction.If your car has an anti-lock braking system (ABS), you can use it to stop without losing control of the vehicle. To do this, press and hold the brake pedal firmly while steering into the skid.
The ABS will pump the brakes for you and help keep your car going straight.If your car doesn’t have ABS or if pumping the brakes doesn’t seem to be helping, gently apply steady pressure on the pedal until you come to a stop. Try not to slam on the brakes as this could cause you to lose control completely.
Once you’ve stopped, assess the situation and decide whether it’s safe to continue driving or if you need to call for roadside assistance. If it’s raining heavily and visibility is poor, it may be best to wait it out until conditions improve before getting back on the road again.
Car Feels Like Tires are Slipping
If you’re driving and feel like your tires are slipping, it’s important to take action right away. This feeling is typically caused by a loss of traction, which can be dangerous. There are a few different things that can cause your tires to lose traction.
If you’re driving on wet or icy roads, for example, your tires may slip. Or if you’re driving too fast around a corner, your tires may also slip.If you think your tires are slipping, the best thing to do is slow down and avoid sudden movements.
You should also try to stay in a straight line as much as possible until the feeling goes away. If the feeling persists or gets worse, it’s best to pull over and stop until you can figure out what’s going on. It’s better to be safe than sorry!
Front Tires Slipping When Accelerating
If your front tires slip when accelerating, it could be a sign of a bigger problem. Here are some things to check:1. Check your tire pressure.
If your tires are underinflated, they could be more likely to slip.
2. Check for any objects that may be lodged in your tires. If you hit something while driving, it could have damaged your tires and caused them to slip.
3. Inspect your tires for any signs of wear or damage. If they’re worn down, they might not have enough traction to grip the road properly, which could cause them to slip.
4. Make sure your wheels are aligned correctly.
If they’re not, it could put extra strain on your tires and cause them to slip.
Conclusion
If you live in an area that experiences winter weather, then you know how important it is to have good tires on your car. Winter tires are designed to grip the road better in icy and snowy conditions. But what happens if your winter tires start slipping?
There are a few reasons why this might happen. First, it could be because the tread on your tires is worn down. This means that there is less surface area for the tire to grip the road with.
Another possibility is that the rubber compound in your tires has hardened due to the cold weather. This can make them less effective at gripping the road. Finally, if you don’t have enough air in your tires, they will also slip more easily.
If you find that your winter tires are slipping, then you’ll need to take action to fix the problem. Start by checking the tread depth and air pressure of your tires. If either of these things is off, then adjust accordingly.
You may also want to consider switching to a different brand or type of tire if you find that your current ones aren’t performing well in winter conditions.

How to Clean Tubeless Tires
Most cyclists know that one of the best ways to avoid getting a flat tire is to ride tubeless. But what happens when your tubeless tires get dirty? In this article, we’ll show you how to clean tubeless tires so you can keep riding without worry.
Tubeless tires are becoming increasingly popular among cyclists for their ability to resist flats. But like any other type of tire, they can get dirty and need to be cleaned from time to time.
- Assuming you have tubeless tires and not tube tires:1
- Inflate your tire to the recommended PSI
- This will help to push the cleaner out as you spray it on
- Spray the cleaner onto the tire
- You can do this by holding the bottle 6 inches away from the tire and spraying in a circular motion
- Let the cleaner sit on the tire for a few minutes so it can break down any dirt or grime that may be on the surface of the tire
- Use a brush to scrub away any stubborn areas of dirt or grime
- A toothbrush or an old rag will work fine for this step
- Rinse off the cleaner with water and dry off your tires with a clean cloth
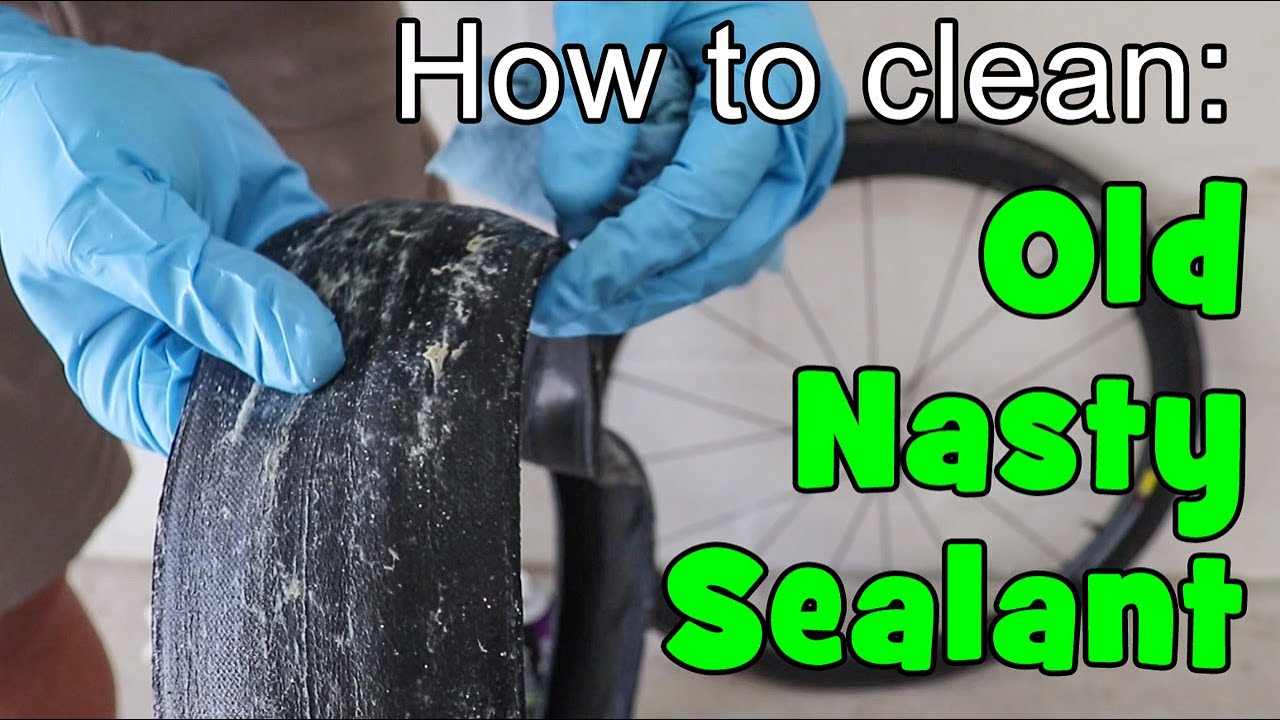
How To Remove Dried Tubeless Tyre Sealant
How to Clean Sealant from Tubeless Tires
Tubeless tires are a great option for many cyclists as they provide a number of benefits over traditional clincher tires. One of the key advantages of tubeless tires is that they can be run at lower pressures, which can improve traction and comfort. However, one downside of tubeless tires is that they can be difficult to clean if you get sealant on them.
If you’ve ever had to deal with sealant on your tubeless tires, then you know how frustrating it can be. The good news is that there are a few simple steps you can follow to clean your tires and get rid of the sealant.First, use a dry rag or brush to remove any excess sealant from the outside of the tire.
Next, use soapy water and a sponge to clean the inside of the tire where the bead sits. Once you’ve cleaned up as much sealant as possible, let the tire dry completely before reinflating it.With these simple tips, you’ll be able to easily clean your tubeless tires and keep them looking like new.
Credit: www.slowtwitch.com
Do You Need to Clean Tubeless Tires?
If you have a tubeless tire, the short answer is no, you don’t need to clean it. But if you want to prolong the life of your tubeless tire and keep it looking fresh, there are a few things you can do to clean it.To start, simply using soap and water on a sponge or rag should be enough to get rid of any dirt or grime that’s accumulated on the surface of the tire.
If your tire is particularly dirty, you can use a more forceful stream of water from a hose to remove any stubborn debris. Just be careful not to use too much pressure, as this could damage the sealant inside the tire.Once you’ve removed all the visible dirt and grime, you can move on to cleaning the sidewalls of the tire.
For this step, we recommend using an all-purpose cleaner or degreaser. Simply apply some cleaner to a sponge or cloth and wipe down the sidewalls until they’re free of any residue. Again, be careful not to use too much pressure or scrub too forcefully, as this could damage the sidewall material.
After cleaning both the surface and sidewalls of your tubeless tire, give it a once-over with a dry rag just to remove any residual cleaner or water. And that’s it! Your tubeless tire should now be clean and ready for action.
How Do You Clean Tubeless Wheels?
If you have tubeless wheels, you know that they require special care when cleaning. Tubeless wheels are made of aluminum or carbon fiber and have a smooth surface with no spoke holes. They are designed for use with tubeless tires, which means there is no inner tube.
This design makes tubeless wheels more aerodynamic and lighter weight than traditional wheel/tire setups.To clean your tubeless wheels, start by removing the tires. Use a tire lever to pry the bead of the tire away from the rim.
Once the tires are off, use a soft brush to remove any debris from the rims. Be sure to pay special attention to the brake track area, as this is where most of the dirt and grime will accumulate.Next, use a mild soap and water solution to clean the rims.
A dedicated bicycle cleaner can also be used. Avoid using harsh chemicals or abrasive cleaners, as these can damage the sensitive finish on tubeless rims. Rinse the rims thoroughly after cleaning to remove all traces of cleaner or soap residue.
Once the rims are clean, it’s time to re-install the tires. Start by adding some sealant to each tire (following manufacturer’s instructions). Then seat one side of the tire bead onto the rim before inflating slightly with a floor pump or compressor (again, following manufacturer’s instructions).
Repeat this process for the other side of each tire until both beads are seated securely on their respective rims. Inflate each tire to its recommended pressure and you’re ready to ride!
How Do You Remove Dried Tubeless Sealant?
When you remove dried tubeless sealant, it is important to do so slowly and carefully. You will need a few tools to help with this process, including: a small screwdriver, a dull knife, and a clean rag.Start by using the screwdriver to pry the dried sealant away from the tire.
Work your way around the tire until all of the sealant has been removed. Next, use the knife to scrape any remaining sealant from the tire. Be sure to do this gently so as not to damage the tire.
Finally, use the clean rag to wipe away any residue from the tire.With these simple steps, you can easily remove dried tubeless sealant from your tires!
How Do You Maintain Tubeless Tires?
Tubeless tires are becoming increasingly popular, as they offer a number of advantages over traditional clincher tires. They’re easier to set up, weigh less, and can be run at lower pressures without the risk of pinch flats. But how do you keep them running smoothly?
Here are a few tips on how to maintain your tubeless tires:1. Check the Sealant Level RegularlyOne of the most important things you can do to maintain your tubeless tires is to check the sealant level regularly.
The sealant is what keeps the tire inflated and prevents punctures from happening in the first place. Over time, it will naturally dry out and need to be replenished. You should check your sealant level every few weeks and add more if necessary.
This is especially important if you live in a hot climate or do a lot of riding in dusty conditions.2. Clean the Rims RegularlyAnother thing that’s important for maintaining tubeless tires is to clean the rims regularly.
If there’s any dirt or debris build-up on the rim, it can cause problems with inflation and sealing. Make sure to give your rims a good cleaning every couple of weeks (or more often if you ride in particularly dirty conditions). This will help keep your tubeless system working properly.
3. Inspect Your Tires Before Every RideIt’s also a good idea to inspect your tires before every ride, even if you just checked them before heading out! Look for any signs of wear or damage, such as cracks in the sidewalls or treads that are starting to wear down excessively.
If you spot anything suspicious, it’s best to err on the side of caution and replace the tire before riding on it again. This may seem like overkill, but it’s really not worth taking the risk with something as crucial as your tires!
Conclusion
If you’ve ever gotten a flat tire while riding your bike, you know how frustrating it can be. You have to walk all the way back to your house or wherever you started from, and then you have to deal with the hassle of changing the tire. But what if there was a way to prevent flats in the first place?
There is, and it’s called tubeless tires.Tubeless tires are becoming increasingly popular among cyclists, because they offer a number of benefits over traditional tires. For one, they’re much more resistant to punctures.
That’s because they don’t have an inner tube that can be punctured by sharp objects on the road. Instead, tubeless tires rely on a sealant that plugs up any holes that may occur.In addition to being more resistant to flats, tubeless tires also tend to roll faster than traditional tires.
That’s because there’s less friction between the tire and the road when there’s no inner tube present. And finally, tubeless tires are generally lighter than traditional tires, which can help improve your bike’s performance.If you’re interested in trying out tubeless tires, there are a few things you need to do before making the switch.
First, you’ll need to purchase a conversion kit that includes everything you need to set up your bike for tubeless use. Second, make sure your rims are compatible with tubeless tires; most modern rims should work just fine. Third, once you’ve installed the kit and inflated your new tire without an inner tube , go for a test ride around your neighborhood before heading out on any long rides .
This will give you a chance to make sure everything is working properly . Once you’ve done all of this , enjoy the benefits of riding with fewer flats!

Front End Alignment on a Car
Most people don’t know how important it is to have a front end alignment on their car. This simple procedure can save you money and keep your car running smoothly. A front end alignment ensures that your car’s wheels are pointing in the right direction.
This prevents wear and tear on your tires and suspension and can improve your gas mileage.
How to Perform a Front End Alignment Yourself – Easy and Free
A front end alignment on a car is an important service that helps to ensure the vehicle’s handling and braking are optimized. The front end of a car takes the brunt of the impact when driving on uneven surfaces or hitting potholes, so it’s important to keep it in good condition. Most mechanics will recommend getting a front end alignment at least once a year or more often if you frequently drive on rough roads.
The service typically costs between $50 and $100, depending on the make and model of your car. During a front end alignment, a mechanic will check and adjust the angles of your car’s wheels. This includes the toe, camber, and caster angles.
They will also inspect your suspension components for any damage or wear. If you notice that your car is pulling to one side while driving, or if you’ve hit a big pothole recently, it’s likely time for a front end alignment. Other signs that you might need an alignment include uneven tire wear or strange noises coming from your suspension.
If you think you might need a front end alignment, be sure to take your car to a reputable mechanic for service.
Front End Alignment near Me
If your car is pulling to one side or the other, or if the steering wheel is off-center when you’re driving straight, it’s likely that your front end alignment is out of adjustment. Over time, bumps and potholes can knock your vehicle’s suspension components out of alignment. This can cause premature tire wear and make your car harder to handle.
Fortunately, front end alignment is a relatively easy fix. Most auto repair shops offer this service, and many will even do it for free if you purchase your tires from them. If you’re not sure where to take your car for an alignment, a quick search for “front end alignment near me” should give you a few options in your area.
Front Wheel Alignment – Do It Yourself
Most people think that a four-wheel alignment is something that should be left to the professionals. However, with the right tools and a little bit of know-how, you can easily do a front wheel alignment yourself! The first thing you need to do is make sure your vehicle is on level ground.
You’ll also need to measure the distance from the center of the front wheel to the fender. This will be your reference point for making adjustments. Next, loosen up the tie rod end jam nuts and turn each adjustment sleeve until it lines up with the mark you made on the fender.
Now, tighten down those jam nuts and check your work by test-driving your vehicle in a straight line. If everything feels good, then you’re done! If your car starts to pull to one side or another, simply readjust the sleeves until you achieve proper alignment.
It’s really that simple! So next time your car needs an alignment, save yourself some money and do it yourself.
Front End Alignment Tools
If you’re a do-it-yourselfer, then you know that one of the most important things you can do to keep your car running smoothly is to perform regular maintenance. This includes tasks like checking your oil level and tire pressure, as well as more involved jobs like changing your brake pads or flushing your coolant system. Another important maintenance task is alignment – making sure your car’s wheels are pointing in the right direction.
There are a few different ways to tell if your car needs an alignment. If you notice that your car pulls to one side when driving or if your steering wheel is off center, these could be signs that your alignment is out of whack. You might also notice unusual wear patterns on your tires.
If you think your car needs an alignment, there are a few different options for getting the job done. You can take it to a professional mechanic or dealership, or you can purchase an alignment tool and do it yourself at home. Alignment tools come in a few different varieties, but they all essentially work by allowing you to make adjustments to the angles of your wheels.
Some tools are more sophisticated than others, but even the simplest ones can get the job done if used correctly. If you’re considering doing an alignment yourself, be sure to read the instructions carefully before getting started. And remember – safety first!
Make sure you have all the proper safety gear (jack stands, etc.) before beginning any work on your car.
How to Do an Alignment Without a Machine
If your vehicle is showing signs of uneven tire wear or the steering wheel seems to be off-center, it’s likely that your car needs an alignment. Many people assume that this is a job that can only be done at a professional garage with special equipment. However, it is possible to do an alignment without a machine, although it does require a bit more work on your part.
Here’s how to do it: First, you need to find a level spot to park your car. You also need to have access to a tape measure and something long and straight, like a ruler or yardstick.
Once you have everything set up, measure the distance from the ground to the center of each tire’s hub. Write down these numbers so you can reference them later. Next, use the tape measure to find the distance between the centers of each tire’s hub.
This measurement should be equal on both sides of the car. If it’s not, then your car is out of alignment. To fix this issue, first, loosen the lug nuts on each wheel using a wrench.
Then, jack up one side of the car at a time and place the jack stands underneath for support. With each wheel still off the ground, grab hold of it and rotate it until the measurement between the hubs is equal on both sides (using your measurements from earlier as a guide). Finally, tighten up the lug nuts and lower the car back down onto all four wheels.
That’s it! You’ve now successfully aligned your vehicle without needing any fancy machines or expensive garage fees!
How to Do a Front End Alignment on a 4X4 Truck
Most 4×4 trucks require a front-end alignment, also called a caster/camber adjustment, at least once a year. The type of terrain you drive on, as well as the weight of any loads you regularly carry in your truck, can affect how often you need to have an alignment done. If your truck starts to pull to one side when driving, or if the steering wheel is no longer centered when driving straight ahead, it’s time for an alignment.
You may also notice that your tires are wearing unevenly – this is another sign that your truck needs an alignment. To do a front end alignment on a 4×4 truck, first, check the owner’s manual to see what specific adjustments need to be made for your make and model of truck. Once you know what needs to be adjusted, loosen the appropriate bolts and turn the adjusting nuts until the desired measurements are achieved.
Then retighten the bolts and take your truck for a test drive to make sure everything feels good before heading out on the trail again!

Credit: wikipedia
What are the Signs That You Need a Front-End Alignment?
If your vehicle is displaying any of the following symptoms, it’s a good indication that you need a front-end alignment:
1. Your vehicle pulls to one side when driving on a level road
2. Your steering wheel is off-center when driving straight ahead
3. You notice uneven tire wear
What Happens When Your Front-End is Out of Alignment?
If your front end is out of alignment, it can cause a number of problems with your vehicle. The most obvious problem is that your car will pull to one side or the other while you are driving. This can make it difficult to keep your car in a straight line and can also make it harder to control your car at high speeds.
Additionally, an out-of-alignment front end can also cause premature tire wear. The tires on your car will start to wear down unevenly, which can lead to them needing to be replaced sooner than they would otherwise. An out-of-alignment front end can have a number of causes.
One common cause is hitting a curb or pothole. Another common cause is simply wearing down over time. As you drive, your suspension components will slowly settle into different positions, and this can eventually lead to the front end being out of alignment.
If you notice that your car is starting to pull to one side or the other, or if you notice uneven tire wear, then it’s important to get your front end checked by a professional as soon as possible.
What Causes a Car to Need a Front-End Alignment?
There are a few different things that can cause your car to need a front-end alignment. One of the most common causes is hitting a curb or pothole. This can throw off the alignment of your suspension and steering components, which will then require an adjustment.
Other causes can include the wearing down of suspension and steering components over time or simply adjusting your ride height (lowering or lifting your car). No matter what the cause, getting a front-end alignment is important for maintaining proper handling characteristics and preventing premature tire wear.
Are Front-End Alignments Necessary?
No – alignments are not necessary on the front end of a vehicle. The only time an alignment would be needed is if something is bent or out of adjustment, and that would be visible to the driver.
Conclusion
Most cars will need a front-end alignment at some point in time. The average cost of this service is $75 to $200. The first step is to check the vehicle’s owner’s manual to see if there are any special instructions for your car model.
Next, loosen the lug nuts on the front wheels and jack up the car. Place jack stands under the frame and lowers the car onto them. Now, remove the lug nuts and tires from the front wheels.
Take a look at the steering and suspension components to see if anything looks worn or damaged. If everything looks good, it’s time to move on to adjusting the toe. The easiest way to adjust toe is with an alignment tool, but it can also be done by measuring from wheel center to wheel center (measurement A) and then from tire tread edge to tire tread edge (measurement B).
The toe should be set, so that measurement A is equal to measurement B plus 1/16th of an inch (.0625). For example, if measurement A is 6 inches and measurement B is 5 3/4 inches, then the toe should be set at 6 1/16 inches (5 3/4 + .0625). One toe has been adjusted, it’s time to move on to camber and caster.
Camber measures how much the tire tilts in or out at the top when viewed from directly in front of or behind the car. The caster measures how much forward or backward tilt there is when viewed from either side of the car. These adjustments are made with bolts that hold either the strut rod or control arm in place – depending on your vehicle’s design – so they can be rotated slightly until the camber and caster fall within factory specifications listed in your owner’s manual.

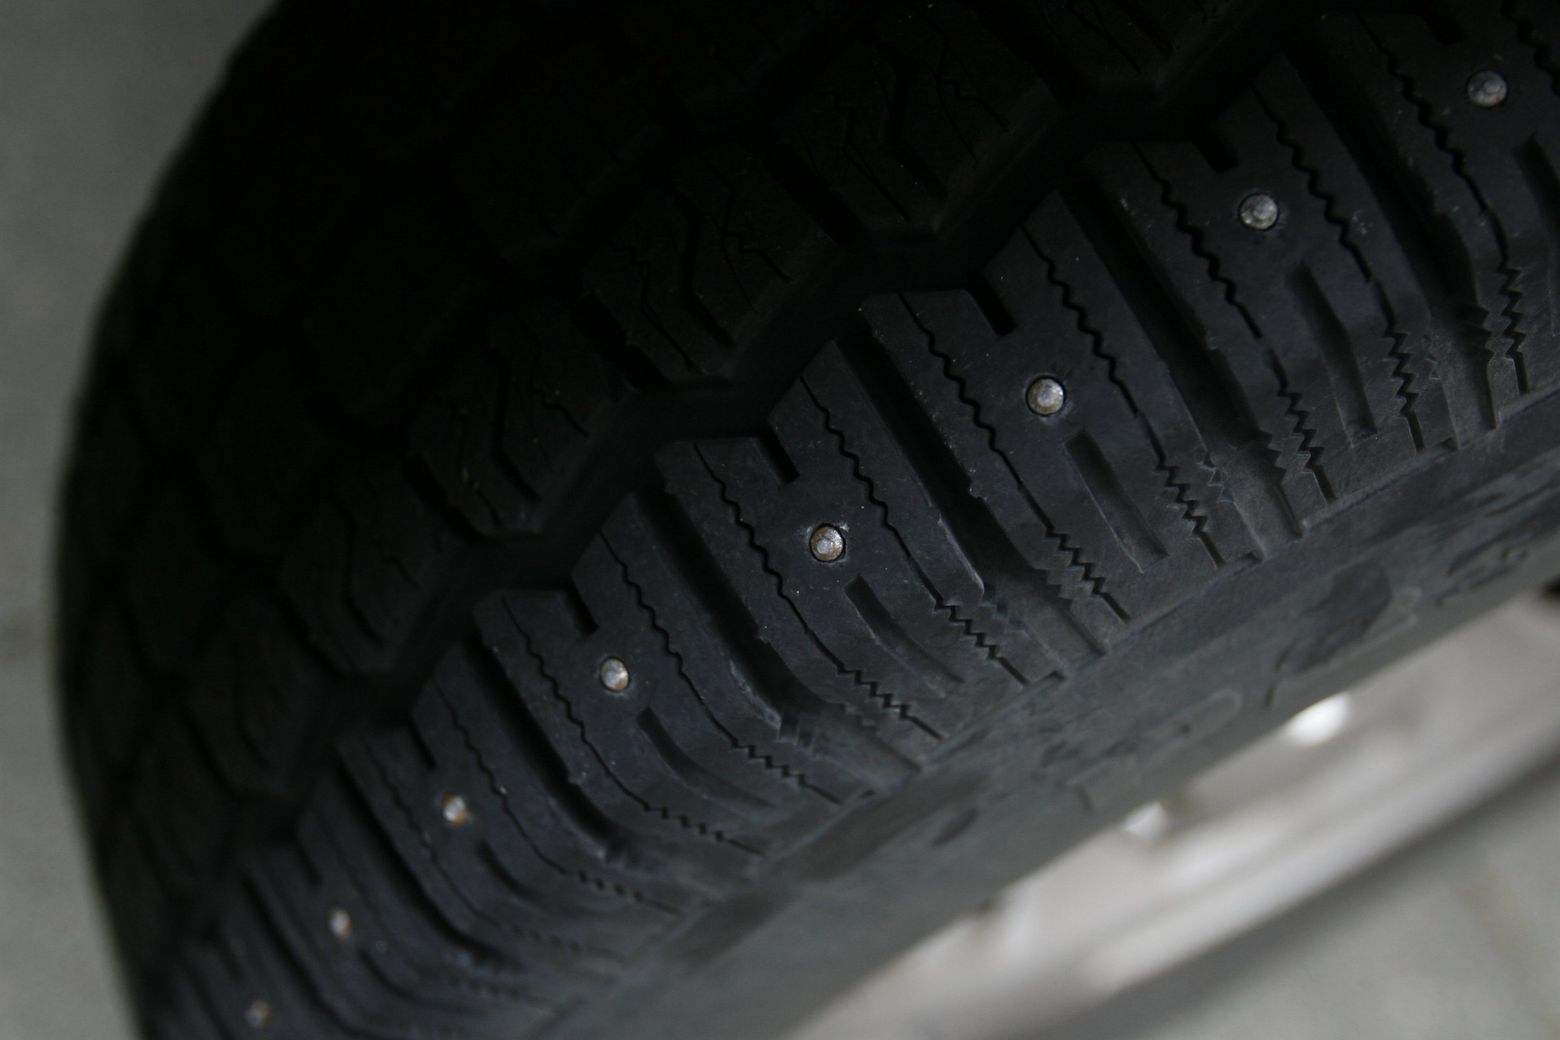
Washington State Studded Tires Dates 2020-2021
Washington state studded tires dates for 2020-2021 are from October 1st to May 31st. This allows drivers to have better traction on the roads during winter weather conditions. Drivers should check with their local county or city to see if there are any restrictions on using studded tires before putting them on their vehicles.
If you live in Washington State, you need to know the dates for when studded tires are allowed. From October 1st to May 31st, you can use studded tires on your vehicle. However, there are a few exceptions to this rule.
If you plan on using studded tires during the winter months, make sure to check the weather conditions before heading out on the road. Studded tires are only effective in certain types of snow and ice. If the conditions are not right, you could end up sliding all over the place.
There is also a limit on how many studs can be in each tire. The maximum number of studs allowed is 24 per tire if they meet specific depth and width requirements. Check with your local tire shop or retailer to make sure your tires comply with the law.
Remember, even if you have studded tires, it’s always important to drive safely and slowly in winter weather conditions!
Credit: www.seattletimes.com
When Can You Put Studs on in Washington State 2021?
As of January 2021, studded tires are allowed in Washington State from October 1st through May 31st.
Can You Still Use Studded Tires in Washington State?
Yes, you can still use studded tires in Washington State. There are no statewide restrictions on the use of studded tires. However, some local jurisdictions may have restrictions in place.
Check with your local authorities to be sure.
When Can You Put Studs on Your Car in Washington State?
If you’re looking to add some extra personality to your car, studded tires may be the way to go. But before you start shopping for studs, it’s important to know the laws in your state. In Washington State, there are a few things you need to keep in mind before hitting the road with studded tires.
First, it’s only legal to use studded tires from October 1st through May 31st. This is because studded tires can do significant damage to roads during warmer months when the pavement is more likely to be soft.Second, you’ll need to make sure that your studded tires are approved by the Department of Transportation (DOT).
DOT-approved tires will have a label on them indicating that they meet federal standards.Finally, keep in mind that even if your studded tires are legal and approved, they can still cause damage to roads. That’s why it’s important to use them only when necessary and avoid driving on bare pavement whenever possible.
What is the Fine for Studded Tires in Washington State?
If you’re caught driving with studded tires in Washington State, you could be subject to a fine of up to $532. The use of studded tires is only allowed from October 1st through May 31st each year.
Toyota Rav4 Snow Wheeling and Off Roading on Icy Steep Hill and Deep Snow in Mill Creek- California
Washington Studded Tire Dates 2022
Studded tires are commonly used in winter months to provide extra traction on icy roads. In the state of Washington, the use of studded tires is allowed from November 1 through March 31.While studded tires can be a big help in winter driving conditions, they can also cause damage to roadways.
That’s why there are dates when their use is allowed and when it’s not.If you plan on using studded tires in Washington state this winter, make sure to follow the rules and only use them during the designated time period.
Washington State Studded Tire Ban
Looking to travel through Washington State this winter? You might want to think twice about using studded tires. A studded tire ban is in effect from November 1st through March 31st on all state highways.
This includes Interstate 90, US 97, State Route 14, and State Route 20. The only exception is for vehicles traveling to or from Canada on I-5.Why the studded tire ban?
Well, studded tires do significant damage to pavement – especially during the first few weeks of winter when the roads are most vulnerable. Over time, this damage can lead to potholes and other costly repairs.So what should you do if you need traction while driving in Washington State during the winter?
First, try switching to all-season or snow tires. These provide more than enough traction for most driving conditions. If you’re still worried about slipping and sliding around on the roads, consider carrying chains in your vehicle (just make sure they’re the right size for your tires).
Bottom line: be prepared before hitting the road this winter! Check your tires, make sure you have chains (if needed), and enjoy a safe and accident-free trip.
Oregon Studded Tires Dates 2021-2022
If you live in Oregon, or plan to travel there during the winter months, you need to be aware of the state’s regulations regarding studded tires. Here are the important dates to remember:November 1-March 31: You may use studded tires on your vehicle.
April 1-October 31: You may not use studded tires on your vehicle.
Alaska Studded Tires Dates 2022
In Alaska, it is legal to use studded tires from September 15 through May 31. After May 31, drivers must remove their studded tires or face a $200 fine.There are a few exceptions to this rule.
If you are driving a commercial vehicle that weighs more than 10,000 pounds, you can use studded tires year-round. Also, if you are driving a recreational vehicle like an ATV or snowmobile, you can use studded tires any time of year.If you do decide to use studded tires in Alaska, there are a few things to keep in mind.
First of all, studded tires are only effective on ice and packed snow – they will not help you if you’re driving on bare pavement or loose snow. Secondly, because studded tires wear down the road surface, they can only be used on certain roads – generally speaking, highways that are regularly plowed and maintained by the state.Finally, it’s important to note that using studded tires comes with some risks.
Because they grip the road so well, they can make it harder to stop or turn suddenly. So if you’re using them, be sure to give yourself extra time and distance to brake and turn safely.
Conclusion
Washington State Studded Tires Dates 2020-2021:In Washington State, the use of studded tires is allowed from October 1st through May 31st. This is to help provide traction on icy and snowy roads during the winter months.

Car Wheel Alignment at Home | Get it Done Easily and Quickly
Most people don’t realize that they can do a car wheel alignment at home. It’s actually not that difficult, and it can save you a lot of money. You’ll need to have a few tools on hand, but if you’re reasonably handy, you should be able to do it yourself.
The most important thing is to make sure that your car is level before you start. You can use a level or a tape measure to check this. Once your car is level, you’ll need to adjust the front wheels so that they’re perpendicular to the ground.
How to Perform Wheel Alignment by Yourself
If you’ve ever taken your car in for a wheel alignment, you know it can be a costly repair. But what if I told you that you could do it yourself at home? That’s right, with a few simple tools and some know-how, you can align your own car’s wheels!
The first thing you’ll need to do is find a level surface on which to park your car. Once your car is parked, put on the parking brake and chock the wheels so that the car can’t move. Next, measure the distance from the ground to the center of each wheel well.
You’ll need these measurements to properly adjust the alignment. Now it’s time to adjust the toe. The toe is simply the angle at which your tires point in relation to the centerline of your vehicle.
To adjust the toe, loosen the bolts that hold the steering knuckle in place and make small adjustments until the tires are pointing straight ahead. Then tighten down all of the bolts and recheck your work. Next up is camber adjustment.
Camber refers to how much your tires tilt inward or outward when viewed from above. To adjust the camber, loosen or tighten the bolts that hold the upper control arm in place until desired camber is achieved (usually around 0 degrees). Again, be sure to tighten all of the bolts before moving on.
The final adjustment is the castor. Castor describes how much your tire stilt forward or backward when viewed from the side of your vehicle. This one can be a bit trickier to adjust, but it’s important to get it right so that you have good steering control while driving.
To set the caster, loosen or tighten the bolts holding the suspension members to achieve the desired setting(usually between 2 and 5 degrees ). And that’s it! You’ve now successfully aligned your own car ‘sw or thousands of dollar sin repair costs!
Wheel Alignment Cost
If your car is out of alignment, it can cause a number of problems. The most obvious problem is that your car will pull to one side or the other. This can make it difficult to drive and can be dangerous if you’re driving on the highway.
Other problems caused by misalignment include premature tire wear, uneven braking, and decreased fuel efficiency. The cost of a wheel alignment varies depending on the type of vehicle you have and where you have it done. Most shops charge between $50 and $100 for a standard alignment, but prices can go up to $200 or more for luxury vehicles or those with complex suspension systems.
How to Do an Alignment Without a Machine
If your car is pulling to one side or the other, it means that your wheels are out of alignment. This can happen for a number of reasons, including hitting a pothole or curb, or simply from normal wear and tear. Regardless of how it happens, it’s important to get your wheels aligned so that your car drives straight and doesn’t put unnecessary stress on your tires and suspension.
The good news is that you don’t necessarily need a machine to align your wheels. You can do it yourself if you have the right tools and know-how. Here’s what you’ll need:
A tape measure: You’ll use this to measure the distance between the center of your wheel and the ground.
A level: This will help you ensure that your wheels are level with each other. • An adjustable wrench: This will be used to loosen and tighten the bolts on your wheels.
A jack: You’ll need this to lift up your car so that you can access the bolts on your wheels. Make sure to use jack stands to support your car once it’s lifted off the ground. NEVER work under a car that is only supported by a jack!
Once you have all of these tools, follow these steps to align your own wheels:
Park your car on a flat surface and turn off the engine. Chock the front tires so that they can’t roll away while you’re working on the back ones. Then, locate the adjustment screws on the rear axle housing (they’re usually near where the shocks mount). If you can’t find them, consult your owner’s manual for their location.
Measure the distance from The ground To The center Of each wheel using The tape measurer And record The numbers in A notebook Or On paper . You want These measurements To Be As accurate As possible , So take Your time And double-check Them before Moving On . Now , Do The Same Thing For The front Wheels .
How to Do a Wheel Alignment With a Tape Measure
If your car is pulling to one side or the other, or if your steering wheel is off center, it’s likely that you need a wheel alignment. You can check this yourself with a tape measure.
- Park your car on a level surface and set the emergency brake. Place a jack under the front of the car and raise it until the tires are just off the ground.
- Measure from the ground to the center of each tire at the front of the car. Write down these numbers so you can compare them later.
- Now measure from the ground to each fender at both the front and back of the car. Again, write down these numbers for comparison later.
- Move to one side of the car and measure from the bottom of the tire to the top of the wheel well; do this at both the front and back of the right-hand side of the car(driver’s side).
How to Do a Rear Wheel Alignment at Home
A rear wheel alignment is a simple adjustment that you can do at home with just a few tools. You’ll need a tape measure, a socket wrench, and an Allen wrench. First, measure the distance from the ground to the center of the axle on each side of the car.
Then, adjust the rear wheels so that they are level with each other. Finally, use the socket wrench to tighten the bolts on the axle.
Best Home Wheel Alignment Tool
If your car is pulling to one side or the other, or if you notice that your steering wheel isn’t level when you’re driving down the road, it’s likely that your car needs a wheel alignment. A wheel alignment is a simple adjustment of the suspension components of your car so that the wheels are aligned properly. This not only makes for a smoother ride but can also improve gas mileage and extend the life of your tires.
There are a few different ways that you can tell if your car needs a wheel alignment. First, take a look at your tires. If they are wearing unevenly, or if one tire seems to be wearing more quickly than the others, it’s likely that your car needs an alignment.
Second, check your steering wheel. If it’s not level with the ground when you’re driving straight ahead, then your car definitely needs an alignment. Finally, pay attention to how your car feels when you’re driving.
If it seems like it’s pulling to one side or the other, or if the steering feels loose or sloppy, those are also signs that an alignment is necessary. If you think that your car might need a wheel alignment, there are a few different options for getting it done. You can take it to a professional mechanic or body shop and have them do it for you (this is usually the best option), or you can buy an inexpensive home tool kit and do it yourself. Either way, once you get your car aligned properly again, you’ll be glad you did!

Credit: www.spotdem.com
Can You Do Wheel Alignment at Home?
If you notice that your vehicle is pulling to one side or the other, or if the steering wheel is not centered when driving straight ahead, it may be time for a wheel alignment. Wheel alignments help ensure that your vehicle’s wheels are pointing in the right direction and can improve gas mileage. Although it is possible to do a wheel alignment at home, it is best to have it done by a professional.
There are three main types of wheel alignments: toe, caster, and camber. Toe alignments adjust the angle of the wheels so that they point directly ahead. Caster alignments adjust the angle of the suspension so that the wheels roll smoothly.
Camber alignments adjust the angle of the wheels so that they are perpendicular to the ground. Most vehicles will need all three types of alignments periodically. The frequency depends on factors such as driving habits and road conditions.
When having a wheel alignment done, be sure to ask for an inspection of other suspension components, such as shocks and struts. These components can wear out over time and affect how your vehicle handles.
How Can I Align My Tires Without a Machine?
If your car’s tires are out of alignment, it can cause a number of problems. The most obvious is that the car will pull to one side or the other. This can make it difficult to keep the car going straight and can lead to premature wear on the tires.
Tires that are out of alignment will also tend to wear unevenly, which can shorten their lifespan. There are a few ways that you can tell if your car’s tires are out of alignment. If you notice that the car seems to pull to one side when you’re driving, or if the steering wheel is off center, these are both signs that the alignment is off.
You may also notice that your tires are wearing unevenly – this is another sign that they’re not properly aligned. If you suspect that your car’s tires are out of alignment, there’s no need to take it to a mechanic – you can align them yourself at home. All you need is a tape measure and a few simple tools.
First, measure the distance from the ground to the center of each tire (you’ll need someone to help you with this). Then, adjust each tire so that it’s level with the others – this is what’s known as “toeing in” or “toeing out”. Finally, check your owner’s manual for information on how far back from the center each wheel should be – this is called “camber”. Once everything looks right, tighten up all of your vehicle’s lug nuts and go for a test drive!
Conclusion
Assuming you would like a summary of the blog post titled “Car Wheel Alignment at Home”, the post discusses how to properly align your car’s wheels at home. It is important to have properly aligned wheels, as this can improve your gas mileage and prevent premature tire wear.
The author outlines a few simple steps to follow in order to ensure your wheels are aligned correctly. With just a little time and effort, you can keep your car running smoothly and efficiently for years to come.

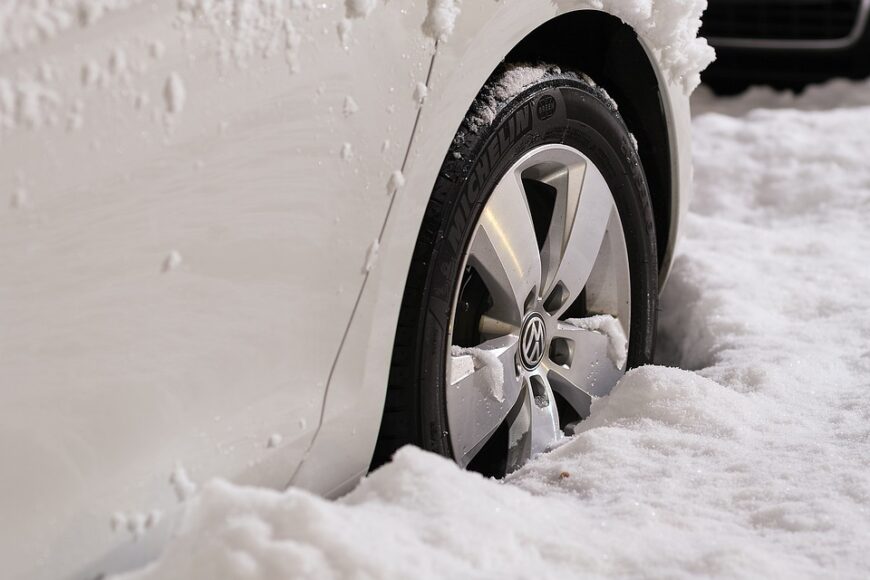
Is It Worth Buying Rims for Winter Tires
If you live in an area with harsh winters, you know that having a good set of winter tires is essential. But what about rims? Are they worth the extra cost?
Let’s take a look at the pros and cons.On the plus side, rims can help to protect your tires from damage. They also make it easier to clean your tires and keep them free of snow and ice build-up.
Rims can also give your car a more stylish look.On the downside, rims can be expensive. They can also be difficult to find if you need a specific size or type for your car.
And, if you’re not careful, they can be easy to damage.
If you live in an area with harsh winters, it might be worth considering investing in a set of winter rims for your tires. Winter rims are designed to provide better traction and grip on icy or snowy roads, which can help keep you safe when driving in winter conditions. They can also help extend the life of your tires by protecting them from damage caused by salt and other de-icing chemicals.
Of course, whether or not winter rims are worth the investment is ultimately up to you. If you don’t do a lot of driving in winter weather, or if you’re confident in your ability to handle your car on slippery roads, then you may not need them. But if safety is a priority for you (and it should be!), then winter rims could be a wise investment.
Credit: www.parkmuffler.com
Is It Better to Get Rims for Winter Tires?
If you live in an area with severe winter weather, it’s a good idea to invest in a set of winter tires. Winter tires are designed to provide better traction and handling in snow and ice, which can help you avoid accidents. Many people also choose to get rims for their winter tires.
Rims can provide several benefits for winter driving. They can make it easier to clean the snow and ice off your tires, and they can also help improve traction by providing more contact points with the road surface. Ultimately, whether or not you get rims for your winter tires is a personal decision.
If you’re concerned about safety, they may be worth the investment.
Can You Use Any Rims for Winter?
If you’re looking to buy new rims for your car, there are a few things you should keep in mind. Winter weather can be tough on your car, and the right set of rims can make a big difference. Here’s what you need to know about choosing the right rims for winter.
First, you’ll want to make sure that the rims you choose are made from a durable material. Steel or aluminum rims are both good choices, as they won’t crack or break easily in cold weather. You’ll also want to make sure that the rims are properly sealed against moisture.
This will help prevent rust and corrosion, which can damage your rims over time.Another important consideration is the size of the rim. wider rims provide better traction on snow and ice, while narrower rims are better suited for dry conditions.
If you’re not sure what size rim is best for your car, consult with a professional before making your purchase.Finally, keep in mind that some states have laws regarding winter tires and wheels. In some cases, you may be required to switch out your regular tires for winter tires when using certain types of wheel covers or chains.
Be sure to check local regulations before making any changes to your car’s tire and wheel setup.With these tips in mind, you’ll be able to choose the perfect set of rims for your winter driving needs.
How Much Does a Set of Winter Tires on Rims Cost?
When it comes to the cost of winter tires, there are a few things to keep in mind. First, the type of vehicle you drive will play a big role in how much your tires will cost. Second, the size and condition of your rims will also affect pricing.
Finally, the brand of winter tire you choose can influence how much you’ll spend.With all of that said, a set of winter tires on rims typically costs between $600 and $1,200. Of course, this is just a general range – prices can vary depending on the factors mentioned above.
If you’re looking for ways to save on winter tires, consider buying them used or shopping around for deals at different tire retailers. You might also be able to find discounts if you purchase your tires during certain times of year – many stores offer sales around Black Friday and Cyber Monday, for example.No matter how much you end up spending on winter tires, remember that they’re an important investment in keeping yourself safe on the road during inclement weather.
So don’t skimp! Make sure to get a good quality set of tires that will last you several seasons.
Does Winter Ruin Your Rims?
It’s no secret that winter weather can wreak havoc on your car. But did you know that it can also damage your rims? That’s right – the cold, salt and snow can all take a toll on your wheels, leaving them looking dull and rusty.
So, what can you do to protect your rims this winter? First, make sure to wash and wax your car regularly. This will create a barrier against the elements and help keep your paint job looking good.
Second, invest in some wheel covers or even just some old towels. This will help keep your rims clean and dry when you’re not driving. Finally, be extra careful when driving in icy or snowy conditions.
Take it slow and easy to avoid potholes and other obstacles that could damage your wheels.By following these simple tips, you can help keep your rims looking their best all winter long!
Are used winter tires and rims really worth the risk?
How to Choose Rims for Winter Tires
If you’re like most people, you probably don’t think too much about your car’s rims – they’re just there to hold your tires in place, right? But if you’re driving in winter weather, it’s important to choose the right rims for your winter tires. Here are a few things to keep in mind when choosing rims for winter tires:
1. The material of the rim is important. Steel is the best choice for winter rims because it’s strong and resistant to corrosion from salt and other chemicals used to de-ice roads. Aluminum is another option, but it’s not as durable as steel.
2. The width of the rim is also important. Winter tires are designed to work with specific widths, so make sure you get the right size for your tires.3. You’ll also need to consider the offset of the rim.
This is how far the hub of the wheel sticks out from the center of the wheel and determines how your car handles turns and corners. Again, make sure you get the right size for your winter tires.4. Finally, pay attention to any special features on your rims that could impact how well your winter tires perform.
For example, some rims have lip sizes that can interfere with tire chains or studs; others have spoke designs that can cause problems with balance weights.
Winter Tires on Rims for Sale
If you’re in the market for winter tires, you may be wondering if it’s worth it to buy them on rims. The short answer is yes! Here are a few reasons why:
1. You won’t have to go through the hassle of taking your tires off and on every season.
2. Storing your tires on rims will help prevent flat spots from forming.
3. It will be easier to keep track of your spare set of winter tires if they’re already mounted on rims.
Of course, there are a few things to keep in mind when shopping for winter tires on rims. First, make sure that the rim size is compatible with your vehicle. Second, remember that you’ll need to purchase four tire/rim sets (one for each wheel).
And lastly, factor in the cost of installation when budgeting for your new winter tire setup.
Winter Tire Rims Steel Or Alloy
It’s that time of year again when the weather starts to turn and we start thinking about winter tires. One question we often get asked is whether steel or alloy rims are better for winter tires. The answer, like most things, is it depends.
Steel rims are usually less expensive than alloy rims and they are also more durable. They are a good choice if you are mostly driving on cleared roads or if you live in an area with little snowfall. Steel rims can be more difficult to change than alloy rims, so keep that in mind if you plan on doing it yourself.
Alloy rims are lighter than steel rims and therefore provide better gas mileage. They also tend to look nicer than steel rims. If you live in an area with lots of snow and ice, alloy rims may be a better choice since they will perform better in those conditions.
Just be aware that they can be more expensive than steel rims and may require special cleaners to keep them looking their best.
Winter Rims
In the winter, it’s important to have rims that can handle the elements. That’s why winter rims are designed to be tougher and more durable than regular rims. Winter rims are usually made of steel or aluminum, which are both strong materials that can withstand the cold weather and icy roads.
They also often have a thicker layer of paint or coating, which helps protect them from rust and corrosion. When shopping for winter rims, make sure to choose a size and style that fits your car and driving needs. And don’t forget to check the weight rating to make sure they can handle the extra weight of snow and ice.
Conclusion
If you’re considering whether or not to buy rims for your winter tires, there are a few things to keep in mind. Rims can offer some advantages, like making it easier to change your tires and providing a more secure connection between the tire and the wheel. However, they also come with some disadvantages, like being more expensive and more difficult to store.
Ultimately, whether or not rims are worth it for winter tires comes down to personal preference and what you value most in a tire set-up.

Mazda 3 Alignment Specs
Mazda 3’s are great cars. They’re fun to drive, and they look good too. But like any car, they need proper maintenance to stay in top condition.
That includes getting the alignment checked and adjusted if necessary. Here are the Mazda 3 alignment specs so you can make sure your car is always driving straight and true.
2008 Mazda 3 Alignment Troubleshooting
If you own a Mazda 3, it’s important to keep its alignment in check. That way, you can avoid costly repairs down the road and ensure that your car runs smoothly. Here are the alignment specs for a Mazda 3:
Caster: 4.5 to 5.5 degreesCamber: -0.5 to +0.5 degrees
What is an Alignment on a Car
An alignment on a car is when the suspension and steering components are properly adjusted. This includes the wheels, tires, and suspension parts. The purpose of an alignment is to make sure that the vehicle tracks straight and true, without veering to one side or the other.
Alignments are important for both safety and performance reasons. Improperly aligned vehicles can be more difficult to control, and can cause premature tire wear.Most alignments will need to be performed by a professional mechanic, as they require special equipment.
However, there are some things that you can check at home to see if your alignment is out of whack. First, take a look at your tires. If they are wearing unevenly, or if the tread is wearing down in one particular spot, it’s likely that your alignment is off.
Secondly, test drive your vehicle on a straight road with no curves or turns. If it seems like the car wants to pull to one side or the other, that’s another sign that your alignment needs attention.If you suspect that your alignment is off, don’t delay in getting it checked out by a professional.
Having proper wheel alignment not only keeps you safer on the roadways – it can also save you money in the long run by preventing premature tire wear!
Caster Alignment
Caster alignment is the adjustment of a vehicle’s steering axis so that it is perpendicular to the ground. This adjustment is made to ensure that the wheels are pointing in the correct direction and not causing any adverse effects on handling or tire wear. Although caster alignment may seem like a small detail, it can have a big impact on how your car handles.
Wheel Alignment near Me
If your car is pulling to one side or the other, or if your steering wheel isn’t centered when you’re driving straight, it’s likely that your wheels are out of alignment. Most cars need a wheel alignment at least once a year, and more often if you drive on rough roads or frequently hit potholes.A wheel alignment consists of adjusting the angles of the wheels so that they’re pointing in the same direction.
This can be done manually, but most mechanics use a machine to do it more accurately. The process usually takes about an hour.If you think your car might need a wheel alignment, the first step is to find a reputable mechanic or tire shop near you.
Once you’ve found a few places, call and ask them how much they charge for a wheel alignment. Be sure to get quotes from at least three different places before making a decision.When you take your car in for an alignment, the mechanic will start by inspecting your tires and suspension components.
They will then adjust the angles of your wheels until they are all pointing in the same direction. Afterward, they will test-drive your car to make sure everything is working properly.If you notice that your car is still pulling to one side after having a wheel alignment, there may be something else wrong with your suspension system.
In this case, it’s best to consult with a professional mechanic to have them take a look at your car and diagnose the problem.
How Long Do Alignments Take
How long does an alignment take?The answer to this question depends on a few factors, including the type of alignment you need and the condition of your vehicle. A simple wheel alignment (which is what most people mean when they say “alignment”) can usually be done in about an hour.
A more complex four-wheel alignment can take two hours or more. And if your vehicle has been in a serious accident or has other major damage, it could take even longer.

Credit: www.reddit.com
What are Good Alignment Specs?
One of the most important things to consider when having your car serviced is the alignment. Many people don’t know what good alignment specs are, so they end up with a subpar alignment that doesn’t fix their problem or may even cause new problems. In this blog post, we’ll go over what good alignment specs are so that you can be sure your car is getting the service it needs.
An alignment involves adjusting the suspension components of your car so that the tires are pointing in the correct direction. This is important for several reasons: first, it helps improve tire contact with the road which leads to better traction; second, it can help improve fuel economy by reducing rolling resistance; and finally, it helps keep your car driving straight down the road and prevents premature tire wear.There are three main types of alignments: toe, caster, and camber.
Toe alignments adjust how far your tires point in or out from center while caster alignments adjust how far forward or backward your wheel tilts. Camber alignments adjust how much your tire leans in or out from vertical when viewed from the front of the vehicle. Most cars will need all three types ofalignments at some point during their lifetime but usually not all at once.
Toealignments are often done after getting new tires because they can help improve fuel economy and prevent premature tire wear. The ideal toe setting depends on the type of vehicle you have but generally speaking, a small amount of toe-in (where the fronts of the tires point slightly inward) is best for passenger cars while a small amount of toe-out (where the fronts ofthe tires point slightly outward) is best for performance vehicles. Too much toe-in or -out can lead to increased tire wear and decreased fuel economy so it’s important to get this setting just right.
Casteralignments don’t typically need to be adjusted unless there’s been a change in suspension components or if you notice that your car veers to one side when driving on a flat surface. The ideal caster setting provides stability and steering feel while also preventing excessive tire wear. If you do need to adjust your caster settings, most passenger cars will benefit from having more positive caster (tilted forward) while performance vehicles will often do better with more negative caster (tilted backward).
What Should Toe Be Set at During Alignment?
Most people believe that the toe setting on their vehicle should be set at 0 degrees. However, this is not always the case. Depending on the make and model of your vehicle, the ideal toe setting may be different.
For example, on some vehicles, the ideal toe setting may be 1/8th of an inch (0.3175cm). It is important to consult your vehicle’s owners manual to find out what the ideal toe setting is for your specific vehicle. Once you know what the ideal toe setting is, you can have a professional mechanic or alignment specialist adjust your car’s alignment accordingly.
Conclusion
Mazda 3s are great cars. They’re fun to drive, and they look good too. But one thing that can ruin the driving experience is if the car isn’t properly aligned.
Luckily, we’ve got you covered. Here are the alignment specs for the Mazda 3:Camber: -0.5 to +0.5 degrees
How Many Years are Winter Tires Good for
There’s no definitive answer to how long winter tires will last. A lot depends on the quality of the tire and how well it’s cared for. In general, though, most winter tires will last for about four or five seasons.
If you live in an area with particularly harsh winters, you may get a little less life out of your tires. Conversely, if you live somewhere with milder winters, your tires may last a season or two longer.
If you live in an area with cold, snowy winters, you know how important it is to have a good set of winter tires. But how long do winter tires really last?Most experts agree that winter tires should be replaced after about six years, regardless of how much they’ve been used.
The rubber compound in tires hardens over time, making them less effective in icy or snowy conditions. So even if your winter tires look like they’ve got plenty of tread left, it’s best to replace them every six years to be safe.Of course, if you only use your winter tires for a few months out of the year, they may last longer than six years.
But if you’re driving on them regularly during the winter months, it’s best to stick to the six-year timeline. And if you live in a particularly harsh climate where temperatures dip below freezing often, you may even want to replace your tires more frequently.No matter how long your winter tires last, one thing is for sure: they can make all the difference when it comes to staying safe on the roads during icy and snowy conditions.
So don’t wait until it’s too late – get yourself a new set of winter tires today!
Credit: www.lesschwab.com
How Long Should a Set of Winter Tires Last?
It is generally recommended that winter tires be replaced after five years. However, this can vary depending on how often the tires are used and how well they are maintained. If you live in an area with severe winters, it is advisable to replace your winter tires more frequently.
Similarly, if you don’t use your winter tires often, they may last longer. Proper maintenance of winter tires is also important for prolonging their life. This includes storing them properly (in a cool, dry place) and keeping them clean (free of salt and debris).
How Do I Know If My Winter Tires are Still Good?
As the weather starts to cool off and snow begins to fall, it’s important to make sure your vehicle is prepared for the winter months ahead. One of the most important things you can do is to switch out your regular tires for winter ones. But how do you know if your winter tires are still good?
Here are a few things to look for:1. Check the tread depth. The minimum legal tread depth in Canada is 4/32″ (3.2 mm), but ideally, you want your winter tires to have at least 6/32″ (4.8 mm) of tread remaining.
You can check this by inserting a quarter into the tire tread groove – if the top of George Washington’s head is visible, then you’re at 4/32″. If his entire head is visible, then you need new tires.2. Inspect the sidewalls for cracks or splits.
These can be caused by age, UV exposure or hitting curbs too hard and can lead to a sudden loss of air pressure or even a blowout while driving. If you see any cracks or splits, it’s time for new tires.3. Look for uneven wear patterns on the tread surface.
This could be an indication that your tires are improperly inflated, which can lead to decreased traction and increased wear over time. Uneven wear can also be caused by misalignment or suspension issues, so it’s best to get your vehicle checked out by a professional if you notice this issue with your tires.If you’re unsure about whether or not your winter tires are still good, it’s always best to err on the side of caution and get new ones – after all, they could mean the difference between getting safely through a snowstorm and being stranded on the side of the road waiting for help!
Do Winter Tires Wear Out Faster?
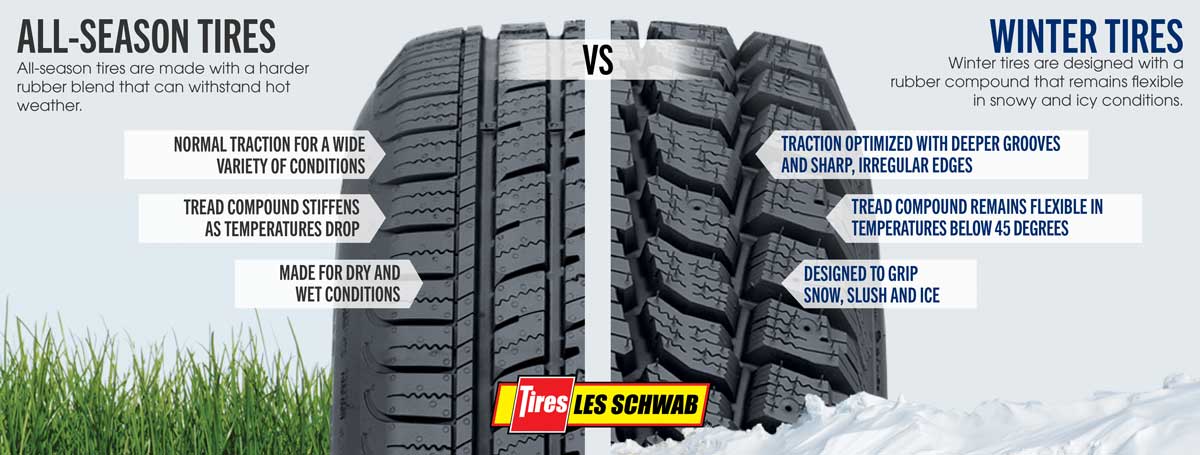
There is a common misconception that winter tires wear out faster than regular tires. However, this is not the case. Winter tires are made from a different type of rubber compound than regular tires.
This rubber compound is designed to remain pliable in cold weather and to provide better traction on snow and ice. As a result, winter tires actually last longer than regular tires when used in their intended conditions.
Do Winter Tires Go Bad?
It’s no secret that winter in Canada can be pretty brutal. In fact, it’s not uncommon for temperatures to dip well below freezing and for there to be a significant amount of snowfall. This weather can make driving conditions quite treacherous, which is why it’s important to have the right tires on your vehicle.
Winter tires are specifically designed to provide better traction and stability in cold, snowy conditions. But what happens when winter is over and you’re left with a set of winter tires that you no longer need? Do they go bad?
The short answer is yes, winter tires can go bad if they’re not properly cared for. Just like any other type of tire, they can deteriorate over time and lose their effectiveness. This is why it’s important to store them properly when they’re not being used.
If you simply leave them out in the elements, they’ll become dry rot and cracked, which will significantly reduce their lifespan.Ideally, you should store your winter tires in a cool, dry place away from direct sunlight. Many people choose to keep them in their garage or basement during the summer months.
If you don’t have access to a storage space like this, you can purchase tire covers to protect them from the sun and rain. Whichever method you choose, just make sure that your tires are stored upright so that they retain their shape.If you take proper care of your winter tires, they should last for several seasons before needing to be replaced.
However, it’s always a good idea to inspect them regularly (at least once per season) to make sure that they’re still in good condition.
What you need to know about winter tires
How Many Years are Tires Good for
Assuming you are talking about car tires, they typically last anywhere from 25,000 to 50,000 miles. Of course, this varies based on the quality of the tire, how well you take care of them, and driving habits.To get the most life out of your tires, it is important to perform routine maintenance.
This includes regularly checking the air pressure and tread depth. You should also avoid driving on rough roads whenever possible and be careful not to hit any curbs or potholes.If you take good care of your tires and drive carefully, you can expect them to last for many years.
However, eventually they will need to be replaced. When this time comes, be sure to buy high-quality tires that will provide a smooth ride and long-lasting performance.
How Long Can You Drive on Winter Tires in the Summer
If you live in a climate with cold winters and hot summers, you may be wondering how long you can drive on winter tires in the summer. The answer depends on a few factors, including the type of tire and the severity of the climate.Most winter tires are made from a softer rubber compound that helps them grip icy roads better.
However, this same compound can cause the tires to wear down faster in warm weather. In general, it’s not recommended to drive on winter tires for more than three or four months in the summer.If you live in an area with very extreme temperatures, you may need to switch to all-season or summer tires sooner.
For example, if you live in a desert region where temperatures regularly exceed 100 degrees Fahrenheit, your winter tires could start deteriorating after just one month of use.Ultimately, it’s important to use your best judgment when deciding how long to drive on winter tires in the summer. If you’re unsure, err on the side of caution and switch to another set of tires sooner rather than later.
How Long Do Blizzak Tires Last
Blizzak tires are a type of winter tire made by Bridgestone. They are designed to provide better traction and handling in snow and ice than regular all-season tires.How long do Blizzak tires last?
That depends on a few factors, including how often they are used and how well they are maintained. Generally speaking, though, you can expect a set of Blizzaks to last for several winters.One important thing to keep in mind is that Blizzak tires must be properly inflated in order to work correctly.
Be sure to check your tire pressure regularly during the winter months (at least once a week), and inflate them as needed. Underinflated tires will not perform as well in the cold weather and could cause you to lose control of your vehicle on icy roads.If you take good care of your Blizzak tires, they should give you many years of safe driving in winter weather conditions.
How Long Do All-Season Tires Last
All-season tires are designed to provide good traction and handling in a variety of conditions, including dry and wet pavement, as well as in light snow. But how long do all-season tires last?The answer depends on a number of factors, including the quality of the tire, how it’s used, and how it’s maintained.
In general, though, you can expect an all-season tire to last between 40,000 and 50,000 miles.Of course, some all-season tires will last longer than others. And if you take good care of your tires and don’t use them too hard, you may be able to get even more mileage out of them.
To get the most life out of your all-season tires:1. Inspect them regularly for tread wear and other damage.
2. Keep them properly inflated.
3. Rotate them every 5,000 to 7,500 miles or as recommended by the manufacturer.
4. Don’t overload your vehicle or exceed the maximum speed rating for your tires.
5 .
Avoid sharp turns and quick stops when possible . 6 . Drive carefully on rough roads .
Conclusion
According to most experts, winter tires should be replaced every three to four years. However, this may vary depending on how often you use your winter tires and how well you take care of them. If you live in an area with harsh winters, it’s a good idea to replace your winter tires more frequently.

Iracing How to Save Tires
Tire management is one of the most important aspects of iRacing. In this post, we will go over how to save your tires and make them last longer. There are a few things that you can do to help extend the life of your tires:
1) Drive smoothly- This may seem like an obvious one, but it cannot be stressed enough. When you drive aggressively, you are putting more stress on your tires and causing them to wear down faster. by driving smoothly, you can help reduce tire wear and make them last longer.
2) Avoid curbs- Curbing your tires can cause damage that will shorten their lifespan. If you must drive over a curb, do so slowly and carefully to minimize the amount of damage done.
3) Don’t spin your tires- Spinning your tires wastes rubber and causes unnecessary wear.
If you find yourself in a situation where you need to spin your tires (i.e. getting unstuck from mud), try to get them spinning as quickly as possible so that they don’t stay spun for too long.
4) Check tire pressure regularly- Making sure that your tire pressure is at the correct level can help improve gas mileage and prevent uneven wear on your tires.
In iRacing, there are a few ways to help save your tires. First, you can use the tire wear slider in the garage to reduce the amount of wear on your tires. Second, you can turn off traction control and ABS in the settings.
This will help prevent your tires from overworking and wearing out prematurely. Finally, make sure to keep your car well-tuned and properly aligned. This will help reduce tire wear and improve your lap times!
HOW TO SAVE TIRES IN IRACING: 3 EASY TRICKS YOU CAN USE TODAY TO IMPROVE TIRE LIFE AND GAIN IRATING
How Do You Save Tires?
When it comes to saving your tires, there are a few key things you can do to ensure they last as long as possible. First and foremost, make sure you keep them inflated to the proper pressure levels. This will help prevent flats and other tire problems.
Secondly, don’t overload your vehicle’s tires by packing too much into the trunk or onto the roof rack. This extra weight puts unnecessary stress on the tires and can cause premature wear. Finally, avoid driving over potholes and other rough terrain whenever possible.
These hazards can damage your tires, so it’s best to steer clear if you can help it. By following these simple tips, you can help extend the life of your tires and keep them looking like new for years to come.
How Do You Save Tires in F1?
In F1, the goal is to preserve the tires so they can be used for the entire race. The teams use a variety of strategies to do this, including:– Running lower tire pressures: This helps the tires last longer by reducing their wear rate.
– Managing tire temperatures: The teams use a variety of techniques to keep the tires within their ideal temperature range, which helps reduce wear and degradation.– Minimizing wheelspin and sliding: Both of these put unnecessary stress on the tires, which can lead to premature wear.
Does Warming Tires in Iracing Work?
It’s a common misconception that warming your tires in iRacing will give you an advantage on the track. In reality, it doesn’t actually do anything to improve your lap times.Warming your tires only has benefits in real life racing, where it helps to increase the tire’s grip levels so you can go faster.
However, in iRacing, the tire models are already optimised for maximum grip, so there’s no need to warm them up beforehand.In short, don’t waste your time heating up your tires in iRacing – it won’t make any difference to your lap times!
How Do You Adjust Tire Pressure on Iracing?
If you’re new to iRacing, the process of adjusting tire pressure may seem a bit daunting. Here’s a quick guide to help you get started.To adjust tire pressure on iRacing, first open the garage menu by pressing F11.
Then, select the car you want to adjust the tire pressure for and click on the “Setup” tab. Next, scroll down to the “Tire Pressure” section and use the up and down arrow keys to adjust the pressure. Finally, press enter to save your changes.
Keep in mind that different cars will have different optimal tire pressures, so it’s important to experiment a bit to find what works best for you. Also, be sure to check your tire pressure regularly during races as they can change due to temperature and wear.

Credit: solox.gg
Iracing Tire Model
Tire model in iRacing is one of the most important aspects that affect the performance of a car. There are different tire models available for different cars, and each one behaves differently. The three main tire models in iRacing are slick, treaded, and rain.
Slick tires are used on dry tracks, treaded tires are used on wet or icy tracks, and rain tires are used on tracks with standing water.Each tire model has its own strengths and weaknesses. Slick tires have high grip but low durability, so they need to be replaced often.
Treaded tires have lower grip but higher durability, so they can last longer. Rain tires have the lowest grip but the highest durability, so they can be used on track with standing water without being damaged.To get the best performance out of your car, you need to choose the right tire model for the conditions of the track.
If you’re not sure which tire model to use, you can always ask a member of the iRacing community for help.
Conclusion
If you’re new to iRacing, or sim racing in general, you may be wondering how to conserve your tires. Here are a few tips to help you get the most out of your rubber!One of the most important things to remember when trying to save your tires is that they need time to cool down.
After a couple of laps, pull into the pits and let them cool for a bit. This will help extend their life significantly.Another thing to keep in mind is how hard you’re pushing your car.
If you’re constantly at 100% throttle, your tires will wear down much quicker than if you take it easy occasionally. Find a balance between going fast and taking it easy on the throttle and you’ll see your tires last much longer.Finally, make sure you’re using tire pressures that are appropriate for the conditions.
If it’s hot out, use higher pressures to avoid overheating the tires. If it’s cold, use lower pressures so they don’t get too hard and brittle. Experiment until you find what works best for you and stick with it.
following these simple tips will help you get the most out of your tires and save you money in the long run!

How to Use a Tire Gauge Correctly
When it comes to proper car maintenance, one of the most important things you can do is check your tire pressure. This is best done with a tire gauge. A tire gauge is a simple device that measures the amount of air in your tires.
There are two types of tire gauges: digital and analog. Using a tire gauge is relatively straightforward, but there are a few things you should keep in mind to get accurate readings. Here’s how to use a tire gauge correctly.
- Start by removing the cap from the tire valve
- Place the tip of the tire gauge on the valve and press down to get a reading
- If the reading is below 20 PSI, add air to the tire until it reaches that level
- If the reading is above 30 PSI, release some air from the tire until it reaches that level
- Replace the cap on the tire valve when you’re finished
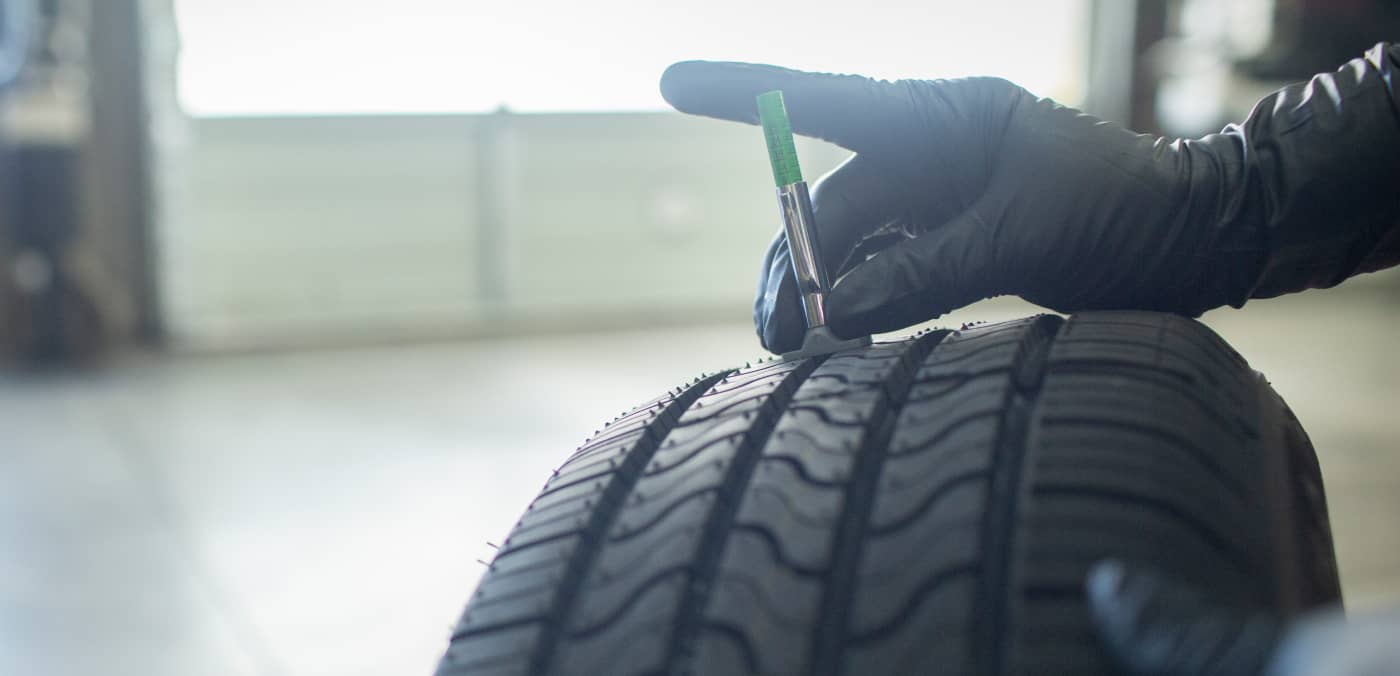
Credit: www.bridgestonetire.com
What is the Most Accurate Way to Measure Tire Pressure?
There are a few things to consider when trying to determine the most accurate way to measure tire pressure. First, it is important to know that there are two types of measurement systems- PSI (pounds per square inch) and BAR (barometric). PSI is the more common unit of measure in the United States, while BAR is used more frequently in Europe.
It is important to use the correct system when checking your tire pressure, as using the wrong one can lead to inaccuracies.Another factor that can affect accuracy is the type of gauge you use. There are three main types of gauges- digital, analog, and dial.
Each has its own advantages and disadvantages, so it is important to choose the right one for your needs. Digital gauges tend to be more accurate than analog or dial gauges, but they can be more expensive. Analog and dial gauges are less expensive but may not be as accurate.
Finally, it is important to check your tire pressure regularly- at least once a month- to ensure accuracy. This will help avoid any potential problems that could occur from incorrect readings.
How Do You Check Tire Pressure With a Gauge?
It is important to check your tire pressure regularly with a gauge in order to ensure that your tires are inflated properly. You can check the pressure in your tires by using a handheld tire pressure gauge or by checking the pressure reading on a digital display at a gas station.To check your tire pressure with a gauge, start by unscrewing the cap from the valve stem on your tire.
Then, press the tip of the gauge onto the valve stem and hold it there for a few seconds. The gauge will give you a reading of the current air pressure in your tire. Compare this number to the recommended air pressure for your tires, which can be found in your car’s owner’s manual or on the placard located on the driver’s side doorjamb.
If you find that your tires are underinflated, use an air compressor to add more air to them until they reach the proper level. If you have overinflated tires, you can release some of the air by pressing down on the center of the tire with your thumb.
Can Tire Pressure Gauges Be Wrong?
Most people don’t realize that tire pressure gauges can be inaccurate. This is because the accuracy of a tire pressure gauge depends on many factors, such as the quality of the gauge, the type of gauge, and how well the gauge is maintained.It’s important to know that not all tire pressure gauges are created equal.
The more expensive digital tire pressure gauges tend to be more accurate than the less expensive analog versions. But even digital tire pressure gauges can be off by a few pounds per square inch (PSI).One way to check the accuracy of your tire pressure gauge is to compare it to another one.
You can also take it to a professional mechanic and have them check it for you. If you find that your gauge is inaccurate, make sure to get it fixed or replaced as soon as possible.
How to Use a Tire Gauge
How to Read a Tire Pressure Gauge at a Gas Station
If you’re like most people, you probably don’t think too much about your tires. But if you want to keep your car running smoothly, it’s important to check your tire pressure regularly. The best way to do this is to use a tire pressure gauge at a gas station.
Here’s how:First, find the recommended tire pressure for your car in the owner’s manual or on the doorjamb of the driver’s side door. Then, locate the tire pressure gauge at your gas station.
It should be attached to an air compressor.To use the gauge, unscrew the cap and press the tip onto the valve stem of one of your tires. Hold it there for a few seconds until you hear or feel air escaping from the tire.
The needle on the gauge will give you a reading of how much air is in your tire. Compare this to the recommended amount and add or release air accordingly.It’s important to check all four tires, even if only one seems low.
And be sure to re-check your tire pressure after driving for awhile, as they can lose some air over time. With just a few minutes of care each month, you can help keep your car running safely and efficiently!
How to Use Digital Tire Pressure Gauge
If you’re like most people, you probably don’t think much about your tires until there’s a problem. But proper tire maintenance is crucial to keeping your car in good shape. That’s why it’s important to know how to use a digital tire pressure gauge.
A digital tire pressure gauge is a small, handheld device that measures the air pressure in your tires. It’s easy to use and can be a big help in keeping your tires inflated properly. Here’s how:
1. Check your owner’s manual or the placard on the driver’s side doorjamb to find out what the recommended tire pressure is for your vehicle.2. Use the digital tire pressure gauge to check the air pressure in all four of your tires. If one or more of them is low, add air until it reaches the recommended level.
3. Check your tires regularly, at least once a month, and before long trips. This will help you avoid problems down the road and keep your car running smoothly.
How Does a Tire Pressure Gauge Work
A tire pressure gauge is a simple device that measures the air pressure in your tires. It typically consists of a small metal or plastic body with a rubber hose attached to one end and a valve at the other. To use it, you simply insert the hose into the valve stem on your tire and press down on the gauge.
The amount of pressure required to move the needle on the gauge will give you an accurate reading of the air pressure in your tires.Most tire pressure gauges also have a release valve that allows you to let some air out of your tires if they are over-inflated. This can be helpful if you need to reduce the air pressure in your tires for any reason (such as when driving on soft sand).
Tire pressure gauges are relatively inexpensive and can be found at most auto parts stores. They are an essential tool for keeping your tires properly inflated, which can help improve gas mileage and extend the life of your tires.
How to Check Tire Pressure Without Gauge
If you’re like most people, you probably don’t think about your tires very often. But did you know that properly inflated tires can save you money and improve your safety on the road? Checking your tire pressure is a simple way to keep your vehicle running smoothly.
Most gas stations have air pumps that you can use to fill up your tires. However, it’s important to know how much air to put in each tire. That’s where a tire pressure gauge comes in handy.
With a tire pressure gauge, you can quickly and easily check the pressure of each tire. Simply remove the valve cap from the tire and press the gauge onto the valve stem. The gauge will give you a reading in psi (pounds per square inch).
It’s important to check your owner’s manual or look for a sticker inside your driver’s door to find out what the recommended psi is for your vehicle. Once you’ve checked all four tires, adjust the pressure as needed using an air pump.
Conclusion
If you want to prolong the life of your tires, it’s important to check their air pressure regularly. You can do this yourself with a tire gauge. Here’s how to use one correctly:
First, remove the cap from the valve stem on your tire. Then, hold the tire gauge firmly against the valve and press down. The needle will pop out and tell you what the air pressure is.
Finally, put the cap back on the valve stem.It’s best to check your tires’ air pressure when they’re cold (i.e., first thing in the morning). That way, you’ll get an accurate reading.