- Home
- Blog

When To.Change Tires
When to change your tires is an important question to answer. Depending on the type of vehicle you have, how often you drive, and the roads you typically travel, the answer will vary. However, there are a few general guidelines that can help you determine when it’s time for new tires.
If you’re wondering when to change your tires, there are a few things you should keep in mind. First, consult your car’s owner’s manual. It likely has specific recommendations for tire changes based on make and model.
In general, though, you should plan on changing your tires every six months or so. This is because tires can wear down over time, even if you don’t use your car often. You may need to change them more frequently if you live in an area with harsh weather conditions or do a lot of driving on rough roads.
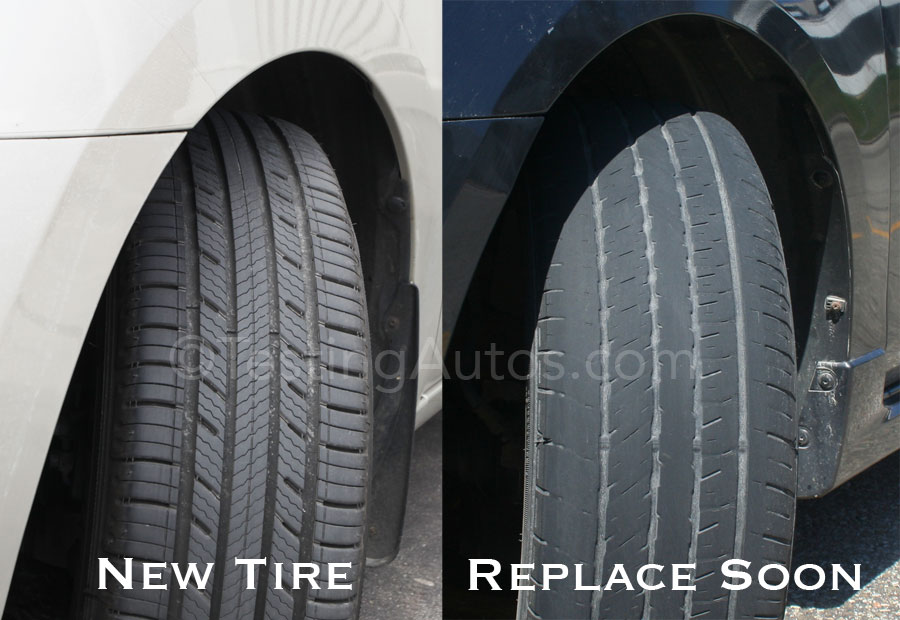
Pay attention to how your car feels while driving. If it seems like the ride is rougher than usual or the steering isn’t as responsive, it could be time for new tires. Also, check the tread depth of your tires regularly.
If the tread is getting shallow, it’s time for a change.Keeping up with regular tire changes will help ensure that your car runs smoothly and safely. So don’t wait until it’s too late – schedule a tire change today!
How Do I Know When My Tires Need Replacing?
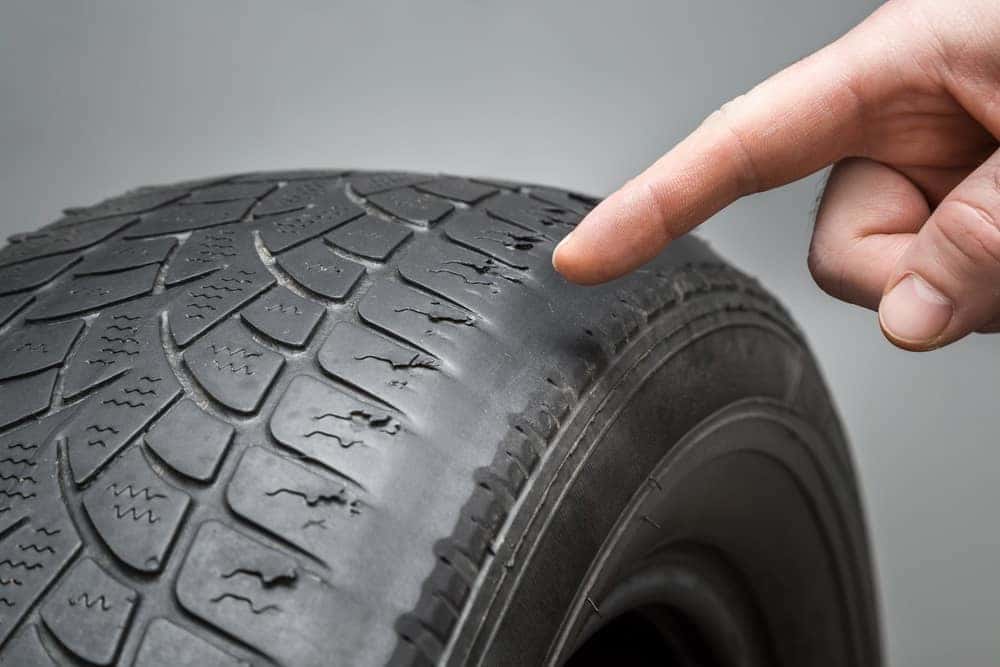
It’s important to regularly check your tires to make sure they are in good condition and have enough tread. Tires that are bald or have very little tread can be dangerous, especially in wet or icy conditions. Here are a few things to look for when checking your tires:
1. Check the tire pressure with a tire gauge. The proper tire pressure is usually listed on a sticker inside the driver’s door frame.2. Look at the tread depth of the tires.
Tires typically need to be replaced when they get down to about 4/32 inch of tread remaining. You can check this by using a penny; insert the penny head first into the tread grooves at different points around the tire. If you can see all of Lincoln’s head, then it’s time for new tires.
3. Examine the sidewalls of the tires for cracks, bulges, or other damage. This can be a sign that the tire has been damaged and is at risk of failure.4. Have your alignment checked if you notice uneven wear on your tires (e.g., one side is more worn than the other).
This indicates that your wheels are not pointing straight, which puts unnecessary stress on your tires and can lead to premature wear.
How Often Should I Be Replacing My Tires?
There’s no definitive answer to how often you should replace your tires, as it depends on various factors such as the type of vehicle you drive, your driving habits, and the roads you typically travel on. However, most experts generally recommend replacing your tires every 3-5 years or when they reach a certain tread depth (usually around 6/32 of an inch).If you’re unsure about when to replace your tires, it’s always best to consult with a professional mechanic or tire specialist.
They can inspect your tires and give you a better idea of when they need to be replaced.
How Long Do the Average Tires Last?
It’s difficult to give an exact answer to the question of how long tires should last. A number of factors can affect the lifespan of a tire, including driving habits, road conditions, vehicle type and tire maintenance. In general, however, most passenger car tires can be expected to last between 25,000 and 50,000 miles.
There are a few things you can do to help extend the life of your tires. First, make sure you’re maintaining proper tire inflation levels. This will help prevent premature wear and tear on the treads.
Second, avoid excessively hard braking or acceleration whenever possible. Both of these actions put unnecessary stress on the tires (not to mention the rest of your car). Third, try to drive on well-maintained roads as much as possible.
Potholes and other road hazards can cause damage to your tires that may not be immediately apparent.If you take good care of your tires and rotate them regularly (as recommended by most manufacturers), they should give you many years of trouble-free service.
Credit: www.testingautos.com
When to Change Tires Miles
When it comes to changing your car’s tires, there is no definitive answer as to how many miles you should drive before making the switch. However, there are a few general guidelines that can help you determine when it’s time for new tires.One of the most important factors in deciding when to change your tires is the tread depth.
Once your tire’s tread depth gets below 6/32 of an inch, it’s time to start shopping for new ones. You can check your tread depth by using a penny – insert the coin into the deepest part of the tread groove and if you can see all of Lincoln’s head, your tread depth is less than 6/32″.In addition to tread depth, another thing to keep an eye on is tire wear.
Even if your tread depth is still above 6/32″, uneven wear can cause problems and decreased performance. If you notice any bald spots or unevenness in your tire’s surface, it’s time for new ones.Finally, pay attention to how your car feels while driving.
If you find yourself having to constantly adjust the steering wheel or fight against skidding, it could be a sign that your tires are worn out and need to be replaced.If you’re unsure about whether or not it’s time for new tires, err on the side of caution and get them replaced sooner rather than later – after all, they’re one of the most important parts of keeping you safe on the road!
Conclusion
If you’re not sure when to change your car’s tires, you’re not alone. It’s a common question, and the answer isn’t always simple. Here are a few things to keep in mind that will help you know when it’s time for new tires.
First, take a look at your owner’s manual. It should have information on how often to change your tires. If you can’t find it or if you’ve lost your manual, don’t worry – there are other ways to figure it out.
One way to tell if it’s time for new tires is by looking at the tread depth. You can do this by inserting a quarter into the tread – if the top of George Washington’s head is visible, then it’s time for new tires. Another way to check is by using the penny test – insert a penny into the tread with Lincoln’s head pointing down.
If you can see all of Lincoln’s head, then the tread is too shallow and you need new tires.In addition to checking the tread depth, pay attention to how your car feels while driving. If you feel vibrations in the steering wheel or seat, that could be a sign that your tires are worn and need to be replaced.
Also pay attention to any strange noises coming from your car – squealing or humming could indicate an issue with the tires.

When was My Tire Made
If you’re like most people, you probably don’t think much about your tires. But have you ever wondered when your tire was made? The answer may surprise you.
Tires are made of rubber, which is a natural product. Rubber comes from trees, and it takes about seven years for a rubber tree to mature enough to produce latex, the raw material used to make rubber.
If you’re like most people, you probably don’t know when your tires were made. And that’s not surprising, since tire manufacturers don’t make it easy to find out. But if you take a little time to look, you can usually find the date code on your tires.
The date code is usually located on the sidewall of the tire, and it looks something like this: “DOT XXYYZZ.” The first two letters (XX) represent the plant where the tire was manufactured. The next two numbers (YY) are the week of the year when the tire was made.
The last two numbers (ZZ) are the year. So, for example, a code that reads “DOT 121052” means that the tire was made at Plant 12 in Week 10 of 2022.It’s important to know when your tires were made because they have a limited lifespan.
Most experts recommend replacing them every six years or so, regardless of how much they’ve been driven. That may seem like a long time, but keep in mind that tires are exposed to sunlight and other harsh conditions that can degrade their rubber compound over time.So next time you’re wondering when your tires were made, take a look at their sidewalls and decode those mysterious DOT codes!
How Can I Tell When My Tires were Made?
It’s important to know when your tires were made because they have a limited lifespan. Tires are exposed to the elements and degrade over time, so it’s important to regularly check their condition and replace them when necessary. There are several ways to tell when your tires were made.
One way is to look at the DOT code on the sidewall of the tire. This code includes a four-digit number that indicates the week and year the tire was manufactured. For example, if the DOT code on your tire says “1210,” that means it was manufactured in the 12th week of 2010.
Another way to tell when your tires were made is to look for a stamp on the inside of the rim. This stamp will also include a four-digit number that indicates the week and year of manufacture.If you can’t find either of these codes, you can contact the manufacturer directly and they should be able to provide you with information about when your particular tires were manufactured.
Knowing when your tires were made is important for ensuring their safety and longevity. Regularly checking their condition and replacing them as needed will help keep you safe on the road.
What Year were My Tires Made?
If you’re wondering when your tires were made, there are a few ways to find out. Each tire has a DOT code on the sidewall that indicates when it was manufactured. The first two numbers in the DOT code are the week of manufacture, and the last two numbers are the year.
For example, if the DOT code on your tire reads “2416,” that means it was manufactured during the 24th week of 2016.You can also use the Tire Identification Number (TIN) to determine when your tires were made. The TIN is found on both sides of the tire and starts with “DOT.”
The last four digits of the TIN represent the date of manufacture. For example, if a tire’s TIN is “DOT XYZW 2416,” that means it was manufactured during the 24th week of 2016.If you can’t find either the DOT code or TIN on your tires, you can usually find a date code stamped on them as well.
This is usually located near where the air valve is located. The date code will be stamped as either a three-digit number or a two-letter/two-digit combination. The three-digit number corresponds to days of production in sequential order, while letter/two-digit combinations correspond to weeks in production order (with A representing Monday through F representing Saturday).
So, if a tire is stamped with “121” or “FA,” that means it was produced on 121st day or during 44th week (counting from Monday) of production for that year respectively .
When Did Date Codes Start on Tires?
Tires are one of the most important components of your vehicle, and it is important to keep them in good condition. One way to do this is to check the date codes on your tires. Date codes can tell you when a tire was manufactured, and this information can be used to help determine if a tire needs to be replaced.
Date codes on tires began in 1971, and they are located on the sidewall of the tire. The code consists of four digits, and the first two digits represent the week of manufacture while the last two digits represent the year. For example, a code of 1210 would indicate that the tire was manufactured during the 12th week of 2010.
It is generally recommended that tires be replaced after six years, regardless of how much tread they have left. Tires degrade over time even if they are not being used, so it is important to keep an eye on their age. If you are unsure about when your tires were manufactured, you can always contact the manufacturer for more information.

Credit: www.tirebuyer.com
Tire Dot Code Lookup
If you’ve ever wondered what those four-digit codes on the sidewalls of your tires mean, wonder no more! Those codes are actually called “tire dot codes,” and they can tell you a lot about when your tires were manufactured.To start with, the first two digits of the code represent the week of the year that the tire was made.
The second two digits represent the year. So, a code that reads “1419” would indicate that the tire was made in the 14th week of 2019.The tire dot code can be a helpful way to keep track of when your tires were made, and can also be helpful if you need to make a warranty claim or return.
That’s because most manufacturers have a policy that covers defects for a certain number of years from the date of manufacture – so knowing when your tires were made can help you determine if they’re still covered under warranty.To find out more about tire dot codes and how to decode them, check out this informative article from Tire Rack.
Conclusion
The blog post discusses when tires are made and how to tell when a tire was manufactured. It is important to know when a tire was manufactured because tires have a shelf life and need to be replaced after a certain amount of time. The blog post gives tips on how to find the manufacture date on a tire and what to do if the date is not listed.

Why Put a Bottle on Your Tire When Parking Alone
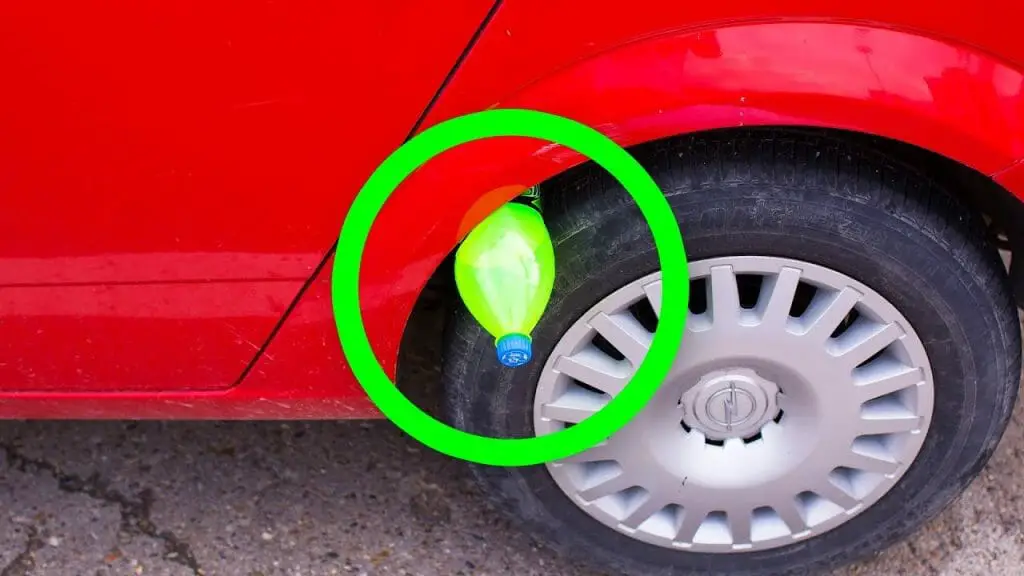
If you’re parking your car in an isolated area, it’s a good idea to put a bottle on your tire. This will create a loud noise if someone tries to tamper with your car, and it will also give you a chance to escape.
If you’re parking your car in a public place by yourself, it’s always a good idea to put a bottle on your tire. This simple act can deter would-be thieves from targeting your car.There are a few reasons why this works.
First, it makes it more difficult for thieves to quickly get your tires off and make their escape. Second, it’s a visual cue that someone is occupying the vehicle, which can make would-be criminals think twice about approaching. Finally, if you have an alarm system, the bottle can help trigger it if someone tries to tamper with your car.
So next time you’re parking in an unfamiliar place or simply want an extra layer of protection for your vehicle, remember to put a bottle on your tire. It could end up saving you a lot of headache (and money) in the long run.
What Does It Mean If Someone Puts a Plastic Bottle on Your Tire?
If you find a plastic bottle on your tire, it could mean that someone is trying to flatten your tire. This can be done by puncturing the bottle and then placing it over the valve stem of your tire. The pressure from the air inside the bottle will cause the tire to slowly lose air and eventually go flat.
Why are People Putting Bottles in Their Wheels?
It’s a new trend that’s been popping up all over social media: people putting bottles in their wheels. But why? Well, it turns out there are actually a few reasons why this might be a good idea.
For one, it can help to keep your tires inflated. If you’ve ever had a flat tire, you know how frustrating it can be to get it back up to full pressure. By keeping a bottle or two in your trunk, you can quickly and easily top off your tires if they start to lose air.
Another reason people are doing this is for the extra weight. A little extra weight in your wheels can help with traction, especially in icy or snowy conditions. It can also help your car feel more stable on the road.
So if you’re thinking about trying out this new trend, there are a few things to keep in mind. First, make sure you’re using bottles that are strong enough to withstand the pressure of being inflated. Second, don’t overdo it – too much weight in your wheels can actually make driving more difficult.
And finally, have fun! This is just one more way to customize your ride and make it unique to you.
Credit: www.youtube.com
Place a Bottle on Your Tire If You’Re Traveling Alone
If you’re traveling alone, it’s always a good idea to place a bottle on your tire. This will help to keep the tire from going flat and will also provide a visual cue for other drivers in case you have to stop on the side of the road.
Conclusion
If you’re parking your car in an unfamiliar or potentially dangerous area, it’s always a good idea to take some extra precautions. One simple but effective measure is to place a bottle under one of your tires before you get out of the vehicle.This will provide a visible deterrent for would-be thieves or vandals, and it will also make it more difficult for them to drive off with your car if they do manage to break in.
Plus, if you have a flat tire when you come back, at least you’ll know what caused it!

How to Change Tires on Sphero Ollie
If you’ve ever taken your Sphero Ollie off-roading, then you know that the tires can take a beating. Over time, they will start to wear down and eventually need to be replaced. Luckily, changing tires on your Ollie is a pretty easy process that anyone can do.
- Power off your Sphero Ollie and place it upside down on a flat surface
- Unscrew the four screws that hold the tires in place using a Phillips head screwdriver
- Remove the old tires from the rims and discard them
- Place the new tires onto the rims, making sure they are snug against the hub
- Screw in the four screws to secure the tires in place using a Phillips head screwdriver
- Power on your Sphero Ollie and test drive it to make sure the new tires are properly secured!
Sphero Ollie Manual
Sphero Ollie is a high performance robot designed for speed, tricks and stunts. It’s the ultimate app-controlled robot companion. With an impressive design, Sphero Ollie is built to endure rough terrain and extreme conditions.
From jumps and spins to flips and grinds, this little machine can do it all – at speeds of up to 14 mph (6 m/s).Using Bluetooth LE technology, you can drive and control Ollie from your iOS or Android device with the free Sphero app. The app also lets you customize your experience with digital stickers, new trick codes and more.
So download the app, grab your phone and let’s get rolling!
Sphero Ollie Tires
Sphero Ollie is a robotic toy that can be controlled with a smartphone or tablet. It comes with two detachable tires that can be used to perform tricks. The Ollie can reach speeds of up to 14 mph and jump up to 2 feet in the air.
Sphero Ollie Replacement Parts
Sphero Ollie is one of the most popular robots on the market, and for good reason. It’s a versatile, fun little machine that can do a lot of tricks. However, like all machines, it eventually wears down and needs replacement parts.
Here are some places you can find Sphero Ollie replacement parts to keep your robot running smoothly.The first place to check for Sphero Ollie replacement parts is the company’s website. They offer a wide variety of replacement parts for the robot, from tires to motors to shells.
You can also buy extended warranties and protection plans from the website, which is always a good idea with electronic devices.If you’re looking for slightly cheaper options, there are several third-party websites that sell Sphero Ollie replacement parts. These sites usually have a wider selection than the company website and may even offer better prices.
However, it’s important to make sure you’re buying from a reputable source so you know the parts will be high quality and compatible with your robot.Finally, if you’re handy with tools and comfortable making repairs yourself, you can find instructions for fixing common issues with Sphero Ollie online. This can be a great way to save money on replacement parts, but only attempt it if you’re confident in your abilities.
Otherwise, you could end up doing more harm than good!
Sphero Ollie App
The Sphero Ollie App is an app that allows you to control your Sphero Ollie robot. With this app, you can customize your Ollie’s colors and settings, as well as create new tricks for it to perform. You can also use the app to compete against other Ollie owners in challenges, and view leaderboards to see how you stack up.
Whether you’re a first-time user or a seasoned pro, the Sphero Ollie App is a must-have for anyone who wants to get the most out of their Sphero Ollie robot.
Sphero Mini
If you’re looking for a fun, affordable way to get into the world of robotics, then you should check out the Sphero Mini. This little robot is packed with features and functionality, yet it’s small enough to fit in the palm of your hand. The Sphero Mini is perfect for anyone who wants to learn about programming and robotics, or just have a lot of fun playing with a cool gadget.
Here’s everything you need to know about the Sphero Mini.The Sphero Mini is a small, spherical robot that can be controlled with your smartphone or tablet. It’s powered by Bluetooth, so you can use it with any device that has Bluetooth connectivity.
The Sphero Mini comes with two free apps — one for controlling the robot, and one for programming it. The control app lets you drive the Sphero Mini around like a remote-controlled car. You can also set up obstacles and challenges for the robot to navigate through.
The programming app lets you create custom programs for the robot to follow. With these programs, you can make the robot do just about anything you can imagine — from playing simple games to performing complex tasks.The best part about the Sphero Mini is that it’s completely open-ended — there are no limits to what you can do with it.
Whether you want to use it as a simple toy or as a tool for learning programming and robotics, the choice is yours.

Credit: www.amazon.com
How Do You Remove an Ollie Tire?
If you need to remove an Ollie tire from your bike, there are a few things you’ll need to do. First, use a wrench to loosen the bolts that hold the tire in place. Next, use a tire lever to pry the tire off of the rim.
Finally, use a tube of sealant to patch any holes in the tire.
Is Sphero Ollie Discontinued?
Yes, the Sphero Ollie has been officially discontinued. However, you may still be able to find them for sale from third-party sellers. The Ollie was one of Sphero’s first robotic toys and was very popular among kids and adults alike.
Its unique design and functionality made it a must-have for anyone looking for a fun and interactive toy. While the Ollie is no longer being manufactured, its legacy will live on in the hearts of those who loved it.
Is Sphero Ollie Waterproof?
Yes, Sphero Ollie is waterproof.
Why Won’T My Ollie Wake Up?
If your Ollie is unresponsive and won’t wake up, there are a few things you can try:-First, check to make sure that the Ollie is properly charged. If it’s not, plug it in and let it charge for at least 30 minutes.
-Next, try pressing and holding the power button for 10 seconds. This should force the Ollie to restart.
-If neither of those work, you can try connecting the Ollie to your computer via USB and then opening up the Sphero Edu app.
Once connected, go to “My Robots” and then select “Ollie.” From there, you should see an option to “Reset Robot.” This will factory reset your Ollie and hopefully get it working again.
If none of these solutions work, then unfortunately your Ollie may be defective and will need to be replaced.
Change Tires and Hubs of Orbotix Ollie Darkside by Sphero
Conclusion
In order to change the tires on your Sphero Ollie, you will need to purchase a new set of tires. Once you have the new tires, you will need to remove the old ones. To do this, use a flathead screwdriver to remove the two screws that hold the tire in place.
After the screws are removed, pull the old tire off of the wheel. Next, take your new tire and line it up with the hole in the center of the wheel. Put the screw back in place and tighten it until it is snug.
Repeat this process for each tire.

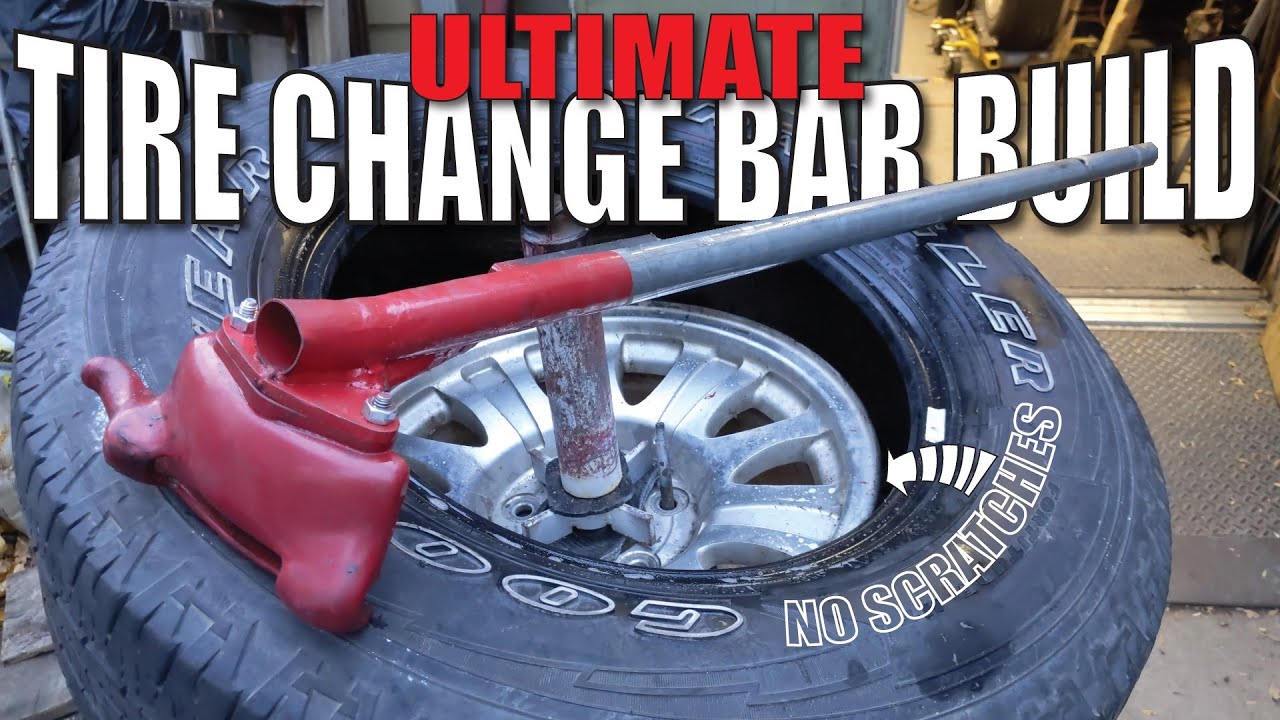
How to Change Tires With Bars
If your car has a flat tire, you’ll need to know how to change it. This process is relatively simple, but it’s important to do it correctly so that you don’t damage the wheel or the car. You’ll need a few tools for this job, including a jack, a lug wrench, and some wheel chocks.
- Park your car on a flat surface and set the emergency brake
- Loosen the lug nuts on the wheel you are changing with a wrench, but do not remove them yet
- Place the jack under your car in the correct position and begin to raise the car until the tire is lifted off of the ground
- Remove the lug nuts and take off the old tire
- Put on the new tire and hand-tighten each of the lug nuts before lowering your car back to the ground
- 6) Once your car is back on the ground, use your wrench to fully tighten each of the lug nuts on your new tire
Tire Bars
A tire bar is a tool that helps to change a tire. It is also known as a lug wrench. A tire bar usually has two parts: the handle and the head.
The head is the part that goes on the bolt, while the handle is used to turn it.Most tire bars are made of metal, but some are made of plastic. They come in different sizes, so it is important to choose one that will fit your tires.
Many people keep a spare tire bar in their trunk in case they get a flat tire.Tire bars can be bought at most auto parts stores or online. They are relatively inexpensive, so there is no need to spend a lot of money on one.
When choosing a tire bar, make sure it is durable and easy to use.
Mount/Demount Tire Bar
If you work in a garage or service station, then you know the importance of having a good quality tire bar. A tire bar is used to help remove and install tires on vehicles. It is a long, metal rod that has a handle on one end and a curved hook on the other.
The hook is used to grab onto the rim of the tire so it can be pulled off or pushed onto the wheel.There are many different brands and styles of tire bars available on the market. Some are made from steel, while others are made from aluminum.
There are also some that have plastic handles. Each type has its own advantages and disadvantages.Steel tire bars are very strong and durable, but they can be quite heavy.
Aluminum ones are much lighter, but they may not be as strong. Plastic handled ones are usually lightweight and easy to use, but they may not be as durable as the other two types.When choosing a tire bar, it is important to consider what type of tires you will be using it with.
If you only work with passenger car tires, then any type will probably do just fine. But if you regularly deal with larger truck or SUV tires, then you will need something that is stronger and more durable like a steel bar.No matter what type of tire bar you choose, make sure that it is comfortable to use and that it fits your hand well.
You don’t want something that is too big or too small because it will either be difficult to control or won’t provide enough leverage when trying to remove stubborn tires.
How to Change a Semi Tire With Bars
If you find yourself in the unfortunate situation of having a blowout on your semi truck, don’t panic! Changing a tire is not as difficult as it may seem. Here is a step-by-step guide on how to change a semi tire with bars:
1. Park your truck on level ground and set the parking brake. Place cones or flares around your truck to warn other drivers of the hazard.2. Jack up the trailer using the jack provided.
Do not use any other type of jack!3. Remove the wheel bolts with a wrench and pull off the damaged tire. Be careful not to damage the hub when removing the tire.
4. Inspect the inside of the wheel for any debris or damage and clean if necessary. Then, fit on the new tire making sure that it is facing in the correct direction. Securely tighten all wheel bolts by hand before using a wrench to torque them to specifications.
Lower your trailer back down and remove the jack stand(s).
Tire Bar Set
If you’re looking for a great way to get your car’s tires off the ground, then you need a tire bar set. This simple tool allows you to quickly and easily remove all four of your car’s tires in one go.Tire bar sets come with two bars that are placed under each tire.
Once in place, simply lift up on the bars and the tires will come right off. It’s that easy!Tire bar sets are a must-have for anyone who wants to make their own tire changes or who needs to change their tires frequently.
They’re also great for those who want to save money by not having to pay a mechanic to do it for them.So if you’re in the market for a tire bar set, be sure to check out our selection. We’ve got everything you need to get the job done right.
Tire Pry Bar
There are many different ways that you can use a tire pry bar. The most common use for this tool is to remove a tire from a vehicle. However, there are other ways that you can use this tool as well.
Here are some of the different uses for a tire pry bar:-Remove nails from tires: If you have a nail in your tire, you can use a tire pry bar to remove it. Simply insert the end of the bar into the hole and pull it out.
-Loosen lug nuts: If you need to loosen lug nuts on a wheel, you can use a tire pry bar to do so. Insert the end of the bar under the lug nut and turn it counterclockwise to loosen.– Pry open doors: In an emergency situation, you can use a tire pry bar to pry open a door if it is jammed shut.
Simply insert the end of the bar into the space between the door and frame and apply pressure to open it up.
Credit: www.youtube.com
How Do You Change a Tire Bar?
Assuming you would like tips on how to change a tire:First, you will need to gather the tools you will need which include a lug wrench, jack and a spare tire. It is also helpful to have gloves and a flashlight.
Once you have all of your materials, park your car on level ground in a safe area away from traffic.Next, loosen the lug nuts on your wheel using the lug wrench but do not remove them yet. Once they are loose, position the jack under your car in the correct spot.
If you are unsure where this is, consult your car’s owner’s manual. Slowly begin to raise the car until the flat tire is lifted off of the ground but be sure not to fully remove it as this could cause injury or damage.Now that the flat tire is no longer touching the ground, finish removing the lug nuts and set them aside.
Carefully remove the flat tire and set it aside as well. Take your spare tire and line up its holes with those on the wheel. Be sure that it is positioned correctly before beginning to screw on the lug nuts by hand as tight as possible.
Once all of the lug nuts are tight, lower your car back down to the ground and use the wrench to give them an extra tightening – again being careful not overdo it or strip them. And that’s it! You’ve successfully changed your own tire!
How Do You Mount a Tire With a Tire Bar?
Assuming you would like tips on how to mount a tire with a tire bar:It is always important to consult your owner’s manual when jacking up your vehicle and removing the wheels. This will give you specific instructions for your car model.
In general, these are the steps you need to follow:
• Park your vehicle on a flat surface and set the parking brake.
• Loosen the lug nuts with a wrench (but don’t remove them).
• Jack up the side of the car that you’ll be working on, using a jack stand for support. Never work under just a jack.
• Remove the wheel and put it out of the way.
• Place one end of the tire bar against the lip of the rim, about halfway around from where you started loosening the lug nuts. The other end should be resting against something solid, like another part of the car body or frame. If necessary, use a rock or piece of wood to brace it in place.
You may want to put some old towels or rags down first to avoid scratching paintwork.
• Now gently pry outward on the bar untilthe bead ofthe tire pops overthe edgeoftherimand seatedown ontoit—youshouldheara “clunk”asthis happens(if not,checkthatyouhaveenoughleverageand tryagain).Workyourwayaroundtheentiretyofthetireuntilitisfullyseatedonthe rim allthewayaround.
Donotforceitorjerkittooquicklyortoomuchoras this could damage therimorbreakthelugnutsfreefromtheirthreads!
How Do You Use a Tire Pry Bar?
In order to use a tire pry bar, first make sure that the vehicle is on a level surface and that the emergency brake is engaged. Next, locate the lug nuts on the wheel and remove them with a socket wrench. Once the lug nuts are removed, place the pry bar under the lip of the tire and gently pry it off of the wheel.
Be careful not to damage the rim of the wheel when removing the tire. Finally, once the tire is off, you can proceed to change it or repair it as needed.
How Do You Take a Tire off the Rim With a Pry Bar?
Assuming you don’t have a tire lever:Position the pry bar under the lip of the tire at the point where it meets the rim. Use your body weight to push down on the pry bar and pop the tire off of the rim.
Repeat this process around the entire circumference of the tire until it is completely removed from the rim.
How Much Does It Cost to Unmount And Remount Tires?
It typically costs between $60 and $120 to have a tire unmounted and remounted. The cost will vary depending on the type of vehicle, the size of the tires, and the complexity of the job. Many tire shops offer discounts for customers who bring in their own tires.
How We Change Tires Using the Gold Tool
Conclusion
If you’re looking to change your own tires with bars, here’s a helpful guide. You’ll need a few things including a wrench, socket set, and torque wrench. Once you have all of your tools ready, follow these steps:
1. Loosen the lug nuts on your wheel using the wrench. Don’t remove them completely yet.2. Place the jack under your car and raise it up until the tire is slightly off the ground.
3. Remove the lug nuts and take off the old tire.4. Put on the new tire and hand-tighten the lug nuts back on.5. Lower your car back down to the ground and use the torque wrench to properly tighten all of the lug nuts.

How to Change Tubeless Fat Bike Tires
If you’re like most people, you probably don’t think about changing your tubeless fat bike tires very often. But if you ride in mud or sand, you know that it’s inevitable. So how do you change them?
Here’s a quick guide to help you out.
- To change a tubeless fat bike tire, you will need:-A tubeless-compatible fat bike rim with a valve stem installed -A tubeless-compatible fat bike tire -Tubeless sealant -A floor pump or air compressor with a chuck that can accommodate a fat bike tire valve1
- Remove the old tire from the rim
- To do this, first loosen one side of the bead all the way around the circumference of the tire
- Then, insert one end of a flathead screwdriver or similar tool under the edge of the bead and lever it up and over the lip of the rim
- Repeat this process on the other side of the bead until you can completely remove the tire from the rim
- Inspect your rim for any damage and clean off any debris that may be present
- Make sure that your rim strip is intact and in good condition – if not, now is a good time to replace it
- Install your new tire onto the rim, making sure that both sides of the bead are seated evenly all around the circumference of the wheel
- Add sealant to your new tire – about 2 ounces should suffice
- 5 Inflate your new tire using a floor pump or air compressor until it reaches its desired pressure (usually between 20 and 35 psi)
How to Inflate Tubeless Fat Bike Tires
If you have a tubeless fat bike, you know how great it is to be able to ride without having to worry about getting a flat. But what do you do when you need to inflate your tires? Here’s a step-by-step guide on how to inflate tubeless fat bike tires:
1. Remove the valve core from the valve stem using a valve core tool. This will allow air to flow into the tire more easily.
2. Fill up a pump with air and attach it to the valve stem.
Pump the tire until it reaches the desired pressure.
3. Replace the valve core in the valve stem and screw it back in place tight with the valve core tool.
4. Detach the pump from the valve stem and you’re all set!
26X4 Fat Tire Tubeless
If you’re looking for a fat tire that can go anywhere and do anything, look no further than the 26×4 Fat Tire Tubeless. This massive tire is perfect for taking on any terrain, whether it’s sand, snow, or mud. And with its tubeless design, you’ll never have to worry about getting a flat.
Just pump up the tires and go!
Best Tape for Fat Bike Tubeless
When it comes to setting up tubeless tires on your fat bike, there are a few things you need to take into consideration. The first is what kind of tape you’re going to use. There are a few different options out there, but we think the best tape for fat bike tubeless setups is the Velox Rim Tape.
This tape is made specifically for tubeless setups and is nice and thick, so it will help to seal up your rims well. It’s also adhesive-backed so it will stay in place once installed. Another great option is the Stan’s NoTubes Rim Strip.
This strip is also made specifically for tubeless setups and does an excellent job of sealing up your rims.Once you’ve decided on which tape to use, installing it is pretty straightforward. Just make sure that you clean your rims well before installing the new tape so that it can adhere properly.
Start by running a bead of sealant around the inside of your rim where the tire will sit. Then, install your new rim strip or tape, being careful to not overlap any sections. Once everything is in place, inflate your tires and check for any leaks.
If everything looks good, then you’re ready to roll!
Fat Bike Tubeless Valve
A fat bike tubeless valve is a type of valve that is used to seal the tire and rim interface on a fat bike. This type of valve is typically made from aluminum and has a large diameter to accommodate the larger size of the fat bike rims. The valves are also Presta compatible so that they can be used with standard presta pumps.
When using this type of valve, it is important to first remove the core from the valve stem. This will allow you to screw the valve into the rim without damaging the tube. Next, you will need to inflate the tire with a presta pump until it is firm.
Once inflated, you can then screw on the cap to lock in air pressure.One advantage of using a tubeless valve on a fat bike is that it helps to prevent flats by sealing off any sharp objects that may puncture the tire. Additionally, these valves offer an improved ride quality since they allow for lower air pressures without compromising traction or stability.
Fat Bike Rim Strips Colors
When it comes to choosing a fat bike rim strip, there are a few things to consider. The most important factor is the width of your rims. Rim strips come in a variety of widths, so be sure to measure your rims before making a purchase.
Another thing to keep in mind is the color of the rim strip. While some people prefer black or white rim strips, others like to choose a color that matches their bike frame or tires. Whatever your preference, be sure to select a rim strip that will provide a snug fit and protect your rims from damage.

Credit: www.singletracks.com
How Do I Change a Tire on a Fat Tire Bike?
If you own a fat tire bike, sooner or later you’ll have to change a tire. It’s not as difficult as it may seem, and with a little practice, you’ll be able to do it in no time. Here are the steps you need to follow:
1. First, loosen the bolts that hold the wheel in place. You’ll need a wrench for this.2. Next, remove the old tire from the wheel.
Be careful not to puncture it while doing so.3. Take your new tire and place it on the wheel, making sure that it’s seated properly.4. Finally, tighten the bolts back up and Pump up your new tire!
Can Fat Tire Bikes Be Tubeless?
Sure, fat tire bikes can be tubeless! In fact, many riders prefer to set up their fat bikes with tubeless tires for a number of reasons. First and foremost, tubeless tires help to prevent flats by sealing the bead of the tire to the rim without the need for an inner tube.
This sealant also helps to fill any small punctures that may occur while riding.In addition, tubeless tires generally offer a smoother ride and better traction than traditional clincher tires with tubes. And since there’s no tube to pinch or puncture, you can run lower air pressures in your tires without worry – perfect for those soft, sandy beaches or snowy trails.
So if you’re looking for a flat-resistant, smooth-riding setup for your fat bike, consider going tubeless!
How Do You Install a Tubeless Fat Tire?
Installing a tubeless fat tire is relatively easy and only requires a few tools. You’ll need a tubeless-compatible rim, a tubeless-compatible tire, some sealant, and a valve stem. Once you have all of these components, you can follow these steps to install your new tire:
1. Remove the old tire from the rim. If you’re not sure how to do this, consult your bike’s owner’s manual.2. Clean the inside of the rim with rubbing alcohol or another cleaner specifically designed for bicycle rims.
This step is important to ensure that there is no dirt or debris that could prevent the new tire from sealing properly.3. Mount the new tire on the rim and inflate it to about 30 PSI (pounds per square inch). At this point, you should also add some sealant to the inside of the tire.
Consult your sealant manufacturer’s instructions for specific details on how much to use.4. Use a floor pump or other air compressor to slowly increase the pressure in the tire until it seats properly on the rim (usually around 40-50 PSI). You may hear an audible “pop” when this happens – this is normal and indicates that the bead has seated correctly.
If you don’t hear this “pop,” deflate the tire and start over at step 3.55 .Once both sides of the bead are seated correctly, continue inflating the tire to its recommended pressure (consult your bike’s owner’s manual or Tire Pressure chart for specific recommendations).
How Do You Change a Tubeless Bike Tire?
If you’re a mountain biker, sooner or later you’re going to have a flat tire. And if you’ve got a tubeless tire, changing it is a little different than with a traditional tire and tube setup. Here’s how to do it.
First, remove the wheel from the bike. Then, use a bead breaker tool to break the seal between the tire and rim. Once the bead is broken, you can pull the tire off of the rim.
Next, inspect the inside of the tire for any objects that may have caused the flat (e.g., thorns, glass, etc.). If there are any objects embedded in the tire, use needle-nose pliers to remove them.Once you’ve inspected and cleaned out the inside of the tire, it’s time to reinstall it on the rim.
Start by adding some air to the tire (this will make it easier to get back on). Then place one side of the tire onto the rim and work your way around until both sides are seated evenly. Add more air until the bead pops into place all around circumference of wheel.
You may need someone to help hold onto wheel while doing this so it doesn’t spin out of control when air starts rushing in! Finally, put wheel back on bike and go ride!
How to Convert & Install Tubeless Tires on Fat Bikes
Conclusion
If you’re looking to change your tubeless fat bike tires, there are a few things you’ll need to do. First, you’ll need to remove the old tire from the rim. To do this, you’ll need to deflate the tire completely and then use a tire lever to pry the tire off of the rim.
Once the old tire is removed, you can then install the new tire onto the rim. Again, start by inflating the tire until it’s just barely touching the ground and then use a lever to seat it onto the rim. Once it’s seated, inflate it to its proper pressure and voila!
You’ve successfully changed your tubeless fat bike tires.

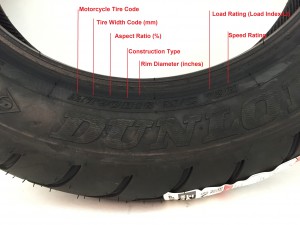
Motorcycle Tire Temperature Range
Motorcycle tire temperature range is one of the most important things to consider when riding a motorcycle. The ideal range for motorcycle tires is between 30 and 50 degrees Celsius. However, depending on the conditions and terrain, this range can change.
For example, if you are riding in hot weather or on rough terrain, your tires will get hotter faster. If you are riding in cold weather or on smooth roads, your tires will stay cooler. It is important to check your motorcycle’s tire temperature regularly to make sure they are within the ideal range.
Most motorcycle riders know that it is important to check their tire pressure before each ride. But did you know that checking the temperature of your tires is just as important? Here’s why:
The ideal operating temperature range for a motorcycle tire is between 80-110 degrees Fahrenheit. If the temperature of your tires is outside of this range, it can negatively affect performance and handling.If your tires are too cold, they will be harder and less grippy.
This can lead to slip-ups and accidents, especially on wet or icy roads. Conversely, if your tires are too hot, they will be softer and more prone to premature wear.So how do you know if your tire temperatures are in the ideal range?
The best way is to invest in a tire pyrometer, which measures the internal temperature of the tire. Another option is to use an infrared thermometer, although these can be less accurate.You should check the temperature of both front and rear tires after every few hours of riding.
If one or both sides are outside of the ideal range, take steps to adjust accordingly. For example, if your front tire is too cold, try increasing your air pressure by 2-3 psi. If your rear tire is too hot, try decreasing air pressure by the same amount.
By taking care of your motorcycle tires and monitoring their temperatures, you can help ensure a safe and enjoyable ride each time you hit the road!
Credit: www.chapmoto.com
How Cold is Too Cold for Motorcycle Tires?
Tires are one of the most important parts of a motorcycle, and their condition can have a big impact on safety. Cold weather can cause tires to harden and become less flexible, which can lead to decreased grip and increased risk of a crash. In general, it’s best to avoid riding in temperatures below 50 degrees Fahrenheit.
But if you must ride in cold weather, there are some things you can do to help keep your tires in good condition:-Check your tire pressure regularly. Cold weather can cause tires to lose pressure, so it’s important to check them often and inflate them as needed.
-Avoid potholes and other obstacles. Hitting something with your tire can damage the tread or cause a flat.
-Be extra careful on wet roads.
Wet conditions combined with cold weather can make it even harder for tires to grip the road. Slow down and give yourself plenty of space between you and other vehicles.
– Inspect your tires before each ride.
Look for any cracks or cuts in the tread or sidewalls.
How Hot Should Motorcycle Tires Get?
It is generally accepted that motorcycle tires should be operated at temperatures between 30 and 50 degrees C. Most sportbike riders lean towards the higher end of this range, while those who ride cruiser motorcycles tend to prefer the lower end. There are a number of factors that can affect how hot your motorcycle tires get, including tire size, air pressure, and riding style.One important factor to consider is the type of rubber compound used in your tires.
Tires made with softer compounds will typically reach higher temperatures than those made with harder compounds. This is because softer compounds provide better grip, which results in more friction and therefore more heat generation. However, it’s important to note that operating your tires at too high of a temperature can cause them to degrade prematurely.
As such, it’s important to strike a balance between grip and longevity when choosing a tire compound.Another factor that affects tire temperature is air pressure. If you inflate your tires too much, they will build up excessive heat due to the increased contact area with the ground.
Conversely, if you don’t inflate them enough, they will flex excessively and generate additional heat through internal friction. As such, it’s important to maintain proper air pressure in your tires at all times.Finally, riding style can also have an impact on how hot your motorcycle tires get.
Those who ride aggressively or frequently engage in hard cornering will put their tires under greater stress and cause them to reach higher temperatures than those who ride more conservatively. So if you’re looking to keep your tires cool, it’s best to avoid putting them through excessive amounts of stress whenever possible.
Is 46 Degrees Too Cold to Ride a Motorcycle?
There is no definitive answer to this question since everyone experiences cold differently. 46 degrees Fahrenheit could be too cold for some people to ride a motorcycle, while others may find it perfectly comfortable. Ultimately, it depends on the individual and how they tolerate cold weather.
Some factors that could make 46 degrees too cold to ride a motorcycle include wind chill, precipitation, and fatigue. Wind chill can make the air feel much colder than it actually is, so if it’s windy out, 46 degrees may be too cold to ride. Precipitation can also make riding uncomfortable and even dangerous, so if it’s raining or snowing, it’s probably best to stay off the road.
Finally, riding in cold weather can be tiring, so if you’re already feeling fatigued, 46 degrees may be too chilly for you.
At What Temperature Do Tires Fail?
There is no definitive answer to this question as different tires fail at different temperatures. However, it is generally agreed that once tires reach temperatures in excess of 200 degrees Fahrenheit, they are at a significantly increased risk of failure. At these high temperatures, the tire’s rubber begins to break down, making it more susceptible to punctures and blowouts.
Therefore, it is important to avoid driving in excessively hot conditions if possible, and to keep an eye on your tires’ temperature if you must do so. If you notice your tires getting too hot, pull over and allow them to cool down before continuing on your journey.
Motorcycle tire pressure and temperature test
Motorcycle Tires near Me
If you’re looking for motorcycle tires near you, there are a few things to keep in mind. First, make sure you know the size and type of tire you need. There are many different sizes and types of motorcycle tires, so it’s important to know what will fit your bike.
Second, check out local motorcycle shops or dealerships. They usually have a good selection of tires and may even offer discounts if you purchase multiple tires at once. Finally, search online for retailers that sell motorcycle tires.
This can be a great way to compare prices and find the best deals.
Conclusion
A motorcycle’s tire temperature range is affected by many factors, including the type of motorcycle, the terrain, the weather and the rider’s habits. A properly inflated tire will have a temperature range of between 20 and 30 degrees Celsius. If the tires are underinflated, they will overheat and could burst.
If they are overinflated, they will be more likely to skid on wet roads.

How to Change Tubeless Mountain Bike Tires
Mountain biking is a great way to get outdoors and enjoy the scenery. However, flat tires can happen when you least expect it. Luckily, changing a tubeless mountain bike tire is relatively easy and only takes a few minutes.
Here’s a step-by-step guide on how to do it.
- Remove the wheel from the bike and disconnect the tire from the rim
- Using a tire lever, pry one side of the tire bead over the edge of the rim
- Work your way around the circumference of the tire until it is completely off of the rim
- Inspect both the tire and rim for any damage
- If either are damaged, replace them before continuing
- Place a new tube or tubeless sealant onto the rim and stretch it around so that it covers the entire surface evenly
- Starting at one end of the tire, work the bead over the edge of the rim until it is seated properly all around
- Inflate to desired pressure and check for leaks
How to Seat Tubeless Tire With Compressor
If you’re looking to seat a tubeless tire with a compressor, here’s what you need to do. First, make sure your valve stem is properly installed and that there’s no air leaks. Next, inflate the tire until it’s about halfway full – this will help ensure that the bead stays seated when you’re adding air.
Once the tire is inflated, use your compressor to add air until the tire is fully seated. You may need to wiggle the tire around a bit as you’re doing this to help seat the bead properly. If everything goes according to plan, you should now have a properly seated tubeless tire!
Replace Tubeless Tire With Tube
If you have a tubeless tire, you can usually fix it with a tube. But if you don’t have a tubeless tire, you’ll need to replace it with a tube. Here’s how:
1. Remove the wheel from the bike.2. Remove the tire from the wheel.
3. Insert the tube into the tire.
4. Inflate the tube slightly and then fit the tire onto the wheel rim. Make sure that the valve is in line with one of the spokes.
5- Use your hands to work around the circumference of the tire, pushing it onto the rim until it’s seated all the way around.
You may need to use a tyre lever or two to get it started; just be careful not to pinch or damage the tube while doing so! If everything looks good, go ahead and inflate the tire to its recommended pressure (you can find this on sidewall of the tire). Put everything back together and enjoy your ride!
How to Inflate Tubeless Bike Tires
Tubeless bike tires are becoming increasingly popular, but they can be a bit tricky to inflate. Here’s a step-by-step guide to help you get the job done:1. Remove the valve core from the tubeless valve.
This will allow air to flow more freely into the tire.2. Use a high-pressure pump to inflate the tire. You’ll need to pump quite hard to get the tire fully inflated.
3. Replace the valve core and screw it tight. This will prevent air from escaping from the tire.4. Inflate the tire again using a lower pressure, until you reach your desired pressure level.
Do You Need Sealant for Tubeless Tires
If you’ve ever wondered if you need sealant for your tubeless tires, the answer is yes! Sealant helps to protect your tires from punctures and leaks, and it also helps to keep them inflated. Here’s a closer look at why you need sealant for tubeless tires:
Tubeless tires are more susceptible to punctures than traditional tires because they don’t have an inner tube. This means that any sharp object that penetrates the tire can cause a leak. Sealant helps to seal up any small holes or punctures so that air doesn’t escape from the tire.
Tubeless tires also tend to lose air pressure over time, even when they’re not being used. This is due to the fact that there’s no inner tube to keep the air in place. Sealant helps to maintain the pressure in your tubeless tires so that they stay inflated and ready to go when you need them.
Overall, using sealant in your tubeless tires is a good idea if you want to keep them properly inflated and free of punctures. It’s an inexpensive way to extend the life of your tires and make sure they’re always ready for action!
Tubeless Mtb Tyres 29
Mountain biking is a great way to get outdoors and explore the trails, but it can be a bit daunting if you’re not familiar with the equipment. One of the most important things on your mountain bike is your tyres, so it’s important to choose the right ones for your riding style and the terrain you’ll be riding on. Tubeless tyres are becoming increasingly popular for mountain biking, as they offer some distinct advantages over traditional tyres.
Tubeless tyres are essentially tyre and rim combinations that don’t use an inner tube. This means that there’s no chance of getting a puncture from a sharp object piercing the tyre and causing a leak. Instead, air is sealed inside the tyre using a special rim strip and valve system.
This makes for a much more reliable set-up, as there’s no risk of flats or blow-outs.Another advantage of tubeless tyres is that they can be run at lower pressures than traditional tyres without sacrificing traction or comfort. This means you can enjoy increased grip and control on technical trails, without having to worry about pinch flats.
You’ll also find that tubeless tyres roll faster than traditional tyres, as there’s less resistance between the ground and the tyre itself.If you’re thinking of making the switch to tubeless tyres, there are a few things you need to know before making the switch. Firstly, you’ll need to invest in some new wheels that are compatible with tubeless systems.
You’ll also need to make sure your frame has enough clearance to accommodate larger diameter tyres (29″ instead of 26″). Once you’ve sorted out those two things, changing to tubeless is relatively straightforward – just follow these simple steps:1) Remove your existing wheels and tires from your bike.
If you’re running disk brakes, make sure to remove any brake rotors too. 2) Install your new tubeless-compatible wheels on your bike (if necessary), making sure that they’re properly secured with all bolts tight 3) Place one side of the supplied rim strip into each wheel
4) Inflate each tire until it seats onto the bead correctly – this may take some trial and error 5) Add sealant through each valve stem (following manufacturer’s instructions), then re-inflate each tire
Credit: www.rei.com
Do You Need to Remove Old Sealant before Applying New Tubeless?
If you’re thinking about upgrading your bike to tubeless, or if you’ve had a puncture and need to replace your sealant, you might be wondering if you need to remove the old sealant first. The answer is generally no – most new tubeless sealants are compatible with old sealants, so you can simply top up your tyres with fresh sealant without having to remove the old stuff first.However, there are a few exceptions to this rule.
If you’re using a latex-based sealant (which is less common these days), then it’s best to remove the old sealant before adding fresh latex-based sealant on top. This is because latex-based and non-latex based sealants can react with each other and cause clumping and poor performance.Additionally, if you’re switching from one brand of tubeless sealant to another, it’s always best to start with a clean slate by removing all traces of the old sealant before adding the new one.
This will help avoid any compatibility issues between the two products.
How Do You Get a Tubeless Bike Tire off the Rim?
Assuming you have a tubeless-ready bike and wheelset, and that your tires are already set up tubeless, here’s how to remove a tubeless tire from the rim.First, deflate the tire completely. This is important because it will make removal much easier and prevent the risk of pinching or damaging the tire during removal.
Next, use a bead breaker tool to break the seal between the tire and rim. You can also use a screwdriver or other blunt object, but be careful not to puncture the tire in the process.Once the bead is broken, begin working your way around the circumference of the tire with one hand while pulling on the opposite side of the tire with your other hand.
With enough force, eventually the entire tire will pop off of the rim.If you’re having difficulty removing the Tire, try using a tyre lever or similar tool to help pry it off. Just be careful not to damage either The Tire or The Rim in The Process!
How Do You Remove And Install Tubeless Tires?
If you’re new to the world of mountain biking, you may be wondering how to remove and install tubeless tires. While it may seem daunting at first, it’s actually a pretty simple process. Here’s a step-by-step guide on how to do it:
1. Start by removing the wheel from your bike. You’ll need a tire lever (or two) to help get the tire off the rim.2. Once the wheel is off, deflate the tire completely.
This will make it easier to work with.3. Using your tire levers, pry one side of the tire bead off the rim. Work your way around until the entire bead is loose.
4. Now it’s time to remove the tube (if there is one). Simply pull it out through the valve stem hole. If you’re not planning on using a tube again, you can puncture it and let all the air out.
5 . Once the tube is out, inspect the inside of the tire for any sharp objects that may have caused a puncture. Remove anything that could potentially cause another flat before proceeding.
6 . Now it’s time to add sealant to your tubeless tires . Pour in enough sealant so that it coversthe entire inner circumference ofthe tire when rotated .
Some riders like to use an applicator syringe to make this process cleaner and less messy .
How Do You Change a Tubeless Tire on a Trail?
If you’re out on a trail and get a flat, you may be wondering how to change a tubeless tire. While it’s similar to changing a regular tire, there are a few key differences. Here’s what you need to know about changing a tubeless tire on the trail.
1. First, you’ll need to remove the wheel from the bike. To do this, first loosen the axle nuts or quick release levers. Then, pull the wheel away from the frame.
2. Once the wheel is removed, use a tire lever to pry off the old tire. You may need to use two or three levers to get it off completely. Be careful not to damage the rim while doing this.
3. Now it’s time to install the new tire. Start by putting one side of the new tire onto the rim and then work your way around until it’s fully seated. Use your hands to press down on the tire and make sure it’s properly seated all around before proceeding.
4 . Now it’s time to inflate the new tire using a track pump or CO2 cartridge . If you’re using a cartridge , first attach it to your valve stem and then inflate until firm .
If you’re using a track pump , just pump until firm . Either way , be careful not over-inflate as this could cause damage to your rim . 5 Finally , re-install your wheel onto your bike and tighten down those axle nuts or quick release levers before hitting the trail again !
How To Change a Tubeless Mountain Bike Tyre (Tire)
Conclusion
If you ride a mountain bike with tubeless tires, sooner or later you’re going to have to change them. Here’s a step-by-step guide on how to do it.1. Remove the wheel from the bike and deflate the tire completely.
2. Using a tire lever, pry the bead of the tire away from the rim. You may need to use two levers at once to get enough leverage.3. Once one side of the bead is loose, work your way around the entire circumference of the tire until both sides are loose.
At this point, you should be able to pull the tire off of the rim entirely.4. Inspect the rim for any damage and clean off any old sealant before installing a new tire. To install the new tire, simply reverse the process above: start by seating one bead on the rim, then work your way around until both beads are in place.
Inflate the tire to its recommended pressure and reinstall on the wheel!

When You Rotate Tires
If you have a car, it’s important to know how to rotate your tires. This simple maintenance task can help extend the life of your tires and save you money in the long run. Here’s what you need to know about rotating tires.
When you rotate tires, it helps to even out the wear and tear on all four of them. Over time, your tires will start to show signs of wear and tear differently. The front tires typically take more of a beating than the back ones since they bear more weight and are more likely to hit potholes or other objects in the road.
By rotating them, you can help make sure that all four tires last as long as possible.There are a few different ways that you can go about rotating your tires. One is to simply swap the front two with the back two.
Another common method is to crisscross them so that the left front goes on the right rear and vice versa. You can also check with your car’s manufacturer to see if they have a specific recommendation for how to rotate your particular model’s tires.Whichever way you choose to do it, just be sure to get into the habit of regularly rotating your tires!
It’ll save you money in the long run and help keep your car running smoothly.
What is the Correct Way to Rotate Tires?
There are a few different ways that you can rotate your tires, and the correct way depends on your vehicle. If you have a front-wheel drive car, then you should rotate the tires from front to back. For a rear-wheel drive car, you should rotate them from back to front.
And for an all-wheel drive car, you should do a “figure eight” pattern.To get the most even wear on your tires, it’s best to have them rotated every 5,000 miles or so. This will help to prevent premature wear and tear, and keep your tires lasting longer.
Do You Need to Balance Your Tires Every Time You Rotate Them?
Most people believe that they need to balance their tires every time they rotate them, but this is actually not the case. Tire balancing is only necessary when you first install new tires on your vehicle, or if you notice that your vehicle is vibrating excessively while driving. If you keep up with regular tire rotations, there’s no need to worry about balancing them as well.
What Happens When You Rotate the Tires?
Most people believe that rotating your tires is simply moving them from one position to another. However, there’s more to it than that. Here’s what you need to know about rotating your tires.
Why Rotate Your Tires?There are several good reasons to rotate your tires on a regular basis:1. To even out tire wear: Over time, different areas of your tires will experience different amounts of wear and tear.
For example, the front tires may show more wear than the rear ones because they bear more of the weight of the car (and driver) when braking and turning. By rotating your tires, you can help ensure that all four tires wear evenly, which will help them last longer.2. To improve traction and handling: Uneven tire tread can negatively affect both traction and handling.
If you live in an area with lots of rain or snow, uneven tread can make it harder to drive safely in winter weather conditions. Regular rotation helps prevent this problem by keeping all four tires in good condition.3. To save money: Replacing all four tires at once can be expensive (not to mention inconvenient).
However, if you keep up with regular tire rotations, you’ll only need to replace each tire one at a time as they reach the end of their lifespan – which can save you both money and time in the long run.
How Often Should New Tires Be Rotated?
Tire rotation is important to maintain even tread wear and prolong the life of your tires. Depending on your driving habits and the type of vehicle you drive, tire rotation should be done every 5,000 to 8,000 miles.If you mainly drive in the city, your tires will suffer from more irregular wear due to all the stopping and starting.
This means you’ll likely need to rotate your tires more frequently, about every 5,000 miles. If you do a lot of highway driving, your tires will have more even wear and can go longer between rotations, about every 8,000 miles.Of course, it’s always best to consult your owner’s manual or ask a qualified mechanic for their opinion on how often to rotate your specific set of tires.
Credit: www.myminiannapolis.com
When to Rotate Tires Awd
When to Rotate Tires AwdIt is important to rotate your tires on a regular basis in order to prolong their life and ensure that they wear evenly. However, the frequency with which you need to rotate them depends on the type of vehicle you drive.
Here are some general guidelines for when to rotate tires on an AWD vehicle:Every 5,000-8,000 miles: If you mostly drive your vehicle on paved roads and highways at moderate speeds, you can likely get away with rotating your tires every 5,000-8,000 miles. This will help prevent uneven tread wear and keep your tires looking good for a long time.
Every 3,000-5,000 miles: If you frequently drive off-road or in other rough conditions (such as in deep snow), it is best to rotate your tires more often – about every 3,000-5,000 miles. This will help ensure that all four tires wear evenly and last as long as possible.As needed: In some cases (such as if you only occasionally drive off-road), it may not be necessary to follow a strict tire rotation schedule.
Instead, simply inspect your tires regularly and rotate them as needed – whenever you notice that one or more of them is starting to show signs of excessive wear.
Conclusion
Most carmakers recommend that you rotate your tires every 5,000 to 7,500 miles. Many service stations will do this for free if you buy your tires there. But if you’re the do-it-yourself type, it’s not difficult to do.
Just remember these four things: 1) Check your owner’s manual to see how your particular car should have its tires rotated; 2) Don’t forget the spare tire;
3) Use a jack and jack stands (or a lift) to get the wheels off the ground; and 4) Be sure to torque the lug nuts back to the correct tightness when you’re finished.

When Does Michelin Have Tire Sales
Michelin is a French tire company that is one of the three largest in the world. The company has a long history dating back to 1889 when it was founded by Édouard Michelin and his brother André. Michelin is known for its innovative products and services, including its tires, which are sold in over 170 countries.
The company also operates several theme parks, including the popular Le Puy du Fou in France.
When Does Michelin Have Tire Sales?Michelin is one of the most popular tire brands on the market, known for their high quality and durability. If you’re in the market for new tires, you may be wondering when Michelin has sales.
Here’s what you need to know.Michelin typically runs sales a few times per year, with the biggest sales happening around Memorial Day, Fourth of July, and Labor Day. However, you can often find good deals on Michelin tires at other times throughout the year as well.
it’s always a good idea to keep an eye out for ads and coupons in your local paper or online.If you’re not able to wait for a sale, Michelin offers a number of rebates throughout the year that can help offset the cost of new tires. You can usually find these rebates on their website or through tire retailers that sell Michelin products.
No matter when you buy, choosing Michelin tires is always a wise investment. With proper care and maintenance, they’ll last for many years and provide excellent performance in all types of driving conditions.
When Does Michelin Have Tire Sales near Round Rock, Tx
Michelin is one of the leading tire manufacturers in the world and they offer a wide variety of tires for all types of vehicles. If you’re looking for a Michelin tire sale near Round Rock, TX, there are a few things you need to know. First, Michelin offers several different types of tires including passenger, light truck, and commercial truck tires.
They also offer a wide range of sizes to fit any vehicle. Second, Michelin has a network of authorized dealerships and retailers that sell their tires. You can find a list of these dealerships and retailers on their website.
Finally, Michelin offers rebates and discounts on their tires from time to time. To take advantage of these deals, you’ll need to sign up for their mailing list or follow them on social media. By following these tips, you’ll be sure to find the best deal on Michelin tires near Round Rock, TX!
Credit: daily.slickdeals.net
When Should You Buy Tires on Sale?
The best time to buy tires on sale is typically in the fall or winter. This is because most manufacturers release new models of tires in the spring, so retailers will offer discounts on older models to make room for inventory. However, it’s important to keep an eye on pricing throughout the year, as some retailers may offer clearance sales at other times as well.
Does Costco Have Tire Sales Every Month?
If you’re looking to save on tires, you might be wondering if Costco has tire sales every month. The answer is yes! Costco typically has at least one tire sale per month, and sometimes multiple sales throughout the year.
Keep an eye on your local store’s circulars and online for special deals. You can also sign up for Costco’s email list to get notified about upcoming sales.
How Often Should You Replace Michelin Tires?
Michelin tires are some of the most popular on the market, and for good reason. They offer great traction and durability, making them a good choice for both city and highway driving. But like all tires, they will eventually need to be replaced.
So how often should you replace your Michelin tires?The answer depends on a few factors, including how you drive and how well you maintain your tires. In general though, you can expect to get between 30-50 thousand miles out of a set of Michelin tires.
If you do mostly highway driving, or if you frequently drive in wet or icy conditions, you may need to replace your Michelin tires sooner than that. That’s because these conditions can wear down tires more quickly. Likewise, if you regularly haul heavy loads or tow a trailer, your Michelin tires may not last as long as those used for lighter duty.
To get the most out of your Michelin tires, it’s important to perform regular maintenance on them. This includes checking the air pressure regularly and having them rotated every 5-7 thousand miles or so. By following these simple steps, you can help extend the life of your Michelin tires and ensure that they provide reliable performance mile after mile.
How Much Do Michelin Tires Cost on Average?
Michelin tires are some of the most popular and well-known tire brands on the market. They are known for their durability, performance, and comfort. Michelin tires typically cost more than other tire brands, but they also tend to last longer and provide a smoother ride.
The average price of Michelin tires is $100-$200 per tire. However, prices can vary depending on the specific model and size of tire you choose.
Conclusion
Michelin, one of the world’s leading tire manufacturers, offers periodic sales on tires throughout the year. However, the best time to buy Michelin tires is typically during the company’s Spring Rebate event. This annual promotion features significant savings on a wide variety of Michelin tires, making it an ideal time for consumers to purchase new tires.