- Home
- Blog

How to Fill Up Rv Tires
If you have an RV, you know that one of the most important things to keep up with is the maintenance of your tires. Tires are not cheap, and if they are not properly cared for, they can blow out while you are driving down the road. Here are a few tips on how to fill up RV tires so that you can avoid any costly accidents or repairs.
How To Inflate RV Tires The Easy Way (Hint: Use a Viair 400P-RV )
- Check your RV’s owner’s manual to find the recommended tire pressure for your specific model
- Use a tire gauge to check the pressure of each tire on your RV
- If any of your tires are low on air, use a portable air compressor to fill them up
- Once all of your RV’s tires are inflated to the proper pressure, put the cap back on the air compressor and stow it away
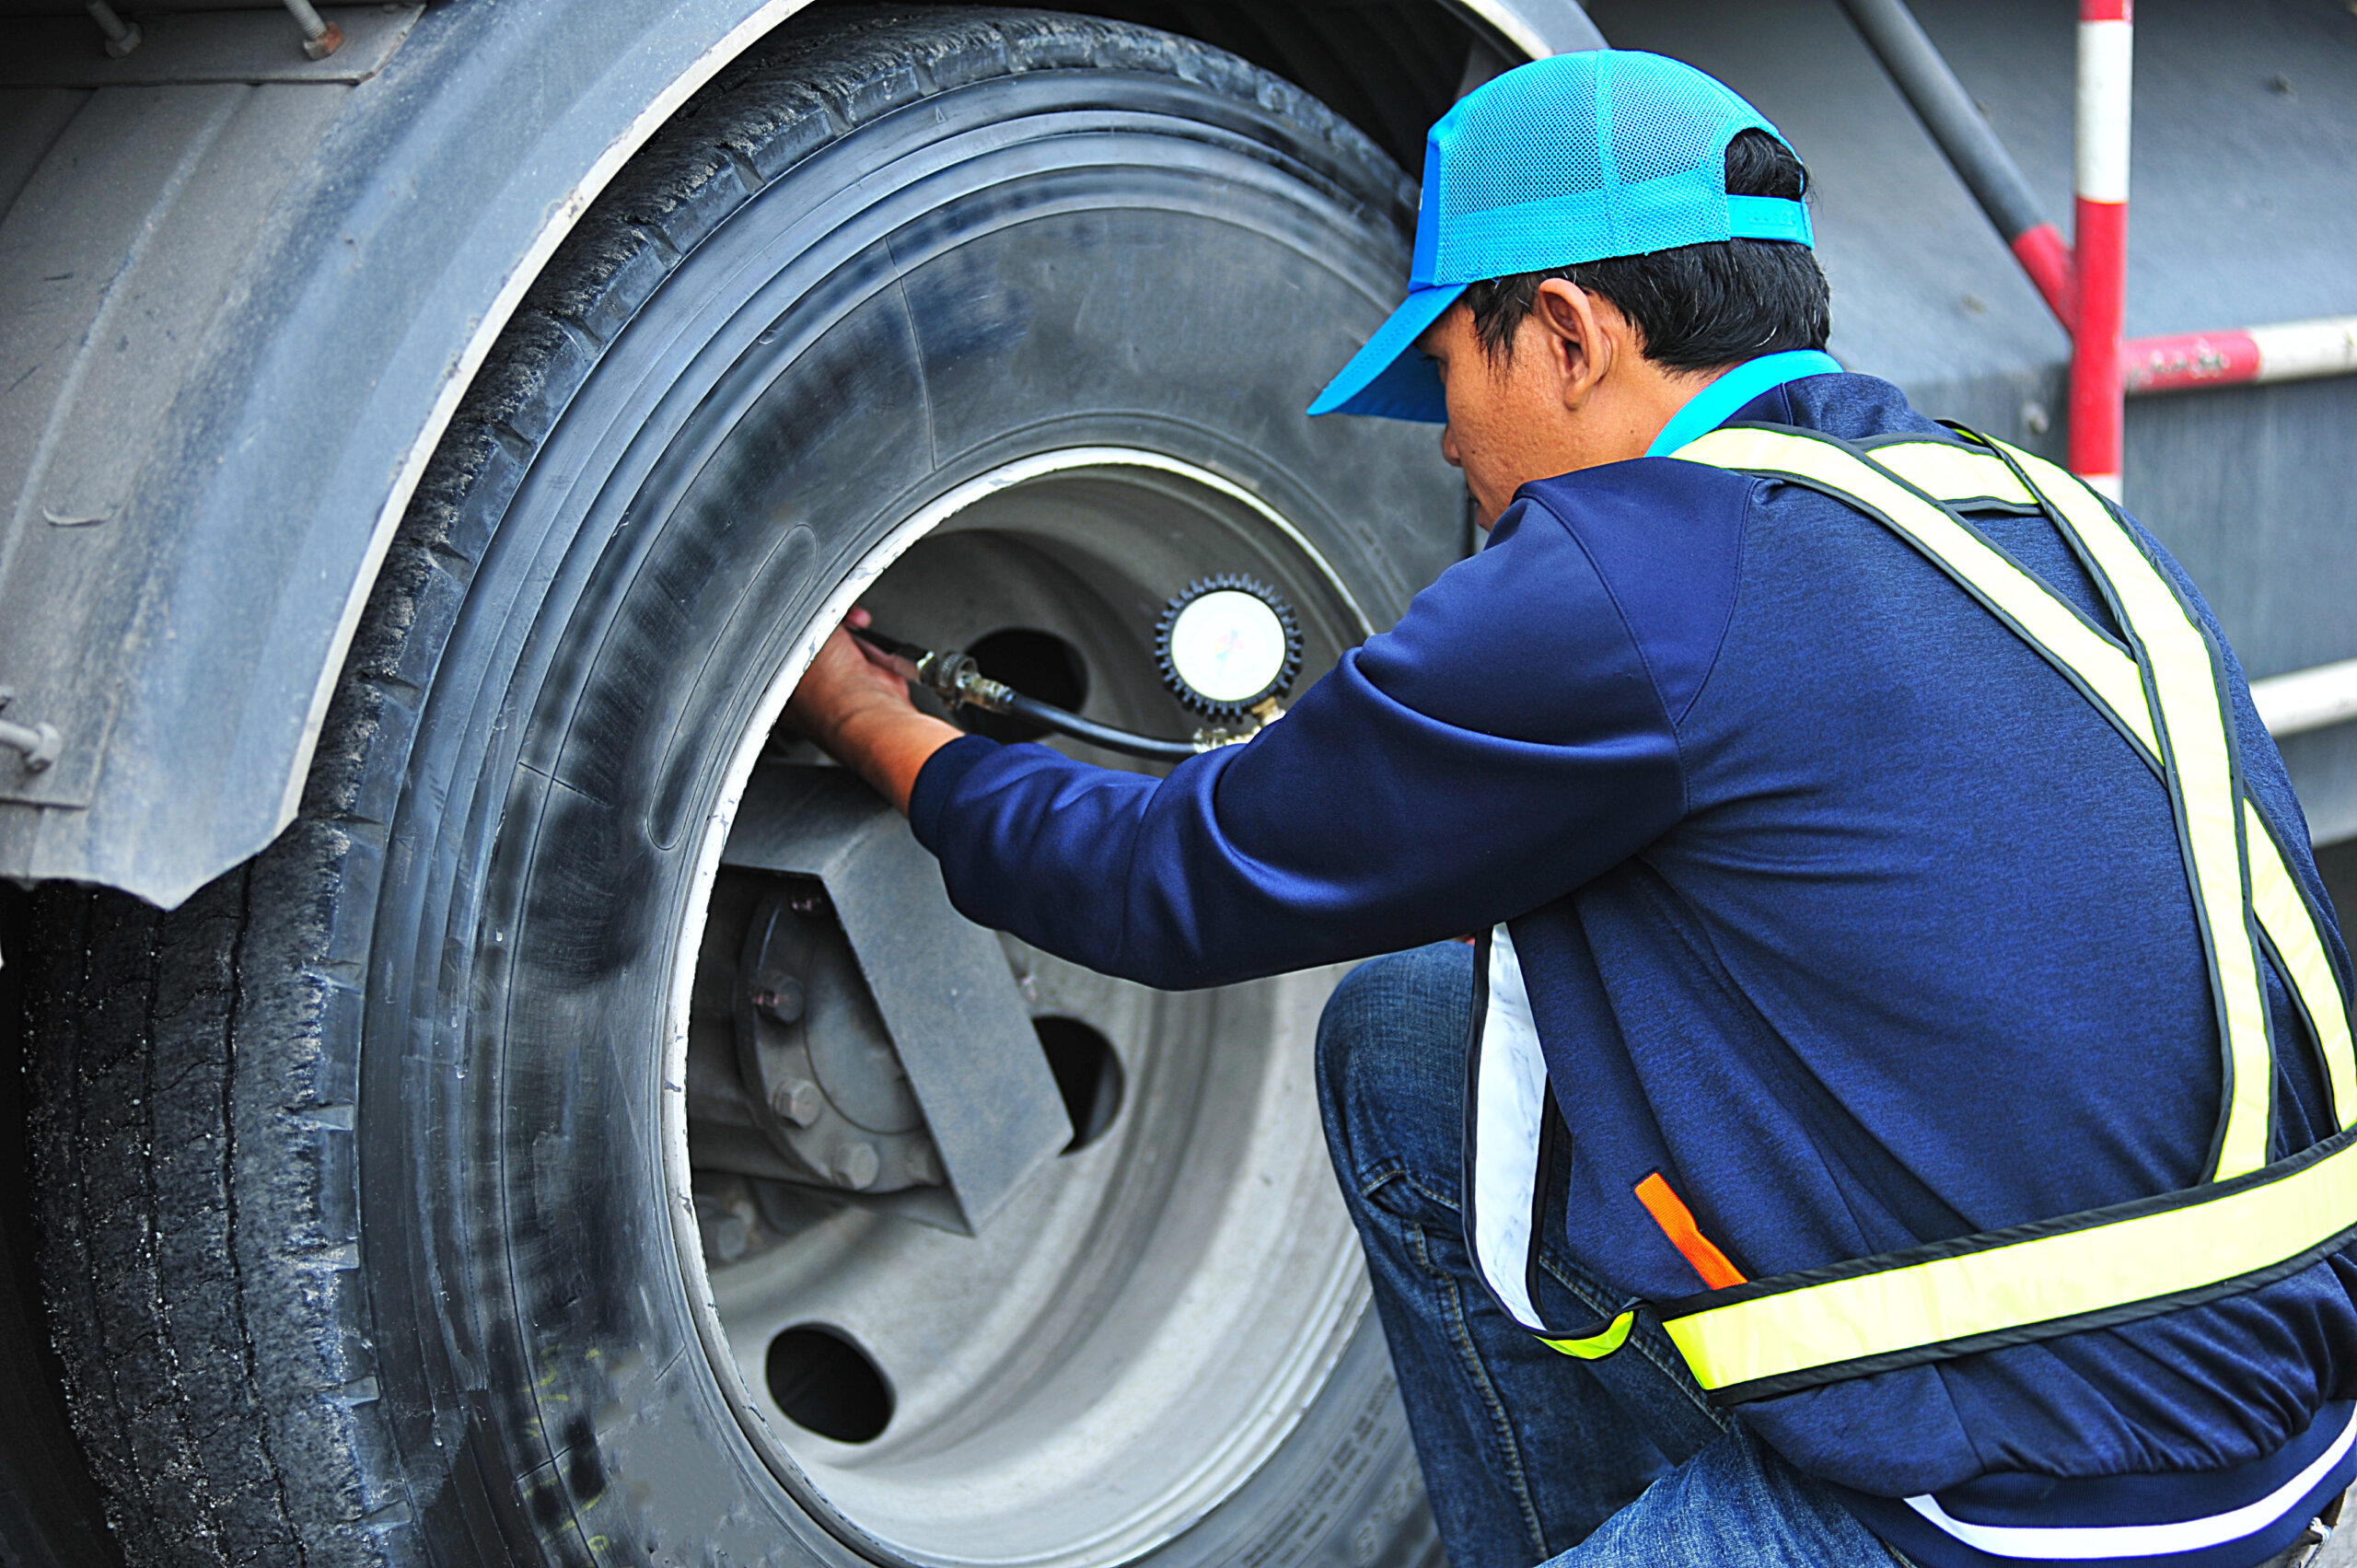
Filling Rv Tires With Air Compressor
RV tires are designed to be inflated to a higher PSI than car tires. This is because they have to support the weight of not only the RV, but also all your belongings inside. The recommended PSI for most RVs is 80-85.
If you don’t have an RV-specific air compressor, you can still fill your tires using a regular air compressor and a tire pressure gauge. Here’s how:1. Park your RV on level ground and set the emergency brake.
Open up the cover to your tire valves (usually located on the side of the RV near the wheels).
2. Using your tire pressure gauge, check what the current PSI is in each tire. Write down or remember these numbers so you know how much air to add later.
3. Connect your air compressor hose to the nearest valve and turn on the power. Slowly add air until you reach the desired PSI for that particular tire (again, this should be around 80-85 for most RVs).
4. Repeat this process for each tire until they’re all filled up properly!
How to Put Air in Dually Tires
If you have dually tires on your vehicle, you know that they require more air than regular tires. But how do you go about putting air in them? Here are a few tips:
1. Find a gas station with an air compressor. Not all gas stations have them, so you may have to call around or do a bit of searching. Once you find one, drive your vehicle over to the air hose and park as close as possible.
2. Remove the valve stems cap from each tire and attach the air hose. Make sure that the hose is firmly attached so that there is no risk of it coming loose while the tire is being inflated.3. Turn on the air compressor and let it fill up each tire until it reaches the desired pressure level.
You may need to check the pressure level periodically to ensure that it doesn’t get too high.4. Once the tires are inflated, remove the air hose and replace the valve stem caps. Drive away and enjoy having properly inflated dually tires!
Class a Motorhome Tire Pressure Chart
If you’re a new RVer, or even if you’ve been RVing for a while, one of the things you need to know is how to check your RV’s tire pressure. The best way to do this is with a tire pressure gauge. You can get one at any auto parts store.
Most RVs have four tires, so it’s important to check all four tires at the same time. Once you’ve checked the pressure in all four tires, write down the numbers so you can remember what they were next time you need to check them.The ideal tire pressure for most RVs is between 80 and 90 PSI (pounds per square inch).
However, it’s always best to consult your RV’s owner’s manual to be sure. Many newer RVs have Tire Pressure Monitoring Systems (TPMS) that will alert you if your tire pressure gets too low.If you find that one or more of your RV’s tires are low on air, simply use an air compressor (available at most gas stations) to add air until the desired PSI is reached.
Don’t forget to recheck the pressure with your gauge after adding air!
Motorhome Tire Pressure Calculator
If you’re like most people, you probably don’t think much about your RV’s tires until there’s a problem. But did you know that maintaining proper tire pressure is one of the best ways to extend the life of your tires and keep your RV running smoothly?Unfortunately, checking and adjusting tire pressure can be a bit of a hassle – especially if you have a large motorhome.
That’s where a tire pressure calculator comes in handy.A tire pressure calculator is a simple tool that takes the guesswork out of checking and adjusting your RV’s tire pressure. All you need to do is enter the specifications of your RV (tire size, axle weight, etc.) and the calculator will tell you what your ideal tire pressure should be.
There are a number of different calculators available online, but we recommend the one from Goodyear Tires. It’s easy to use and it’s free!Once you know what your ideal tire pressure should be, all that’s left to do is check each tire with a digital Tire Pressure Gauge and adjust as needed.
Then just sit back and enjoy the ride!
19.5 Rv Tire Pressure
If you are a RV owner, then you know that having the right tire pressure is important. Not only does it keep your RV safe on the road, but it also helps to improve fuel efficiency. The ideal tire pressure for a RV is 19.5 psi.
This number may vary depending on the weight and size of your RV, so be sure to check your owner’s manual before inflating your tires.To inflate your tires to 19.5 psi, you will need a tire gauge and an air compressor. Start by checking the current pressure in your tires with the tire gauge.
If they are low, attach the air compressor to the valve stem and add air until the desired pressure is reached. Be sure to check all four tires and make adjustments as needed.It’s important to regularly check your RV’s tire pressure, as even a small change can impact how well your vehicle handles on the road.
By keeping an eye on this simple maintenance task, you can help ensure a smooth ride for both you and your passengers!
Credit: www.doityourselfrv.com
How Much Air Should I Put in My Rv Tires?
It is important to have the correct amount of air in your RV tires. Too little air and the tire could overheat and fail. Too much air and the ride will be rough, wear on the tires will be increased, and fuel economy will suffer.
The best way to ensure you have the correct amount of air in your RV tires is to check them regularly with a gauge.The recommended tire pressure for most RVs is 80 psi for the front tires and 95 psi for the rear tires when they are cold. This means that you should check your tire pressure when they haven’t been driven on for at least three hours or more.
If you don’t have a reliable tire pressure gauge, you can usually find one at a gas station or auto parts store.To check your RV tire pressure, first remove the valve cap from each tire. Place the end of the gauge onto the valve stem, making sure there is a good seal so no air escapes.
Push down on the gauge until you hear a click. The reading on the gauge will show you how much air is currently in your RV tire. If it’s below 80 psi (front) or 95 psi (rear), add enough air until it reaches those levels.
Replace each valve cap after checking all four tires’ pressures.
Should Rv Trailer Tires Be Filled to Max Psi?
It is generally recommended that RV trailer tires be filled to the maximum pressure listed on the tire’s sidewall. This ensures that the tire can carry the maximum weight rating and provides the best possible handling and stability. Overinflating tires can lead to a rough ride, so it is important to find the right balance between comfort and performance.
How Do You Inflate a Dual Rv Tire?
If you have a dual tire RV, you will need to inflate both tires at the same time. Here is how you do it:1. Park your RV on level ground and set the emergency brake.
2. Locate the inflation valves for both tires. These are usually located near the center of the wheel.3. Using an air compressor or hand pump, connect one end to the valve of the first tire and begin inflating.
4. Monitor the pressure gauge on the air compressor or hand pump to ensure that both tires are inflated to the same pressure. This is important because if one tire is inflated more than the other, it could cause problems while driving.5. Once both tires are inflated to the proper pressure, disconnect the air compressor or hand pump and replace the caps on both valves.
How Do I Put Air in My Tire With an Air Compressor?
Assuming you have a standard air compressor:Attach the air hose to the tire valve. If your compressor has a gauge, check to see what PSI (pounds per square inch) rating it has.
Most car tires require between 32 and 35 PSI.
Open the valve on the tire until you hear hissing. This means that air is flowing from the compressor into the tire.
When the desired amount of air has been reached, close off the valve on the tire by twisting it to the right. You may need to use pliers for this. Detach the hose from the tire valve and store it properly until next time.
Conclusion
If you own an RV, you know that keeping your tires in good shape is important. Not only do they have to be inflated to the correct pressure, but they also need to be free of any nails or other objects that could puncture them. Fortunately, there are a few easy ways to keep your RV tires in top condition.
One way to fill up RV tires is with a air compressor. You can find these at most gas stations or auto parts stores. Simply attach the hose from the compressor to the tire valve and turn it on.
The machine will do the rest, filling up your tire with air until it reaches the proper pressure.Another option for filling up RV tires is with a hand pump. These are small pumps that you can carry with you and use whenever you need to add air to your tires.
They’re not as fast as an air compressor, but they’re still very effective and can save you a lot of time if you have multiple tires that need attention.Once your RV tires are filled up, it’s important to check the pressure regularly. Tires can lose air over time, so it’s best to check them at least once a month.
Use a tire gauge to see what the current pressure is and inflate or deflate accordingly. It’s also a good idea to keep an eye on the tread depth of your tires; if it starts getting low, it’s time for new ones!

How to Make Airless Tires
In order to make airless tires, you will need the following materials: a tire, a mold, and a material that can be used to create a seal. The first step is to remove the existing tire from the wheel. Next, you will need to create a mold of the desired shape and size.
Once the mold is created, you can then begin to add the sealant material around the edge of the tire. Make sure that all areas are covered evenly before allowing the sealant to dry.
- Remove the inner tube from the tire
- You can do this by first deflating the tire, then using a tire lever to pry off one side of the bead
- Once one side is off, work your way around the rest of the tire until it is completely removed
- Inspect the inside of the tire for any debris or objects that may be causing a puncture
- If anything is found, remove it and dispose of it properly
- Pour about 2 ounces of sealant into the hole where the inner tube was located
- You can also use a patch kit to patch up any holes in the tire before sealing it airtight
- Inflate the tire with an air compressor until it reaches its maximum psi rating
- Do not overinflate, as this could cause damage to the tires or wheels
- Replace the wheel on your vehicle and enjoy your new airless tires!
I Made DIY Airless Tires
What are Airless Tires Made Of?
Airless tires are made of a flexible, strong material called polyurethane. This material is used in many different applications and has a variety of benefits. It is durable, long lasting, and has a high resistance to punctures.
Polyurethane is also eco-friendly and recyclable.
Are Airless Tires Possible?
It’s a question that has been asked for years – are airless tires possible? The answer is yes, but they’re not quite ready for prime time yet.Airless tires have been around for decades, and the technology has been steadily improving.
The latest generation of airless tires is made from a special composite material that can support the weight of a vehicle without needing to be inflated with air.The big advantage of airless tires is that they can’t go flat. That means no more punctured tires, and no more worrying about getting a flat while you’re out on the road.
It also means that you’ll never have to worry about checking your tire pressure or topping up your tires with air.The downside of airless tires is that they’re not as efficient as traditional pneumatic (air-filled) tires. That’s because the composite material isn’t as flexible as rubber, so it doesn’t absorb shock as well and it doesn’t grip the road as well in wet or icy conditions.
So far, airless tires have only been used on very small vehicles like golf carts and lawnmowers. But there are some companies working on commercializing the technology for passenger cars. Michelin has developed a prototype airless tire called the Tweel (a portmanteau of “tire” and “wheel”), which it plans to test on passenger vehicles within the next few years.
Bridgestone has also announced plans to launch an airless tire by 2025.It’s still early days for airless tires, but they hold a lot of promise for making our roads safer and our journeys more hassle-free.
Why Don’T We Have Airless Tires Yet?
It’s a question that’s been asked for years – why don’t we have airless tires yet? The answer, it turns out, is both complicated and fascinating.The first thing to understand is that airless tires are not a new invention.
In fact, they were first patented way back in the 19th century. So why haven’t they taken over the market?There are a few reasons.
First of all, airless tires have some serious drawbacks. They’re much heavier than traditional tires, which means they can negatively impact fuel economy. They also don’t absorb shocks as well as traditional tires, so they can make for a rougher ride.
But perhaps the biggest reason airless tires haven’t taken off is because traditional tire technology has gotten so good. Tires today are lighter and more efficient than ever before, thanks in large part to advances in materials science. And while airless tires may someday be the norm, for now they remain an interesting curiosity – albeit one with some very real potential benefits.
How Fast Can You Drive With Airless Tires?
There is no definitive answer to this question as it depends on a number of factors, such as the type of airless tire, the surface you are driving on and your own driving style. However, we can give you some general guidelines.Airless tires are made from solid rubber or composite materials and do not rely on air pressure to support the weight of the vehicle.
This means that they can be driven at high speeds without fear of punctures or blowouts.However, airless tires are not without their drawbacks. They are usually heavier than traditional pneumatic tires, which can impact handling and fuel economy.
Additionally, they may not provide as much grip on slippery surfaces and can wear down more quickly on rough roads.If you’re considering switching to airless tires, it’s important to do your research and choose a product that will best suit your needs. But once you have, you’ll be able to enjoy worry-free driving at high speeds!

Credit: www.youtube.com
Airless Tyres Disadvantages
Airless tyres are a type of tyre that doesn’t require air to remain inflated. They’re also known as solid tyres. Although they have some advantages, there are also several disadvantages associated with airless tyres.
One of the biggest disadvantages is that airless tyres can’t be used on all types of vehicles. For example, they can’t be used on bicycles or motorcycles because the lack of air makes them too unstable. Additionally, airless tyres can’t be used on cars or trucks that exceed a certain weight limit.
This is because the weight of the vehicle would cause the tyre to break down and collapse.Another disadvantage of airless tyres is that they don’t provide as much cushioning as traditional tyres do. This means that they don’t absorb shock as well, which could lead to a rougher ride for passengers.
Additionally, it’s important to note that airless tyres wear down much faster than regular tyres. So, if you’re planning on using them on your car or truck, you’ll need to replace them more often than you would regular tyres.Overall, there are both advantages and disadvantages associated with airless tyres.
Conclusion
If you’re looking for a way to make your tires last longer, consider airless tires. Airless tires are made without any inner tubes or outer casing, so there’s no risk of punctures or flats. They’re also more resistant to wear and tear, so they’ll last longer overall.
To make airless tires, start by creating a mold for the tire using a 3D printer or CNC machine. Then, use a vacuum pump to remove any air from the mold before pouring in liquid rubber. Once the rubber has cured, remove the tire from the mold and inflate it with nitrogen gas.
Finally, install the tire on your vehicle and enjoy flat-free driving!
How to Fix Tire Stem
A tire stem is a valve on the outside of the tire that allows air to enter or exit. If your tire stem is leaking, you will need to replace it. You can purchase a new stem at most auto parts stores.
To install the new stem, you will need to remove the old one first. Use a wrench to loosen the nut that holds the stem in place. Once the nut is loose, pull the stem out and insert the new one.
Tighten the nut to secure it in place.
- Examine the tire to see if there is any visible damage to the stem
- If the stem is bent or broken, it will need to be replaced
- Use a tire gauge to check the air pressure in the tire
- If the pressure is low, inflate the tire to the recommended level
- Remove the cap from the valve stem and use a valve stem tool to unscrew the core from the stem
- Inspect the core for any damage and replace it if necessary
- Screw the new or repaired core back into place and screw on the cap securely
Credit: www.youtube.com
Can a Tire Valve Stem Be Fixed?
If you have a leaking tire valve stem, you may be able to fix it yourself. The first thing you need to do is identify the problem. There are two types of leaks: those that occur when the tire is inflated and those that occur when the tire is deflated.
If your leak occurs when the tire is inflated, it’s likely due to a faulty valve stem. You can try replacing the valve stem with a new one. If your leak occurs when the tire is deflated, it’s likely due to a hole in the tire itself.
In this case, you’ll need to patch or replace the tire.Once you’ve identified the problem, you can take steps to fix it. If you have a leaky valve stem, start by removing the cap from the valve stem and then unscrewing the core from the stem.
Inspect the core for damage and replace it if necessary. Next, clean any dirt or debris from around the valve seat and reinstall the core in the stem. Be sure to screw it in tightly so that it makes a good seal.
How Much Does It Cost to Replace a Stem on a Tire?
It costs about $20 to replace a stem on a tire. The process is fairly simple and does not require any special tools. You will need a new stem, which you can purchase at most auto parts stores.
Once you have the new stem, simply remove the old one and screw in the new one. Make sure it is tight so that air does not leak out.
How Do You Fix a Broken Stem on a Tire?
One of the most common bicycle repairs is fixing a broken stem on a tire. If you have ever had a flat tire, you know how frustrating it can be. Luckily, there are some easy steps you can follow to fix a broken stem on a tire.
First, you will need to remove the wheel from the bicycle. Once the wheel is removed, take a close look at the stem. If the stem is bent or damaged, it will need to be replaced.
If the stem is not damaged, you can try to straighten it with a pair of pliers.Next, use a wrench to loosen the nut that holds the tube in place. Be careful not to over-tighten or strip the nut.
Gently pull out the old tube and discard it.Now it’s time to insert the new tube into the tire. Make sure that the valve is facing up so that air can easily enter into it when you start pumping.
Slowly begin to inflate the new tube until it reaches its proper pressure level for your tires (this information should be listed on your tires). You may want to use a bike pump specifically designed for Presta valves since they can be tricky to inflate by mouth alone.
Reattach your wheel and enjoy having a fully inflated tire again!
Can You Replace Stem on Tire?
If you’re a regular driver, it’s important to know how to change a tire. And while most people know how to do this, many don’t know that you can actually replace the stem on a tire. The stem is the valve that allows air to flow into and out of the tire.
Over time, these stems can become damaged or even broken. Fortunately, they’re relatively easy and inexpensive to replace.The first thing you’ll need to do is purchase a new stem from your local auto parts store or online retailer.
Once you have the new stem, remove the old one by unscrewing it from the tire. Next, take your new stem and screw it into place. Be sure to hand-tighten it so that it’s snug but not too tight.
Finally, inflate your tire using an air compressor or pump until it reaches the proper pressure (you can find this information on the sidewall of your tire).That’s all there is to it! By following these simple steps, you can easily replace the stem on your tire in no time flat.
How to Replace a Tire Valve Stem Yourself at Home with Simple Tools
Temporary Fix for Leaking Valve Stem
If you have a valve stem that is leaking, there is a quick and easy fix that you can do yourself. All you need is some Teflon tape and a few minutes of your time.Start by turning off the water to the valve.
Then, remove the cap from the valve stem and wrap the Teflon tape around the threads. Be sure to wrap it in the direction that will allow it to tighten when you screw it back on.Once you have wrapped the threads, put the cap back on and turn on the water.
The leak should be gone! If not, simply repeat these steps until it is fixed.
Broken Tire Valve Stem
If you’ve ever had a flat tire, you know the frustration of dealing with a broken tire valve stem. A broken valve stem can cause a slow leak in your tire, which can be difficult to detect. In some cases, a broken valve stem can also cause your tire to lose air quickly, resulting in a flat tire.
There are several reasons why your valve stem might break. The most common reason is simply due to wear and tear. Over time, the rubber gasket that seals the connection between the valve stem and the wheel rim wears out.
This can allow air to slowly escape from your tire, eventually leading to a flat.Another common cause of broken valve stems is impact damage. If you hit a pothole or curb hard enough, it can damage the valve stem and cause it to break.
This type of damage is usually easy to spot, as there will likely be other damage to the wheel as well.If you suspect that you have a damaged or broken valve stem, it’s important to have it fixed as soon as possible. A leaking tire can lead to decreased fuel economy and potentially dangerous driving conditions.
If your tire loses air quickly, it could result in an accident. To avoid these risks, bring your car into a trusted mechanic or Tire Shop and have them check your tires for any damage.
How to Tighten a Tire Valve Stem Without Tool
If you have a slow leak in one of your tires, it may be because the valve stem is loose. You can usually tell if the valve stem is loose if the tire pressure drops slowly over time. If you notice this happening, you’ll need to tighten the valve stem.
Fortunately, this is a relatively easy task that doesn’t require any special tools. All you need is a small wrench or pliers. Just follow these simple steps:
1. Remove the cap from the valve stem. This will expose the inner workings of the valve.
2. Use your wrench or pliers to tighten the large nut in the center of the valve.
Turn it clockwise until it’s tight.
Tyre Valve Stem Replacement
If you have a slow leak in your tire, it might be time to replace the valve stem. A faulty valve stem can cause air to leak out of the tire, which leads to a flat tire.The valve stem is located at the end of the valve and is responsible for letting air in and out of the tire.
Over time, the valve stem can become worn down and no longer seal properly. This causes air to slowly escape from the tire, leading to a flat tire.Replacing a valve stem is a relatively simple process that anyone can do at home with just a few tools.
You’ll need a new valve stem, an adjustable wrench, and some pliers. Start by removing the old valve stem from the wheel using an adjustable wrench. Then, use pliers to remove any debris from the hole where the old valve stem was located.
Next, insert the new valve stem into the hole and tighten it with an adjustable wrench until it’s snug. Finally, inflate your tire to its proper pressure using an air compressor or hand pump. That’s all there is to it!
Conclusion
If you have a leaking tire, it may be because your tire stem is damaged. You can usually tell if your stem is damaged if there is air coming out of the valve when you press on it. If this is the case, you’ll need to replace the stem.
Motorcycle Metal Valve Stems
There are a few things to consider when selecting the right motorcycle metal valve stems for your bike. The first is the size of the stem. There are three different sizes: small, medium, and large.
The second thing to consider is the type of threading. There are two types: standard and reverse. The third thing to consider is the length of the stem.
There are four lengths: short,medium, long, and extra long.
If you’re a motorcycle rider, then you know that valve stems are an important part of keeping your bike in good working order. But what are they made of?Valve stems are typically made from metal, and there are several different types that can be used.
The most common type is the stainless steel valve stem, which is resistant to corrosion and can withstand high temperatures. Other options include titanium and aluminum valves, which are both lightweight and strong.No matter what type of valve stem you choose, make sure it’s compatible with your bike’s tires.
That way, you can keep your ride running smoothly for years to come.
When to use a rubber… valve stem! | Metal vs. Rubber Valve Stems
Motorcycle Tubeless Valve Stem
If you own a motorcycle, then you know how important it is to have good tires. Not only do they provide traction and stability while riding, but they also help protect your investment by keeping the road surface from damaging your rims. But did you know that there’s more than one type of tire valve stem?
In fact, there are two main types: tubeless and tube-type.Tubeless valves are the most common type found on motorcycles today. They’re easy to install and don’t require a tube, which makes them lighter weight and more puncture resistant.
The downside is that they can be difficult to repair if damaged.Tube-type valves are less common but offer some advantages over tubeless valves. They’re easier to repair if damaged and can be used with tubes, which makes them ideal for riders who want the option of using either tubeless or tube-type tires.
The downside is that they’re heavier and require more maintenance than tubeless valves.
Motorcycle 90 Degree Valve Stem
Assuming you would like a blog post about how to change a motorcycle’s 90-degree valve stem:Many newer model motorcycles have what is called a 90-degree valve stem. This means that the hole in the rim for the valve stem is perpendicular to the ground instead of parallel.
The advantage of this design is that it makes it more difficult for debris and road grime to enter and clog up the valve stem. However, when it comes time to change or repair a tire, this design can make accessing the valve stem more difficult.If you find yourself in this situation, don’t worry!
Changing a 90-degree valve stem is not as hard as it may seem at first. Here are some easy steps to follow:
1) Use a socket wrench to loosen the nut that secures the valve stem in place.
You may need to use an extension if your socket wrench isn’t long enough.
2) Once the nut is loose, pull out on the valve stem until it pops out of its hole in the rim. Be careful not to lose the washer that sits between the nut and rim!
3) To install a new valve stem (or re-install your old one), simply line everything back up and push it into place until you hear/feel a click. Again, be sure not to lose that washer!
4) Finally, use your socket wrench (with extension, if necessary) to tighten down on that nut until secure.
You’re all done!
Motorcycle Tire Valve Stem
If you own a motorcycle, it’s important to know about the valve stem. This is a small metal tube that protrudes from the wheel and is used to inflate and deflate the tire. The valve stem is located at the point where the tire meets the rim of the wheel.
The valve stem serves two purposes: it allows air to enter or exit the tire, and it acts as a valve to prevent too much air from entering or escaping. When you want to add air to your tire, you simply unscrew the cap on the valve stem and use an air pump to fill up the tire. To let air out of the tire, you press down on the little pin in the center of the valve stem.
It’s important not to lose track of your motorcycle’s valve stems caps, as they play an important role in keeping dirt and water out of your tires. If you’re ever in doubt about how much air should be in your tires, consult your owner’s manual or take your bike to a professional mechanic for help.
Motorcycle Valve Stem Leaking
A motorcycle valve stem leaking is not a good thing. It can cause your engine to run hotter and produce less power. It can also lead to pre-ignition, which can damage your engine.
If you think your valve stem may be leaking, take it to a mechanic and have them check it out.

Credit: www.denniskirk.com
Are Metal Or Rubber Valve Stems Better?
Valve stems are an important part of a car’s tire and wheel assembly. They provide the airtight seal that is necessary to keep air in the tires and allow for proper inflation. Valve stems also help to protect the inner workings of the tire from dirt, debris and moisture.
There are two types of valve stems: metal and rubber. Metal valve stems are generally considered to be the better option because they create a tighter seal and are less likely to leak. Rubber valve stems are less expensive, but they are more prone to leaks and can degrade over time.
What Size are Motorcycle Valve Stems?
Valve stems on motorcycles come in a variety of sizes, depending on the make and model of the bike. The most common size is 3/8 inches, but some bikes may have valve stems that are 1/2 inch or even 5/8 inch in diameter. It’s important to check your owner’s manual to find out what size valve stems your motorcycle has so you can purchase the proper size tires for your bike.
How Long Do Metal Valve Stems Last?
Valve stems are one of the most important components in a vehicle’s tire and wheel assembly. They provide the airtight seal that prevents air from escaping the tire, and they also act as the connection point between the tire and the wheel. Valve stems are made from metal, and they can last for years if they are properly maintained.
However, over time, valve stems can become worn or damaged, which can cause them to leak air or break completely. If you notice any leaking or damage to your valve stems, it’s important to have them replaced as soon as possible.
How Do You Stop a Metal Valve Stem from Leaking?
If your metal valve stem is leaking, there are a few things you can do to try and stop the leak. First, make sure that the valve stem is properly inflated. If the valve stem is not properly inflated, it will likely continue to leak.
Second, check the seals on the valve stem. If the seals are worn or damaged, they may need to be replaced. Finally, if all else fails, you can try tightening the valve stem.
Sometimes, a loose valve stem can cause leaks. If you tighten the valve stem too much, however, you may damage it so be careful.
Conclusion
If you’re looking for a quick and easy way to add some personality to your motorcycle, look no further than your valve stems! Whether you want to go for a more understated look or really make a statement, there are plenty of options out there when it comes to metal valve stems. In this blog post, we’ll take a look at some of the different styles and designs that are available so that you can find the perfect set for your bike.
Male Onlyfans Creator Try Online Only Fans Sites!
Top 20 Very best OnlyFans Young girls in 2023 To Follow Along With

OnlyFans is really a busy, digital ecosystem all by itself, with new credit accounts popping up right and left – greater than 50 thousand in total, no exaggeration.
2023 is ready to find out even more Only Followers articles makers visiting the forefront of our own monitor.
A desire to indulge, you can use our list of the best OnlyFans girls in 2023 to find new babes to subscribe to, even though with no time to thumb through them all.
OnlyFans isn’t exhibiting any symbol of slowing in the near future, with well over 1 zillion articles inventors and checking. The most effective OnlyFans young girls this current year are proof of that.
But consider discovering your chosen product!
It is becoming more and more challenging to sift through many of these credit accounts when every single version out there is advertising their selves to be the greatest there is – whilst the opposing could be accurate.
So, we dug through countless OnlyFans accounts for the best models you can subscribe to.
There’s one thing for everyone – from enjoyable profiles to affordable types and the ones with unequaled, totally free Only Enthusiasts stuff in the best OnlyFans girls this coming year.
Very first Seem – Best OnlyFans Profiles
Abby – Top rated OnlyFans lady total
Sam Slayres – Game addict babe on Only Enthusiasts
Kacy Black colored – Cutest Only Supporters bank account
Haley Brooks – Superstar OnlyFans appearance-equally
Bella Bumzy – Free OnlyFans habit forming video lessons
1. Abby – Greatest OnlyFans Bank account General
Functions:
Abby offers the OnlyFans profile that you really ought to be following. Not only does this cute teen redhead have an infectious personality, but her page is full of the most delicious booty www.onlyfansmodel.net/only-fans-male-models.html shots.
She’s a bit of a saucy minx, though, so don’t be fooled by her innocent looks. Although she actually is a game addict geek, she also understands exactly what you need and will gladly provide to you personally.
You will have to concept her though, each one of her finest content is behind the scenes. Ask her for many custom made information, and be prepared to extensively enjoy yourself.
Together with her standard blogposts, Abby on a regular basis live streams where she’ll connect with you IRL.
Challenge her to a game of Zelda, or ask her to be your virtual girlfriend. She’ll do both, if you are prepared to pay.
Her catalog currently has close to 200 blogposts. Whilst she’s still a newbie, she’s speedily getting likes, that ought to let you know all you need to know. Total, this young lady is just one to watch.
2. Sam Slayres
The first OnlyFans account on our list is a great option because it is incredibly interactive, and it is only going to cost you $3 a month to subscribe to it.
You’re also going to be able to benefit from both photos and videos, if this is the kind of variety and content that you are looking for.
Exceeding 300,000 likes to date, Sam is certainly one of the most fully commited and diligent OnlyFans models available.
She offers a variety of content, and also a higher standard, in order that you are going to get a great deal for your investment.
She also wishes to offer her clients with customized, special content material, and the point that it is merely going to amount to $3 a month, ensures that you’re bound so as to remain satisfied with every day uploads.
The only downside to this OnlyFans account is that you will need to pay a little bit more if you want more exclusive content, but we think that overall, she is one of the best OnlyFans girls.
3. Kacy Black
She is completely open to giving and receiving personalized requests,. That is this next OnlyFans profile is also going to cost you just $3 when it comes to a subscription, and the best part.
She actually is rather preferred, thinking of other OnlyFans accounts on the market, and she supplies the two videos and photos to her subscribers.
She has greater than 1000 photos and videos on her OnlyFans accounts, so you’re definitely getting a good deal out of your membership.
Exceeding 500,000 loves currently, it is reliable advice that there are tons of other folks which can be dedicated to Kacy, and you will discover her around on Instagram and Twitter simultaneously.
4. Haley Brooks
Something that units Haley in addition to other OnlyFans profiles around is the fact she is free so that you can entry.
In order to access her content, and the best part is that she has a wide range of exclusives that you’ll be able to get your hands on, this means that you won’t have to sign up for a subscription.
She is known for her trademark short video tutorials, as well as content that is certainly fashionable. You are definitely in luck if this is the kind of content that you’re looking for.
Naturally, like so many other OnlyFans accounts out there, Haley offers not only free content, but content that you have to pay for, so if you have been enjoying her free content for a while, but wanted to take it up a notch, then you can sign up for more videos and images.
5. Bella Bumzy – Extremely Lovable n Geeky OnlyFans Woman
Best capabilities:
With a unique booty cause and a lot of geeky content material to boot, Bella Bumzy has taken her cues from some of the finest OnlyFans women, and created them her own. She tells us of your character you would find on among the finest VR porn sites but better yet.
Bella regularly uploads new content for her readers, on the top of supplying distinctive clips and customized content material. But why is her be noticeable is her dedication for the craft.
If you’re a fan of geek culture, you’re going to get instantly hooked on one of Bella’s many anime and movie-inspired image video and sets clips. She’s virtually straight down with any costume or situation that you might want her to perform on digital camera, so don’t hesitate to ask for tailor-made demands.
6. Maria Moobs – Favorite Latinx Only Fans Lady
A heaping dose of Latinx curves can get rid of any painful center. At $3 for 1 month, Maria’s “Moobs” and booty are simply the treatment you will need.
Ok, ample cracks, let’s get to the saucy items.
It’s her willingness to satisfy her fans that drives up her popularity, though it’s a given that she’s got bootylicious written all over her. In addition to standard “girlfriend-type” content, she does theme activities, way too.
Find her as a bratty cowgirl or alluring health and fitness center rat. In any case, it’s good.
She even offers you the chance to customize her shooting set up, by choosing the area,outfit and positions, etc. My point is that Maria is as versatile as she is hot. Maria is one hell of the chitchat lover, too, so never say we did not notify you.
7. Molly Sims – Very best OnlyFans Manufacturing Type
She’s able to provide you with hard-hitting sexual content, perfected with a nice storyline and hand-picked outfits, though molly Sims might be petite. This surface of model is a master at edging her members, teasing all of them with quality images and videos every day.
Is that she doesn’t leave you hanging, even though the best part.
She’s prepared to go beyond and above to cater to her viewers’ needs, and she does all of that having a grin. Through the free of charge art gallery to her distinctive videos – you won’t be left flaccid.
Apart from her common give, also you can question her for custom content material by way of DMs. As well as, she gives subscribers the opportunity get exclusive offers from her far more high quality image sets and movies, which you can get by just text messaging her.
8. Lauraleigh
This tiny princess is not so modest in the chest – she’s got a bouncing bosom that has supporters flocking to her page, as well as a divine derriere. A kinky princess with a lust to the taboo, Lauraleigh (or “LL” as she fondly goes by) is really a buxom babe who is ready to meet your fantasies and deepest wants with over 6000 blogposts as well as an providing of personalized needs.
Having a 90Per cent away from selling going on appropriate only and now $3 for four weeks, this sassy, sexy woman is amongst the best petite OnlyFans ladies to follow along with.
9. Bryce Adams
This suit femme fatale is fiercely attractive and really loves the simple stuff in life. She’s a sweet gal by using a extremely suit physique as well as a curvy rear. Bryce’s OnlyFans site is all about sexiness, honesty and realness and enjoyment. She seeks to guarantee most of her followers really like what she gives, and motivates them to get to out and share with her.
Bryce is actually all all-natural, allows custom requests from fans, enjoys corresponding, and contains a lot of steamy workout articles. While she doesn’t have as significantly content material available as several of the other women about this checklist, Bryce has quickly climbed within the OnlyFans acceptance step ladder with 1000s of fans and an incredible number of wants in her articles.
10. Kira Bee
This personal-proclaimed little kitten is British so when petite as may be. She adores having a good time with her fans and it has a library in excess of 3800 content which includes 20 whole-length specific video clips, several “out-of-this-world” toys, and a lot of single videos you never desire to miss. The good thing? It is all unlocked once you join her.
She’s at present operating a 65Percent off transaction, to help you gain access to numerous sugary and small pictures and videos of this kinky kitten Kira for just $5.25. Kira Bee is the page you want to follow if you love small sweethearts with big toys.
FAQs
Am I Able to Look for OnlyFans for Models?
Because of OnlyFan’s conditions and terms, you aren’t going to be able to search OnlyFan’s database for models.
Just know that there are some that are going to be a scam, and they will get you into trouble with OnlyFans, even though there are third party companies out there that have the option of helping you search for models.
If you don’t want to be banned for using OnlyFans, then definitely don’t go with one that you don’t have a good gut feeling about, OnlyFans has a radar for this kind of thing, so.
You also have to look at the filtration systems that they are utilizing to obtain the types inside their search engine results.
What Kind of Information Should I Expect from OnlyFans?
OnlyFans is fairly wide and diverse-varying in terms of the material that they offer subscribers.
OnlyFans started back 2016, and in the day, it had been geared generally toward grown-up focused content material, that is still a big majority of just what it gives in terms of content creators go.
However, over the last couple of years, OnlyFans has been expanding to include everything from influencer and gaming content, to fitness content.
Can One Pay for My OnlyFans Registration with PayPal?
The bad news is that you can’t use your PayPal to pay for your OnlyFans subscription.
This is because currently, OnlyFans doesn’t have an agreement with PayPal, but of course, this could change in the future, depending on the direction that OnlyFans takes.
Can One Take full advantage of A Free Of Charge Registration?
Yes, you’ll be thrilled to understand that there are a lot of OnlyFans profiles around that don’t charge audiences to check out their information initially.
As you can see from our list above, there are plenty of OnlyFans content creators out there that aren’t going to charge initially, though they might charge to look at their more exclusive content.

How Much to Torque Tires
The torque of a car’s tires is important for many reasons. The correct torque ensures that the wheels are properly secured to the axle, and it also helps to keep the vehicle stable while driving. Over or under torquing your tires can lead to serious problems, so it’s important to know how much to torque them.
How Much to Torque TiresTire torque is one of the most important yet underrated aspects of maintaining a vehicle. Many people neglect to properly torque their tires, which can lead to premature wear and tear, as well as decreased fuel efficiency.
There are a few different factors that go into determining how much torque to apply to your tires. The size and weight of your vehicle, as well as the type of tire you’re using, all play a role in how much torque is necessary.Generally speaking, however, most passenger vehicles will require between 60 and 80 ft-lbs of torque on each tire.
This can be accomplished with a simple hand-held wrench or impact gun.If you’re not sure how much torque to apply to your particular vehicle, it’s always best to consult your owner’s manual or ask a professional mechanic. Over-torquing your tires can cause damage, just like under-torquing them can lead to premature wear and tear.
With a little bit of care and attention, however, you can ensure that your tires are properly torqued and ready for the road ahead!
Wheel Nut Torque Nm
Most drivers are familiar with the importance of keeping their car’s tires properly inflated. But did you know that it’s just as important to keep your wheel nuts tightened to the correct torque? Wheel nut torque is measured in Newton-meters (Nm) and specifies how much force is required to turn a nut one full revolution.
While there are many factors that can affect wheel nut torque, such as weather and driving conditions, most manufacturers recommend between 90 and 120 Nm for passenger cars. That said, always check your car’s owner manual or with a dealer before making any adjustments.Under- or over-tightening your wheel nuts can have serious consequences.
If they’re too loose, your wheels could come off while you’re driving! If they’re too tight, on the other hand, you risk stripping the threads or breaking the studs entirely. So it’s important to get it just right.
Here are a few tips for properly torquing your wheel nuts:1. Use a quality torque wrench that’s been calibrated recently. Cheap wrenches may not be accurate, which could lead to problems down the road.
2. Make sure all of your lug nuts are the same size and grade. Using different types could throw off your torque readings.3. Apply lubricant to the threads before tightening (but not so much that it drips).
This will help prevent galling, which can damage threads and make future removal difficult.
Credit: roadsumo.com
How Much Torque Do I Need to Tighten My Wheels?
Most cars these days have torque specifications for their lug nuts printed on a sticker somewhere within easy view of the driver. If you can’t find it, consult your car’s owner’s manual. The number will be expressed in foot-pounds, and will usually be between 60 and 90.
That said, it is generally advisable to use a torque wrench when tightening lug nuts. A torque wrench allows you to apply a specific amount of force to the nut, ensuring that it is tight enough without being overtightened. This is especially important with aluminum wheels, which can be damaged by overtightening.
If you don’t have a torque wrench available, you can still tighten the lug nuts by hand. Start by screwing them on until they’re snug, then give them an extra quarter turn with your socket wrench. This should get you close to the correct level of torque.
Can You Torque a Tire Too Much?
If you’re talking about torqueing a lug nut, it is possible to torque it too much. This can cause the lug nut to become stripped or break, which can lead to the wheel coming off while driving. It’s important to follow the manufacturer’s recommendations for how much torque to apply.
If you’re talking about inflating a tire, there is such a thing as too much air pressure. This can cause the tire to burst. Again, it’s important to follow the manufacturer’s recommendations for how much air pressure to put in your tires.
FAQ – What Are the Proper Torque Specifications for Wheels?
Conclusion
How Much to Torque Tires?It’s simple: use a torque wrench and follow the vehicle manufacturer’s recommended setting. That said, there are a few things to keep in mind when torquing your tires.
First, make sure the lug nuts or bolts are clean and free of debris. This will help ensure that they’re tightened properly. Second, be sure to use a quality torque wrench.
A cheap one may not give an accurate reading, which could lead to under- or over-tightening the lugs. Finally, always check your work once you’ve finished tightening the lugs. Make sure that they’re all tight and that the wheel is sitting squarely on the ground.

How to Find a Very Slow Tire Leak
If you have a very slow tire leak, it can be difficult to find the source of the leak. The best way to find a very slow tire leak is to use a pressure gauge to check the pressure in your tires. If the pressure in your tires is low, then you may have a very slow tire leak.
You can also try using a flashlight to look for any cracks or holes in your tires.
- Check your tires for any visible signs of damage or leaks
- If you see any cracks, punctures, or other damage, this may be the source of your leak
- Inflate your tires to the recommended pressure and then check them again after a few hours to see if they have lost any air
- If they have, this is likely the source of your leak
- Use a tire pressure gauge to check the pressure in your tires on a regular basis
- This will help you identify when they are starting to lose air so you can take action to fix the problem before it gets worse
- If you still can’t find the source of your leak, take your car to a professional mechanic and have them inspect it for you
- They will be able to locate the source of the problem and make repairs as needed
Slow Leak in Your Tire? How to Check Car Tires for Leaks and Punctures
Tire Losing Air No Leak Found
If your tire is losing air but you can’t find a leak, there are a few possible explanations. The first is that the valve stem may be faulty. This is the part of the tire that you screw the air pump nozzle onto in order to add air.
If this is the problem, you’ll need to replace the valve stem.Another possibility is that there’s a small hole in the tire itself. These holes are often caused by nails or other sharp objects penetrating the tire.
You’ll need to take your tire to a professional to have it patched.Finally, it’s also possible that your car’s wheel rim is bent or damaged in some way. This can cause an air leak as well.
Again, you’ll need to take your car to a professional for help with this issue.
Slow Tire Leak Fix
Slow Tire Leak FixA slow tire leak can be a real pain. You may not notice it at first, but eventually it will start to affect your driving.
The good news is that there are some easy ways to fix a slow tire leak.The first thing you need to do is find the source of the leak. This can be tricky, but it’s important to take your time and look carefully.
Once you’ve found the leak, you can patch it up with a tire repair kit or take it to a professional for help.If you have a slow tire leak, don’t put off fixing it. It’s not worth the risk of driving on a flat tire or getting stranded on the side of the road.
With a little effort, you can get your tire back in shape and avoid any major problems down the road.
How Long Does It Take for a Slow Leak to Flatten a Tire
It is estimated that a slow leak can flatten a tire in about two to three days. A slow leak is defined as a gradual loss of air pressure from the tire. This can be caused by a small hole or crack in the tire, or by a faulty valve stem.
Once the tire has lost enough air pressure, it will eventually go flat.
Driving on a Tire With a Slow Leak
If you’ve ever driven on a tire with a slow leak, you know it’s not a fun experience. The constant sound of the air escaping from the tire is enough to drive anyone crazy. Not to mention, it’s also dangerous.
A slow leak in your tire can eventually lead to a flat tire if left unchecked. This can obviously cause some serious problems while you’re driving. If you have to change a flat tire on the side of the road, it’s not only inconvenient, but it can also be dangerous.
So, what causes tires to slowly lose air? There are actually a few different things that can cause this issue. A small nail or screw in your tire is one of the most common culprits.
If you hit something while driving and don’t realize it, the damage may not be immediately apparent. But over time, that small hole will allow more and more air to escape from your tire.Another possible cause of a slow leaking tire is simply old age.
Tires are made of rubber, which naturally breaks down over time. As your tires age, they become less durable and more susceptible to leaks. So if you’ve had your tires for awhile, they may be more likely to develop slow leaks than newer tires would be.
Of course, there are other potential causes of slow leaks as well (including damaged wheel rims and faulty valves), but those are two of the most common ones.

Credit: www.youtube.com
How Do I Find a Slow Air Leak in My Tire?
There are a few ways that you can find a slow air leak in your tire. One way is to use a pressure gauge to check the pressure of your tires regularly. If you notice that the pressure in one of your tires is consistently low, then you may have a slow air leak.
Another way to find a slow air leak is to visually inspect your tires for any cracks or holes. If you see any damage to your tires, it’s possible that there is an underlying issue causing air to slowly leak out. Finally, if you hear a hissing sound coming from one of your tires, this could be another sign of a slow air leak.
If you suspect that you have a slow air leak, it’s important to take your car to a mechanic so they can properly diagnose and repair the issue.
Why is My Tire Losing Air But No Hole?
If you notice that your tire is losing air but there’s no hole, it’s likely due to a faulty valve stem. The valve stem is the part of the tire that sticks out and allows air to go in and out. Over time, the rubber on the valve stem can degrade and cause a slow leak.
Another possibility is that the bead seal, which is the lip that goes around the edge of the rim, is damaged. This can happen if you hit a pothole or curb too hard. The bead seal keeps air from escaping between the tire and rim, so if it’s damaged, air can slowly leak out.
If you’re not sure what’s causing your tire to lose air, take it to a mechanic or tire shop and they’ll be able to diagnose the problem.
What Would Cause a Slow Leak in a Tire?
There are a few things that could cause a slow leak in your tire. If you have a hole in your tire, it’s obvious that air will slowly escape and cause a flat. But sometimes the hole is so small or in such a difficult spot to see that it takes awhile for the problem to become evident.
Another possibility is that the valve stem itself is damaged or loose, which also allows air to seep out gradually.It’s also possible for there to be an issue with the bead of the tire where it meets the rim. If this seal isn’t tight, air can slowly escape there as well.
And finally, if you have a crack in your wheel rim, that too can allow air to seep out slowly over time and result in a flat tire.If you notice that one of your tires is looking low, don’t wait too long to check it out and determine the source of the leak. The sooner you find and fix the problem, the less chance there is of ending up stranded on the side of the road with a completely flat tire!
How Do You Fix a Slow Leak in a Tire?
Slow leaks in tires can be caused by a number of factors, including punctures, poor sealant application, or simply age. Regardless of the cause, there are a few things you can do to fix a slow leak in your tire.First, try to locate the source of the leak.
If you can see where the air is escaping from, that’s a good sign. Once you’ve found the hole, clean it out with a wire brush or similar tool. This will help ensure that your patch or plug will adhere properly.
Next, apply a bead of sealant around the hole. You can use either tire plugs or patches for this step; just make sure whatever you’re using is compatible with your particular tire. If you’re using a patch, press it firmly into place and then inflated the tire to seat the patch.
For plugs, insert them into the hole and then use something like pliers to pull them flush with the surface of the tire. Again, inflate the tire to seat the plug.Once you’ve plugged or patched the hole, check your work carefully to make sure there are no other leaks present.
Then re-inflate your tire to its proper pressure and put it back on your vehicle. With any luck, that slow leak will be gone for good!
Conclusion
If you have a slow tire leak, there are a few things you can do to find it. First, check the air pressure in all of your tires. If one or more of them is low, that could be the leak.
Next, inspect the tires for any signs of damage, such as cracks or punctures. If you see anything that looks like it could be the source of a leak, use a tire plug kit to repair it. Finally, if you still can’t find the leak, take your car to a mechanic and have them take a look.

Diy Valve Stem Replacement – Replacing Valve Stems
If your car’s tires are looking a little low, it might be time for a valve stem replacement. This is a relatively easy DIY project that anyone can do at home with just a few tools. You’ll need to purchase a new valve stem and cap, which you can find at any auto parts store.
Once you have the new valve stem, simply remove the old one and screw in the new one. Then, put the new cap on and you’re all set!
If you have a leaking or damaged valve stem on your car, you can replace it yourself with a few simple tools. You’ll need to remove the tire from the wheel first. Then, use a wrench to loosen the nut that holds the valve stem in place.
Once the nut is loose, pull out the old valve stem and insert the new one. Finally, screw on the nut tightly to secure it in place.

Credit: www.ingeniovirtual.com
Can You Replace Your Own Valve Stem?
If you have a leaking valve stem, you may be able to replace it yourself. You’ll need a few tools, including a valve core tool and a new valve stem.First, use the valve core tool to remove the old valve stem from the tire.
Next, insert the new valve stem into the tire and screw on the cap. Finally, inflate the tire to the proper pressure.If you’re not confident in your ability to replace the valve stem yourself, take it to a professional mechanic or Tire Shop.
Can You Replace a Valve Stem Without Taking the Tire Off?
A valve stem is the part of a tire that protrudes from the rim and allows air to be pumped into or released from the tire. If your valve stem becomes damaged, it can cause a slow leak in your tire. You may be able to replace the valve stem without taking the tire off, but it will be more difficult and you run the risk of damaging the tire. It’s always best to remove the tire from the rim before attempting any repairs.
Can You Replace Just the Valve Stem on a Tire?
If you have a small leak in your tire, it may be possible to just replace the valve stem. This is a very quick and easy fix that anyone can do. You will need to purchase a new valve stem and then use a wire cutter to remove the old one. Be sure to put the new valve stem in the same location as the old one so that the tire maintains its balance.
How Do You Remove a Valve Stem from a Tire Without Tool?
Assuming you don’t have a valve stem tool and need to remove the valve stem from a tire, there are a few ways you can do it. One way is to use a nail or another sharp object to pierce through the rubber seal at the end of the valve stem. Once you’ve pierced through the seal, you can then pull out the valve stem with your fingers.
Another way to remove a valve stem without a tool is to use a pair of needle nose pliers. First, locate the metal cap on the end of the valve stem and unscrew it. Then, use the needle nose pliers to grab onto the base of the valve stem and pull it out.
If neither of these methods work, you may need to take your tire into a professional who has the tools and experience to safely remove the valve stem for you.
How to replace a tire Valve Stem without special tools at home
Valve Stem Replacement Without Removing Tire
If you’re like most people, you probably don’t think much about your car’s tires until there’s a problem. But if you take the time to learn about all of your vehicle’s parts and how they work together, you’ll be a much better driver. That’s why we’re taking some time today to talk about valves stems-specifically, how to replace them without removing the tire.
The valve stem is part of the tire that allows air to enter or exit. It’s located at the very top of the tire and is held in place by a small cap. over time, these valves can become damaged or corroded, which can cause problems with inflation and deflation.
If you notice that your tires are losing air more quickly than usual, it might be time to replace the valve stem. Fortunately, this is a relatively easy repair that can be done without having to remove the tire from the vehicle. You’ll need to purchase a new valve stem and cap from your local auto parts store (make sure to get one that fits your specific make and model).
Then, use a wrench or pliers to remove the old stem by unscrewing it from the top of the tire. Be careful not to damage the rim in the process. Once the old stem is out, simply screw in the new one and hand-tighten it until it’s snug. Put the cap back on and check for any leaks before driving away!
Valve Stem Repair Kit
A valve stem repair kit is a great way to fix a leaking valve stem. If you have a leaking valve stem, it is important to replace the entire valve stem, not just the seals. A valve stem repair kit will come with everything you need to replace the entire valve stem.
How to Remove Valve Stem Without Tool
Assuming you’re talking about a car’s tire valve stem, there are a few ways to remove it without using a tool. The first is to use your fingers or pliers to unscrew the cap from the stem. Once the cap is off, you can use a pen or other object to press down on the valve and release the air from the tire.
If the valve is stuck, you can try using a small screwdriver or nail to pry it out. Finally, if all else fails, you can always take the tire to a mechanic or tire shop and have them remove the valve for you.
Valve Stem Removal Tool
A valve stem removal tool is a small, hand-held tool used to remove the valve stem from a car’s tire. The tool consists of a handle and a small, metal hook that fits over the end of the valve stem. To use the tool, simply insert the hook into the hole at the end of the valve stem and twist it to loosen and remove the stem.
If you need to change a tire on your car, you will need to use a valve stem removal tool to remove the old tire from the wheel. This process is simple and only takes a few minutes. First, locate the hole in the center of the wheel where the valve stem is located.
Next, insert the hook on the removal tool into this hole and twist it counterclockwise until it loosens and comes out. Finally, pull out the old tire from the wheel and replace it with a new one. Be sure to put the new tire on securely before driving!
Conclusion
If your car’s valve stems are worn out, you can replace them yourself with new ones. You’ll need to purchase the right size of valve stem for your car’s tires. Once you have the new valve stems, simply remove the old ones and screw on the new ones. Make sure they’re tight so they don’t come loose while you’re driving.

Tighten Valve Stem Core Without Tool
You know how it is, you’re out on the open road and suddenly realize that one of your tires is looking a bit flat. You pull over to the side of the road and discover that your valve stem core is loose. Luckily, there’s no need to call a tow truck or search for a gas station with an air pump.
With a little resourcefulness, you can tighten that valve stem core without any tools.
Valve stem cores can be a pain to deal with, especially if you don’t have the right tool. But there’s no need to go out and buy a special tool – you can easily tighten a valve stem core without one.Here’s how:
1. Start by unscrewing the cap from the valve stem.2. Use your fingers to grip the core tightly, and turn it clockwise until it is snug against the valve stem.3. Screw the cap back on, and you’re done!
REMOVE schrader “valve core” with pliers (tire valve stem core)
How to Remove Schrader Valve Core Without Tool
Removing a Schrader valve core without a tool may seem like a daunting task, but it is actually quite simple. All you need is a small flathead screwdriver and a pair of needle-nose pliers.First, use the screwdriver to remove the cap from the valve stem.
Next, use the needle-nose pliers to grip the valve core and unscrew it from the stem. Be careful not to lose the tiny washer that sits on top of the valve core!Once the valve core is removed, you can now press down on the pump nozzle to release any air that may be in the tire.
To replace the valve core, simply screw it back into place and replace the cap.
Remove Valve Core Without Tool
Assuming you’re talking about a Schrader valve (the kind with a pin in the center of the cap), it’s actually really easy to remove the valve core without a tool. All you need is a small nail or similar object.Start by unscrewing the cap from the valve.
Then, use your nail or other object to depress the pin in the center of the valve. This will release any air pressure that may be inside the tire.Once the pressure is released, you should be able to easily twist out the valve core using your fingers.
Be careful not to lose track of the small washer that sits on top of the valve core – this helps keep air from leaking out around the edges of the valve.That’s all there is to it!
Homemade Valve Stem Remover
If you have a car, you know that every now and then, you need to add air to your tires. This is done by removing the valve stem cap from the tire valve stem, then attaching a hose from an air compressor to the valve stem in order to add air pressure to the tire. But what happens when that valve stem cap is stuck on there and won’t come off?
You don’t want to just start yanking on it, because you could break something. Instead, try this homemade valve stem remover tool.You’ll need:
-a small screwdriver-a hammer-a nail or other sharp object
First, take your small screwdriver and insert it into the hole in the center of the valve stem cap. Then, use your hammer to tap on the end of the screwdriver until the cap pops off. If it’s still being stubborn, take your nail or other sharp object and insert it into one of the holes in the side of the cap (there are usually 4).
Give it a couple taps with your hammer until hopefully, pop! Thecap comes off.
Valve Stem Tool
Valve stem tools are devices that help to remove and install valve stems on vehicle tires. There are many different types of valve stem tools available on the market, but they all serve the same basic purpose.Valve stem removal can be a difficult task, especially if the valves are corroded or damaged.
A good quality valve stem tool will make this job much easier and allow you to remove the valves without damaging them.When choosing a valve stem tool, it is important to select one that is made from high-quality materials. This will ensure that it lasts for many years and can withstand repeated use.

Credit: godswrench.com
How Do You Tighten a Valve Stem Core?
First, you’ll need to identify the valve stem core on your tire. It’s the small cylindrical piece that protrudes from the center of the valve stem. Once you’ve found it, use a valve core tool to unscrew the old one by turning it counterclockwise.
Be careful not to lose the washer that’s under the valve core!Next, take your new valve stem core and screw it into place clockwise. You may need to use some force to get it started, but be careful not to over-tighten it.
Once it’s in place, replace the washer and screw on the cap. That’s all there is to it!
How Do You Get a Valve Stem Core Out Without Tools?
Assuming you’re talking about a Schrader valve (the type with a spring-loaded pin in the center), the easiest way is to use something pointy to depress the pin, then grab onto the end of the valve stem and pull. If that doesn’t work, you can try using two needle-nose pliers or a set of vice grips to get a better grip on the stem.If you’re talking about a Presta valve (the type with a smooth shaft and no spring-loaded pin), you can try unscrewing the cap at the top of the valve, which will sometimes release any air pressure that’s holding the core in place.
Then, grab onto the end of the valve stem and pull. If that doesn’t work, you can try using two needle-nose pliers or a set of vice grips to get a better grip on the stem.
Can You Tighten Stem Valve Stem?
It is possible to tighten a stem valve stem, but it is not recommended. The reason for this is that the threads on the valve stem are very fine and can be easily damaged. If you do decide to attempt to tighten the valve stem, use a very small amount of force and be careful not to over-tighten it.
It is also important to make sure that the washer under the valve stem nut is in good condition before attempting to tighten the valve stem.
How Tight Should a Valve Stem Core Be?
If you’re wondering how tight your valve stem core should be, the answer may surprise you. It actually doesn’t matter all that much. As long as the core is snug and not loose, it will be fine.
Of course, there are always exceptions to the rule. If you know that your tire is losing air and you can’t figure out why, it’s worth checking to see if the valve stem core is loose. A loose core could be the culprit and tightening it up should solve the problem.
In general though, don’t worry too much about how tight your valve stem core is. As long as it’s not loose, you’ll be just fine.
Conclusion
You can tighten a valve stem core without using a special tool. Just turn the core clockwise with your fingers until it’s snug. If you need to use a wrench, be careful not to overtighten and damage the core.

Tire Valve Stem Price
The price of a tire valve stem can vary depending on the type of material it is made from, as well as the size and style. The most common type of valve stem is made from rubber, and these typically cost between $5 and $10 each. Metal valve stems are also available, but they are generally more expensive, costing between $15 and $20 each.
You may not think about your car’s tire valve stems very often, but they play an important role in keeping your tires inflated. If you’re looking to replace a damaged or leaking valve stem, you may be wondering how much they cost.Tire valve stems typically range in price from $5-$10 each.
However, the exact price will depend on the make and model of your vehicle as well as the type of valve stem you need. For example, some vehicles require special Schrader valves that are more expensive than standard ones.If you’re not sure which type of valve stem you need, it’s best to consult with a professional mechanic or tire specialist.
They’ll be able to help you find the right part for your car and install it properly so that you can get back on the road safely.

Credit: www.ebay.com
Can You Replace Just the Valve Stem on a Tire?
If you have a leaky valve stem on your tire, you may be wondering if you can just replace the valve stem and not the entire tire. The answer is yes, in most cases you can replace just the valve stem.The first thing you’ll want to do is check the sidewall of your tire to see what type of valve stem it has.
There are two types of stems, Schrader and Presta. If your tire has a Schrader valve stem, then it’s a standard type that’s also used on car tires. These stems are relatively easy to find and replace.
Presta valves are typically found on higher-end bikes and their tires. They’re a little more difficult to find replacement parts for, but it’s still possible. Once you know what type of valve stem you have, you can start shopping for a replacement.
When replacing the valve stem, it’s important that you get one that’s an exact match for your tire size. You can usually find this information on the sidewall of your tire as well. Once you have the new valve stem, simply unscrew the old one and screw in the new one hand-tight.
Then use a wrench to tighten it another 1/4 turn or so. That’s all there is to it!
Can I Drive With a Broken Tire Valve Stem?
Most people believe that it is not safe to drive with a broken tire valve stem. However, as long as the tire is properly inflated, there should be no problem driving with a broken valve stem. If the tire is not properly inflated, then the broken valve stem could cause the tire to leak air and eventually go flat.
How to Replace a Tire Valve Stem Yourself at Home with Simple Tools
Tire Valve Stem Replacement Cost
If you’ve ever had a flat tire, you know that it’s not a fun experience. The good news is that changing a tire is relatively easy and doesn’t require any special skills or tools. The bad news is that it can be expensive, especially if you have to replace the valve stem.
The valve stem is the part of the tire that allows air to enter and exit. It’s located at the top of the tire and has a cap that screw on/off. Over time, these stems can become worn or damaged, which can lead to leaks.
If your tire loses air quickly, it’s probably time to replace the valve stem.Valve stem replacement isn’t something you can do at home unless you’re comfortable working with tools and have some experience with car maintenance. If not, it’s best to take your car to a mechanic or tire shop.
They’ll be able to quickly identify the problem and fix it without damaging your tires.The cost of replacing a valve stem will vary depending on where you take your car and what type of tires you have. In general, expect to pay around $20-$50 per tire (or more for high-end tires).
So, if you need to replace all four tires, you’re looking at a bill of $80-$200+. Ouch!While it’s not cheap, replacing your valve stems is much cheaper than buying new tires.
Plus, it’s a fairly quick and easy repair that can be done in an afternoon. So if your tires are losing air faster than usual, don’t ignore the problem – get it fixed as soon as possible!
Tire Stem Replacement
It’s that time of year again. The weather is getting colder and your tires are starting to show their age. If you’re like most people, you probably don’t think much about your tires until they go flat.
But flat tires aren’t the only problem that can arise from neglecting your tire maintenance. Another common issue is a faulty tire stem.If you’ve ever had a flat tire, you know that it’s not a fun experience.
Changing a tire is dirty work and can be dangerous if you don’t know what you’re doing. But changing a tire stem is even worse. Not only is it difficult to do, but it’s also expensive.
A new tire stem can cost anywhere from $20-$100 depending on the type of vehicle you have.So why do stems go bad in the first place? There are several reasons, but the most common one is simply age.
Over time, the rubber seals in the stem deteriorate and allow air to escape. This causes the Tire Pressure Monitoring System (TPMS) light to come on, which is an indication that something needs to be fixed.Another reason for a faulty stem is improper installation .
If a stem isn’t installed correctly, it can cause problems down the road . Finally , incorrect torque values can also lead to issues . If too much or too little force is used when installing the stem , it can cause problems .
If you suspect that your tire stem may be going bad , there are some signs to look for . First , check your TPMS light . If it’s lit up , there’s a good chance that your stem needs to be replaced . Second , take a look at your tires . If they look low on air or are sagging , that’s another sign that your stems might be going bad . Finally , listen for any hissing noises coming from your tires ; this could indicate an issue with the seal around the valve stems .
Tire Valve Stem Core
A tire valve stem core is a small part of your car that helps to inflate and deflate your tires. It is located at the end of the valve stem and screws into place. If you need to change your tire, you will first need to remove the valve stem core in order to let the air out of the tire.
There are two types of valve stem cores: Schrader and Presta. Schrader cores are more common and can be found on most car tires. Presta cores are typically used on bicycles.
To remove a Schrader core, you will need a special tool called a core remover. This tool can be purchased at most auto parts stores. To remove a Presta core, you will need a screwdriver or another type of small tool that can fit into the hole in the center of the core.
Once you have removed the old valve stem core, you can screw in a new one by hand. Be sure not to over-tighten it, as this could damage the threads on the valve stem. Once the new core is in place, you can reinflate your tire and be on your way!
Tire Valve Stem Replacement Cost Walmart
If you’ve ever had a flat tire, you know that it’s not a fun experience. Fortunately, changing a tire is relatively easy and only takes a few minutes. However, if you have a slow leak in your tire, it may be time to replace the valve stem.
The valve stem is the part of the tire that allows air to flow in and out. Over time, it can become worn or damaged, which can cause air to leak out slowly. As a result, your tire may lose pressure and eventually go flat.
Fortunately, replacing a valve stem is relatively inexpensive and only takes a few minutes. Most auto parts stores sell replacement valve stems for less than $10. In addition, many stores (including Walmart) offer installation services for a small fee.
To replace the valve stem yourself, simply remove the old one with a wrench and screw on the new one hand-tight. Then use the wrench to tighten it another quarter turn. That’s it!
Now you can inflate your tire and be on your way.
Conclusion
A tire valve stem is a small metal or rubber part of a wheel that helps regulate the air pressure inside the tire. Over time, these stems can wear down and need to be replaced. Depending on the type of vehicle you have, the price for a new valve stem can range from a few dollars to over $100.