- Home
- Blog

Standard Valve Stem Hole Size
The standard valve stem hole size for a car is 11.5mm. However, there are many different types of valves and each one has its own specific hole size. For example, the hole size for a Schrader valve is 8.5mm.
There are also different sizes for Presta valves, which have a smaller hole size than Schrader valves. If you’re not sure what type of valve your car has, you can always ask a mechanic or look up the information in your owner’s manual.
The standard valve stem hole size for a car tire is 0.453 inches (11.5 millimeters). The hole size for a bike tire is usually smaller, at around 0.35 inches (8-9 millimeters). If you have a tire with a larger hole, you can use an adapter to fit it onto a smaller wheel.
When to use a rubber… valve stem! | Metal vs. Rubber Valve Stems
What Size Drill Bit for .453 Valve Stem
If you’re looking for the best drill bit size for a .453 valve stem, you’ve come to the right place. In this blog post, we’ll provide all the information you need to know about what size drill bit is best for a .453 valve stem.We’ll start by explaining what a valve stem is and why you might need to drill a hole in it.
A valve stem is a small metal rod that protrudes from the side of a tire and is used to inflate or deflate the tire. If your tire has a slow leak, chances are it’s because of a faulty valve stem. To fix this, you’ll need to remove the old valve stem and install a new one.
In order to do this, you’ll first need to drill out the old valve stem. But what size drill bit should you use? The answer depends on the width of the valve stem itself.
For example, if your valve stem is .453 inches wide, then you’ll need to use a 5/16 inch drill bit. Anything larger than that will be too big and anything smaller will be too small.
Standard Valve Stem Size
Standard Valve Stem SizeDo you know what the standard valve stem size is for your vehicle? If not, you’re not alone.
Many people are unaware of this important piece of information.The valve stem is the part of the tire that goes into the wheel to hold air pressure. It’s important to know the right size for your car, because if it’s too small, air can escape and cause a flat tire.
If it’s too big, it can be difficult to get a good seal when inflating your tires.The standard valve stem size for most cars is 8mm. However, there are some exceptions.
For example, BMWs use a 12mm valve stem size. So, be sure to check your owner’s manual or ask a professional before purchasing new tires or wheels for your car.
Tr414 Valve Stem Hole Size
There are a few different types of valves that can be used in pneumatic systems, but the most common is the tr414 valve. This valve has a stem hole size of .414 inches (10.5 mm) and is typically used in applications where air pressure needs to be controlled. The tr414 valve is a simple yet effective design that allows for precise control over air flow.
How to Measure Valve Stem Size
Valve stem size is an important measurement for many reasons. It helps determine the correct valve stem length and diameter for your application, and can also help ensure a proper seal between the valve and the seat. There are a few different ways to measure valve stem size, but the most common method is with calipers.
To measure valve stem size with calipers, first make sure that the jaws of the caliper are clean and free of debris. Next, open the jaws of the caliper so that they are wide enough to fit around the entire circumference of the valve stem. Place the caliper around the valve stem, making sure that it is perpendicular to the surface, then close the jaws until they just touch the sides of the stem.
Finally, take a reading from the scale on the side of the caliper. This will give you your valve stem size measurement in either inches or millimeters.Once you have your measurement, you can use it to select a properly sized valve stem for your needs.
If you’re unsure about what size you need, always err on the side of caution and choose a larger size rather than a smaller one – it’s much easier to shorten a longer valve stem than it is to lengthen a shorter one!

Credit: yardandgardenguru.com
How Do I Know What Size Valve Stem to Get?
If you are unsure about what size valve stem to get, the best way to find out is by measuring the old valve stem. If you can’t measure the old valve stem, then you can use a caliper to measure the diameter of the hole in which the valve sits. Once you have this measurement, you can purchase a replacement valve stem that is either the same size or slightly larger.
It is important that the new valve stem fits snugly in the hole, as a loose fit can cause problems down the line.
Are All Valve Stems the Same Size?
No, all valve stems are not the same size. There are a variety of valve stem sizes depending on the application. For example, a car tire will have a different valve stem size than a bicycle tire.
Some common valve stem sizes include: Schrader (standard), Presta (high-pressure, used on road bikes), and Dunlop (used on some mountain bikes).
What is a Standard Valve Stem?
A valve stem is a small, metal rod that protrudes from the tire and attaches to the valve. The purpose of the valve stem is to allow air to enter or exit the tire. Most valve stems are made of brass or steel and have a cap that screwson/off.
Are Tire Valve Stems the Same Size?
Tire valve stems come in a variety of sizes, depending on the size of the tire. The most common sizes are 8mm and 11mm, but there are also smaller sizes for bicycles and larger sizes for trucks and RVs. The size of the valve stem is stamped on the side of the stem, so it’s easy to tell what size you need.
Conclusion
Valves are an essential part of any car, and the stem hole is one of the most important parts of the valve. The standard valve stem hole size is 11mm, but there are a few different sizes that can be used. 10mm, 12mm, and 13mm valves can all be used in place of the standard 11mm valve.
Each size has its own benefits and drawbacks, so it’s important to choose the right size for your car.

Schrader Valve Definition
A Schrader valve is a type of valve that is typically used on car tires. It is also known as a Presta valve. The Schrader valve consists of a pin that protrudes from the center of the valve and a spring-loaded check valve.
The check valve allows air to flow into the tire but prevents it from escaping.
The Schrader valve is a type of valve that is typically used on car tires. It is also known as a presta valve. This valve has a small metal pin in the center that is used to open and close the valve.
When the pin is pushed in, it allows air to flow into the tire. When the pin is pulled out, it prevents air from flowing into the tire.

Credit: www.aliexpress.com
What is a Schrader Valve Do?
A Schrader valve is a type of valve that is typically used on car tires. It is also known as an American valve. The valve consists of a metal or plastic stem with a cap that covers the opening.
There is a small pin in the center of the valve that allows air to flow into or out of the tire. To inflate a tire, the cap is removed and air is pumped into the tire through the valve. To deflate a tire, the cap is removed and the pin is pressed to release air from the tire.
Where are Schrader Valves?
You can find Schrader valves on many types of tires, including car tires, bike tires, and even some wheelbarrow tires. They’re also used in a variety of other applications, like air compressors and inflatable balls.The Schrader valve is named after its inventor, August Schrader.
He patented the design in 1891, and it’s been in use ever since. The valve consists of a metal or plastic body with a small hole in the center. There’s a pin in the center of the hole that’s held in place by a spring.
When you press down on the pin, it opens the hole and allows air to flow into or out of the tire.So why are Schrader valves so ubiquitous? They’re cheap to manufacture and easy to use.
Plus, they create an airtight seal when closed, which is important for maintaining tire pressure.
What’S the Difference between a Schrader Valve And a Presta Valve?
A Schrader valve is the type of valve you would find on a car tire. It is a small metal pin that protrudes from the rim and is opened and closed with a thumbscrew. A Presta valve is much thinner and has a knurled nut at the top that must be loosened before air can enter the tube.
What is a Schrader Valve Hvac?
A Schrader valve is a type of valve used in many HVAC systems. It is named after its inventor, August Schrader, who patented the design in 1884. The Schrader valve has a small metal pin in the center of the valve that is pushed down to open the valve and release air or other gases.
When the pin is released, the valve closes and seals again.The Schrader valve is most commonly used in car tires, but it can also be found in some air conditioners and refrigerators. It is also sometimes used as a pressure relief valve in home plumbing systems.
Presta vs Schrader Valves: What's The Difference? What's Better?
Schrader Valve Thread
If you’re a cyclist, then you’re probably familiar with Schrader valves. These valves are commonly found on bicycle tires and inflate them using a standard bicycle pump. But did you know that Schrader valves also have a thread?
This thread is actually quite useful if you need to remove the valve from the tire. To do this, simply unscrew the valve from the tire using the Schrader valve thread. This can be helpful if you need to patch a hole in your tire or if you want to clean out the valve itself.
So next time you’re at the bike shop, make sure to ask for a Schrader valve with a thread!
A/C Schrader Valve
If your car has an A/C system, then it likely has a Schrader valve. This valve is responsible for releasing the refrigerant from the A/C system so that it can be serviced or repaired. The Schrader valve is located on the low pressure side of the A/C system and looks like a small black cap.
To release the refrigerant, you’ll need to use a special tool called a Schrader valve core removal tool. This tool can be purchased at most auto parts stores. Once you have the tool, simply insert it into the valve and turn it counterclockwise until it pops out.
Be sure to have a catch pan ready to collect the refrigerant as it will come out under pressure.Once you’ve released all of the refrigerant, you can proceed with servicing or repairing your A/C system. When finished, simply reverse the process by inserting the Schrader valve core removal tool back into the valve and turning it clockwise until tight.
Schrader Valve Nut
If you have a car, you’ve probably seen a Schrader valve before – it’s that big, metal valve on the tire that you use to put air in. The Schrader valve is named after its inventor, August Schrader, and the nut is an essential part of this valve.The Schrader valve nut is responsible for holding the valve stem in place.
Without it, the stem would simply fall out of the tire, making it impossible to add air. The nut also helps to keep dirt and debris out of the valve stem so that it can function properly.The Schrader valve nut is made of metal and has a hexagonal shape so that it can be tightened with a wrench.
Over time, these nuts can become loose and may need to be tightened periodically. If your tire loses air quickly or if you notice that your Schrader valve is leaking air, then it’s likely that the nut is not tight enough.Fortunately, tightening a Schrader valve nut is a relatively easy task that anyone can do at home with just a few tools.
All you need is a wrench (preferably an adjustable one) and some patience. Simply loosen the old nut with your wrench and then remove it completely by hand. Next, thread on the newnut until it’s finger-tight before using your wrench to tighten it further – but be careful not to overdo it!
Finally, test your work by putting some air in your tire and checking for leaks.
Schrader Meaning
The Schrader meaning is derived from two German words: “schrader” and “tracht.” The first word, “schrader,” means “strict” or “severe.” The second word, “tracht,” means “clothing” or “garment.”
When put together, the Schrader meaning refers to a type of severe clothing worn by men in Germany during the Middle Ages. This type of clothing was usually made of wool or linen and was often used as armor during battle.
Conclusion
A Schrader valve is a type of valve that is typically used on car tires. It is also known as an tire valve or an inner tube valve. The Schrader valve was invented by August Schrader in 1891.
Ill for Intercourse | the Metropolitan Dater
Proof of summer maybe discovered both inside and outside my personal apartment, for
it was freaking hot!
My personal bad boyfriend was actually sick with a temperature and head colder,
making him completely under my personal control
. I got no qualms about providing him tepid water and decongestion tablets. We slipped straight into this service membership apron and assisted him completely as best i really could. By day 2,
I started feeling my very own fever surge
, but this is an alternative method of temperature.
Usually,
I love sex,
although last couple of weeks I experiencedn’t thought something of it. I became preoccupied with family members and focused on work, thus every evening We ended up hitting the hay before he even got into bed. We were completely dull, and I also is able to see now that the majority of it was my personal fault. You need to know, do not also live togetherâ¦so typically as soon as the week-end will come, the two of us are ready to, um, you know,
hold arms
for an extremely long-time.
Recently ended up being various, however. My pasty sweetheart ended up being forced to stay-in sleep for hours each time, without resting.
There seemed to be some thing in the air Monday through Fridayâ¦did any of you think it?
The alteration in times is what I at first believed.
I love summertime additionally the warm weather can make me personally want to get of garments.
We woke upwards two nights in a row and stripped off sick-boy’s wet clothing. Their fast arms and quick moves got my personal mind twirling like a ballerina en pointe.
From the third night, dear sweetheart had got an adequate amount of my personal secret violence and switched on me. He grabbed myself and got power over all of our fun time.
I loved every moment (you should not determine, he was unwell, there was no âhour’ to be enjoyed). Every morning we questioned at my behaviorâ¦why was actually we very interested in him today? It did not generate a lot good sense. While the snot rags accumulated alongside the window sill and the sheets became sicklier with excess use, i really couldn’t assist but get excited that we’d quickly be in bed again.
For ladies, at least my self, i need to have the mental comfort to get the required zeal into my sensuous time. Since the son was not feeling really, he wound up sticking with me personally all few days and then he needed me personally. Yes, the guy most likely only didn’t have the
energy
to drive house. But, i favor to consider he thought we would be beside me, that I made him feel a little bit better while he believed sorry for himself. This idea could totally end up being lost on him, but no matter what this possibility, I became feeling protected and delighted, and so I reciprocated in intimate kind.
As Saturday day horny guys near me, their wry phrase confronted me personally. The guy questioned basically’d heard the disturbance the night before. We understood just what he was alluding. We dismissed his awkward remark, kinda blushed, and made no excuses over the past week’s consuming behavior. He’s quite the guy I covertly admit. Tall fever, coughing, achy, but not too ill for sex. This may be my personal brand new favored date high quality, shallow or no.

How to Paint Tractor Tires
There are a few things you need to do in order to paint tractor tires. The first is to clean the surface of the tire. This can be done with a power washer, or by scrubbing the tire with a brush and soapy water.
Next, you need to sand the surface of the tire in order to rough it up and provide a good surface for the paint to adhere to. Once the tire is sanded, you can then apply primer to it. After the primer has dried, you can then start painting the tire with your desired color.
- Choose the right paint for your tractor tires
- You will need a paint that is specifically designed for rubber surfaces
- Clean the tires thoroughly before painting
- Use a soap or degreaser to remove any dirt, grime, or debris from the surface of the tires
- Mask off any areas you do not want painted
- This includes the treads of the tire as well as any exposed metal surfaces
- Apply a primer to the tires if desired
- This will help the paint adhere better and provide a more even finish
- Paint the tires with an airbrush or brush, using even strokes to cover all areas evenly
- If using multiple colors, allow each layer to dry completely before adding additional layers of color

Credit: www.pinterest.com
How Do You Paint a Tractor Wheel?
If you’re looking to add a splash of color to your tractor, painting the wheels is a great way to do it. Here’s how to paint a tractor wheel:1. Start by removing the wheel from the tractor.
This will make painting much easier and will allow you to get a more even coat.2. Clean the wheel thoroughly with soap and water to remove any dirt or grime that could prevent the paint from adhering properly.3. Once the wheel is clean, sand it down with fine-grit sandpaper to create an even surface for painting.
Be sure to wipe away any dust created by sanding before moving on.4. Next, apply a primer specifically designed for use on metal surfaces. This will help the paint adhere better and provide a more uniform appearance once applied.
5. Once the primer is dry, it’s time to start painting! Choose a color that you like and begin applying it evenly across the entire surface of the wheel using a brush or roller designed for use with metal surfaces. multiple thin coats rather than one thick coat for best results.
What Kind of Paint Do You Use to Paint a Tractor?
There are a few different types of paint that can be used to paint a tractor. The type of paint that you use will depend on the type of tractor that you have and the look that you are going for.If you have an older tractor, you may want to use an enamel paint.
This type of paint is very durable and will stand up to a lot of wear and tear. It also has a high gloss finish that will make your tractor look new again.If you have a newer tractor, you may want to use a latex paint.
This type of paint is less durable than enamel, but it is much easier to apply and it dries much faster. It also has a matte finish which can give your tractor a more modern look.No matter what type of paint you use, make sure that you follow the manufacturer’s instructions carefully so that you get the best results possible.
Can I Spray Paint My Tires?
Whether or not you can spray paint your tires depends on the type of paint you use. latex paint will not adhere to the rubber surface of most tires and will simply peel off. However, there are speciality paints made for painting tires that can be found at auto stores.
These paints are more expensive than regular latex paint, but they will give your tires a professional look and won’t peel off.
How Do You Paint Tires With Rims?
It’s easy to paint your tires with rims! Here’s how:1. Choose the right type of paint.
You’ll need a durable, high-quality paint that can withstand the elements. Look for a paint specifically designed for automotive use.2. Clean the surface of your tires and rims.
Make sure they’re free of dirt, grease, and grime before you start painting.3. Apply painters’ tape to any areas you don’t want painted, such as the brake calipers or wheel hubcaps.4. Paint your tires and rims using even strokes.
Start with one coat of paint, then let it dry completely before adding additional coats if necessary.5. Remove the painters’ tape once the paint is dry to reveal your newly painted tires and rims!
Painting Tractor Tires
What Kind of Paint to Use on Tires
If you’re looking to add a touch of personality to your car, painting your tires is a great way to do it! But what kind of paint should you use?There are a few things to consider when choosing paint for your tires.
First, you’ll want to make sure the paint is compatible with the material of your tires. Most tires are made from rubber, so you’ll want to use a paint that adheres well to rubber. Second, you’ll want to choose a paint that can withstand the elements.
Tire paint is subject to a lot of wear and tear, so it needs to be able to hold up against UV rays, moisture, and other environmental factors.The best type of paint for tires is actually latex-based house paint! It’s inexpensive, it adheres well to rubber, and it’s durable enough to withstand the elements.
Plus, it comes in lots of different colors so you can really get creative with your tire painting project!
Conclusion
If your tractor tires are looking a little worse for wear, you can easily give them a new lease on life with a fresh coat of paint. Here’s how to do it:1. Start by cleaning the tires thoroughly with soap and water.
This will help the paint to adhere better.2. Once the tires are dry, apply a primer specifically designed for rubber surfaces.3. Once the primer is dry, start painting the tires with a brush or roller designed for use with latex paint.
For best results, use two coats of paint.4. Allow the paint to fully cure before putting the tractor back into service. This usually takes about 24 hours.
How to Install a Tubeless Tire Valve Stem
A tubeless tire valve stem is a device that allows air to enter and exit a tubeless tire. They are typically made of brass or aluminum and have a rubber gasket that seals the opening. Tubeless tire valves are installed in the rim of the wheel and protrude through the hole in the center of the wheel.
The stem has a cap that covers the opening to keep dirt and debris out. To install a tubeless tire valve stem, you will need a few tools including a drill, an adjustable wrench, and a screwdriver.
- Start by finding the right size valve stem for your tire
- You can do this by checking the sidewall of your tire or consulting a chart that matches up tire sizes with valve stem sizes
- Once you have the right size valve stem, use a sharp knife to cut a clean, straight slit in the side of your tire where you want to install the valve stem
- Be careful not to cut yourself on the knife while you’re doing this
- Insert the valve stem into the slit in the tire, making sure that the nut end is facing outwards so that you can screw it onto the rim later
- Use a pair of needle-nose pliers to grab hold of the metal washer at the base of the valve stem and pull it upwards so that it’s flush with the top of the rubber grommet
- This will create an airtight seal between the tube and tire
- Screw on
How to Replace a Tire Valve Stem Yourself at Home with Simple Tools
Replacing Tubeless Valve Stem Mtb
If you have a tubeless mountain bike tire, then you know that flat tires are a thing of the past. But what happens when your tubeless valve stem goes bad? Don’t worry, it’s not the end of the world.
In this blog post, we’ll show you how to replace your tubeless valve stem so you can get back on the trail in no time.The first thing you’ll need to do is remove the old valve stem from your wheel. To do this, use a tire lever or other similar tool to pry out the old valve stem.
Once it’s out, take a look at the new valve stem and make sure it’s compatible with your wheel before proceeding.Next, use some soapy water to lubricate the outside of the new valve stem. This will help it seat properly in the wheel when you install it.
Once it’s lubricated, insert the new valve stem into the wheel and hand-tighten it until it’s snug.Now comes the tricky part: getting air into your tire without leaking around the edges of the new valve stem. The best way to do this is by using a floor pump with a Presta adapter (if your wheel has a Presta hole).
If you don’t have a floor pump, you can try using a hand pump, but be warned that it might take awhile to get enough air pressure built up this way. Also, make sure that whichever pump you’re using has enough pressure to seat your bead properly; most pumps only go up to 60 psi or so and won’t be enough for some tubeless setups (especially if you’re running lower pressures for increased traction).
Tubeless Tire Valve Stem Replacement
Tubeless tires are becoming increasingly popular, especially among mountain bikers. They offer many advantages over traditional tube-type tires, including improved puncture resistance and a lower risk of flats.One potential downside of tubeless tires is that the valve stem can be damaged or broken if you hit it on a rock or other hard object.
If this happens, you’ll need to replace the valve stem before you can ride again.Valve stems are relatively inexpensive, so this is not a major repair. However, it is important to know how to do it properly so that you don’t end up with a flat tire on the trail.
Here’s a step-by-step guide to replacing a tubeless tire valve stem:
1. Remove the damaged or broken valve stem from the rim using a pair of pliers.
2. Insert the new valve stem into the rim and hand-tighten it until it’s snug against the rim wall.
3. Using an air compressor or pump, inflate the tire to its recommended pressure (do not exceed maximum pressure).
4. Spin the wheel and check for any leaks around the valve stem area. If there are no leaks, your repair is complete!
Tubeless Valve O Ring Inside Or Outside
If you’re a mountain biker, you’ve likely ridden both tubed and tubeless tires. Tubeless tires have many benefits over traditional tube tires, including improved traction, decreased rolling resistance and weight savings. One key component to making a tubeless tire system work is the valve stem.
Most valve stems have a small O-ring that sits between the valve stem and the rim. This O-ring helps to seal the connection and prevent air from leaking out. When installing a new tubeless tire, it’s important to make sure that this O-ring is in place and properly seated.
There are two schools of thought on whether the O-ring should be placed on the inside or outside of the rim. Some people feel that placing it on the outside provides a better seal since there’s less surface area for air to leak through. Others believe that putting the O-ring on the inside protects it from being damaged by rocks or other debris when riding.
Which method is best? There’s no definitive answer, but we tend to favor putting the O-ring on the inside of the rim for two reasons. First, it’s easier to inspect and clean if it’s not hidden behind the tire bead.
Second, ifthe O-ring does get damaged, it’s less likely to cause an irreparable hole in your rim since there’s another layer of protection (the tire) between it and any sharp objects.
Tubeless Valve Stem Leaking
Valves are an essential part of any tubeless wheel setup, and they can be the source of a lot of headaches if they’re not working properly. If you’ve ever had a tubeless tire go flat overnight, or struggled to get your tires to hold air after changing a tube, it’s likely that your valves are the culprit.One common issue with valves is that they can start to leak air over time.
This is usually due to a bad seal between the valve stem and the rim, and it can be frustrating to deal with. Luckily, it’s relatively easy to fix.If you have tubeless valves that are leaking air, the first thing you’ll want to do is remove the valve stems from your rims.
Once they’re out, inspect the seals for any damage or debris. If everything looks good, simply re-install them and see if that solves the problem.If your valves are still leaking after inspecting and cleanings the seals, you may need to replace them entirely.
This isn’t necessarily a difficult task, but it does require special tools that most people don’t have at home. You can buy replacement valves at most bike shops or online retailers.Installing new valves is pretty straightforward – just remove the old ones and screw in the new ones in their place.
Make sure that they’re tight so that they don’t come loose while riding! After installing new valves, inflate your tires and check for leaks again before heading out on a ride.

Credit: www.instructables.com
How Do You Put a Valve Stem on a Tubeless Rim?
It’s actually pretty easy to put a valve stem on a tubeless rim. You’ll need a few tools, but it’s not difficult. Here’s what you’ll need to do:
1. Remove the wheel from the bike. If you’re not sure how to do this, consult your bike manual.2. Take off the tire.
You can do this by deflating the tire and then using a tire lever to pry the bead of the tire off of the rim. Once one side is loose, work your way around until the entire tire is removed.3. Inspect the inner surface of the rim for any damage or debris that could puncture your new tube- less tires .
If everything looks good, move on to step 4 . If not, make sure to clean or repair the area before continuing .4 .
Insert your valve stem into the hole in the rim . Make sure that it’s tight and secure before moving on . Some valve stems have a small locking nut that needs to be tightened down; if yours does , make sure to do that now .
5. Put your tire back on . Start with one side of the bead and work your way around until both sides are seated properly onto the rim . Inflate your tire to its recommended pressure (you can find this information on most tires) and check again that everything is secure before putting your wheel back on and hittingthe road !
How Do You Install a Tubeless Valve?
Installing a tubeless valve is a pretty simple process that anyone can do with just a few tools. You’ll need:-A tubeless valve stem (I recommend the Presta style)
-An air compressor (or you can use a CO2 cartridge if you have one)
-A tire lever (or two)
-Some soapy water (to help seat the tire on the rim)
-And finally, your tubeless compatible tires and rims!1. Start by removing the existing inner tube from your wheel. If you’re not running tubeless already, now would be a good time to switch to tubeless compatible tires and rims.
2. Once the inner tube is out, use your air compressor or CO2 cartridge to inflate the tire until it’s about halfway full.
3. Next, take your soap solution and coat both sides of the bead of the tire. This will help to create an airtight seal when you go to install the new tubeless valve stem.
4. Now it’s time to actually install the valve stem itself. First, find the correct hole in your rim for where the valve stem should go through. It’s important that this hole is big enough for the entire valve stem to fit through without being too loose or too tight.
5.. Take your Tubeless Valve Stem and insert it through the hole in your rim from inside out until only about 1/4″ of thread is sticking out on either side6..
On one side ofthe wheel, screw onthe retaining nutuntil it’s snug againstthe rimand then giveit an additional 1/4 turnwithyour handsto make sureit’s locked in place securely..Doingthiswill compressthe rubber o-ringsealonthe backsideoftherimandcreatea good seal..Ifyou don’t lockthese nutsin placethey may workthemselvesloose over timeand allowairto leakout aroundthe valveseal!Oncethe nutis secure,double checkthat thereis no airleakingfromaroundit beforemoving ontoinstallingthe othervalvecomponents..7.. Oncethe retainingnut issnuggeddownagainsttherim,screwonthe capnutuntil it finger tightas well .
Can You Replace a Valve Stem on a Tubeless Tire?
A valve stem is a vital part of a tubeless tire, and if it becomes damaged, it will need to be replaced. While this may seem like a daunting task, it is actually relatively simple to do. Here are the steps you’ll need to take:
1. Remove the damaged valve stem from the tire. You’ll need to use a tire lever or other tool to pry it out.2. Insert the new valve stem into the hole left by the old one.
Make sure that it is seated properly and that the washer is in place.3. Inflate the tire to its proper pressure using a pump or compressor. Be careful not to overinflate!
4. Replace the wheel on your vehicle and enjoy your ride!
How Tight Should a Tubeless Valve Stem Be?
If you’re running tubeless tires, then you need to have tubeless-compatible rims and tires. You also need to use a tubeless valve stem, which is different from a standard Schrader or Presta valve stem. Tubeless valve stems have a larger base that helps to create an airtight seal between the tire and rim.
So how tight should a tubeless valve stem be? The answer is “not too tight, and not too loose.” If the valve stem is too loose, then air will leak out around the base of the stem.
If it’s too tight, then you risk damaging the seal between the tire and rim, which could cause an air leak. The best way to find the perfect tension is to screw the valve stem in until it’s snug, but don’t overtighten it.
Conclusion
Tubeless tires are becoming more and more popular, but they can be a bit tricky to install. This helpful guide will walk you through the process of installing a tubeless tire valve stem, step by step.First, you’ll need to remove the old inner tube from the tire.
Once that’s out of the way, clean the rim surface with alcohol or another solvent to make sure it’s free of dirt and debris. Next, apply some sealant to the inside of the tire.Now it’s time to install the valve stem.
Start by threading it through the hole in the rim, then screwing on the nut finger-tight. Use a wrench to tighten it down just enough so that it’s snug against the rim – don’t overdo it or you may strip the threads. Finally, inflate your tire to its recommended pressure and check for leaks around the valve stem area.
With any luck, you should now have a properly installed tubeless tire!

Tyre Valve Stem Tool
A tyre valve stem tool is a very handy and essential tool for anyone who owns a car or other vehicle with tyres. It is used to remove and replace the valve stems in tyres, which can become damaged or worn over time. The tool is very easy to use, and only takes a few minutes to complete the task.
A tyre valve stem tool is a small, handy tool that can help you inflate or check your tyres with ease. It’s a essential piece of kit for any car owner or driver and can save you time and hassle when it comes to keeping your tyres in good condition. Here’s everything you need to know about this useful little gadget…
What is a tyre valve stem tool?A tyre valve stem tool is a small, easy-to-use device that helps you add air to your tyres or check their pressure. It consists of a metal rod with a handle on one end, and a small rubber head on the other.
The head fits snugly onto the valve stem (the small metal part protruding from the side of your tyre) and allows air to flow through into the tyre while preventing it from escaping. This means you can quickly add air to your tyres without having to remove the entire wheel – perfect for when you’re in a hurry!Why do I need one?
A tyre valve stem tool is an essential piece of equipment for any car owner or driver. It’s quick and easy to use, so inflating or checking your tyres takes no time at all. Plus, it’s much more accurate than using a standard pump – meaning you can be sure that your tyres are always at the correct pressure.
This helps to improve fuel efficiency as well as prolonging the life of your tyres. In short, owning a tyre valve stem tool is essential for anyone who wants to keep their car running smoothly!
TVT01 Tyre Valve Tool Demonstration [How to use]
Valve Stem Core Tool
If you’ve ever had a tire go flat, you know how frustrating it can be. Fortunately, there’s a tool that can help you fix the problem quickly and easily – the valve stem core tool. This handy little tool is designed to remove the valve stem core from your tire so you can add air or sealant.
It’s also great for cleaning out clogged valves.The valve stem core tool is a simple yet essential piece of equipment for anyone who owns a car or truck. If you don’t already have one, we highly recommend picking one up.
You’ll be glad you did the next time you have a flat tire!
Valve Stem Tool Kit
Valve stem tool kits are used to remove and install valve stems on a variety of valves, including ball valves, check valves, and butterfly valves. The tools in the kit include a valve stem removal tool, a valve stem installation tool, and an assortment of Valve Stem O-rings.The first step in using the valve stem tool kit is to identify the type of valve that you need to remove or install the valve stem on.
Once you have identified the type of valve, you will need to select the appropriate size removal tool and installation tool for the job. After selecting the correct size tools, you will need to lubricate the threads on both the removal tool and installation tool with Valve Stem Oil. This will help to prevent damage to the threads during use.
Next, you will use the removal tool to unscrew the old valve stem from the body of the valve. Once the old stem has been removed, you can then screw in the new valve stem using the installation tool. Make sure that you screw it in tight so that it doesn’t come loose later on.
Finally, replace any o-rings that may have come off with new ones from your kit before putting everything back together again.
Harbor Freight Valve Stem Tool
If you’re in need of a valve stem tool, look no further than Harbor Freight. This trusted retailer offers a wide selection of valve stem tools, perfect for any job. Whether you’re looking for a simple tool to help with tire changes or something more complex for engine work, Harbor Freight has the right tool for you.
There are many different types of valve stem tools available at Harbor Freight. For basic tire changes, a simple hand-held tool will suffice. These tools can be used to remove and install both Schrader and Presta valves.
If you’re working on an engine, however, you’ll need a more heavy-duty tool. For this type of work, Harbor Freight offers several different air compressor-powered options.No matter what type of valve stem tool you’re looking for, Harbor Freight is sure to have it in stock at an affordable price.
Be sure to check out their selection the next time you need a newtool for your garage or workshop!
Valve Stem Tool Autozone
If you’re looking for a valve stem tool, Autozone is a great place to start your search. They carry a wide variety of tools, including ones specifically designed for valve stems. Whether you need a basic tool or something more specialized, Autozone is sure to have what you’re looking for.
When it comes to valve stem tools, there are a few things to keep in mind. First, you’ll want to make sure that the tool you choose is the right size for your particular valves. If the tool is too small, it won’t be able to properly grip the valve stem; if it’s too large, it could damage the valve itself.
Second, you’ll want to consider the material of the tool. Some materials are better suited for different types of valves than others; if you’re not sure which material will work best for your needs, ask a sales associate at Autozone for assistance. Finally, keep in mind that some valve stem tools are designed for specific tasks; if you need a tool that can perform multiple functions, make sure to select one that’s up to the task.
With so many options available, finding the perfect valve stem tool doesn’t have to be difficult. Autozone has everything you need to get the job done right – so get started today!

Credit: www.amazon.com
How Do You Put a Valve Stem on a Tire Without a Tool?
Putting a valve stem on a tire without a tool may seem like a daunting task, but it is actually quite simple. All you need is a small piece of metal or plastic to act as a makeshift valve stem tool.Start by removing the old valve stem from the tire.
To do this, simply unscrew it counterclockwise. Once the old valve stem is removed, take your makeshift tool and insert it into the hole where the valve stem was previously located.Now, screw in the new valve stem clockwise until it is tight.
Be sure not to over-tighten it, as this could damage the tire. That’s all there is to it! Now you know how to put a valve stem on a tire without a tool.
What Tool Do You Use to Remove a Valve Stem?
Assuming you are talking about a tire valve stem:There are a few different tools that can be used to remove a valve stem from a tire, but the most common is a tire iron. A tire iron is a small, L-shaped tool that is inserted into the hole in the center of the valve stem.
Once it is in place, the tire iron is turned counterclockwise to loosen and remove the valve stem.Another tool that can be used to remove a valve stem is an air compressor. An air compressor can be used to blow air into the tire, which will push the valve stem out.
This method is not recommended, as it can damage the rim of the tire if done incorrectly.If you have access to a professional garage or shop, they may have special tools that can be used to remove stubborn or damaged valve stems. These tools usually require more training and experience to use correctly, so it is best to leave them to the professionals.
How Do You Use a Valve Stem Tool?
A valve stem tool is a very versatile and handy tool that every car owner should have. There are many different ways to use this tool, and it can be used for a variety of different tasks.To start, let’s look at how to use a valve stem tool to change a tire.
If you have ever changed a tire before, you know that one of the most important steps is getting the old tire off of the wheel. This is where the valve stem tool comes in handy.Simply insert the tip of the valve stem tool into the hole in the center of the wheel where the valve stem is located.
Then, twist the handle of the tool clockwise until you feel resistance. At this point, stop twisting and pull on the handle of the tool until you hear a popping sound. This indicates that the old tire has been released from the wheel.
Now, take your new tire and line up the hole in its center with the hole in your wheel. Again, insert the tip of your valve stem tool into this hole and twist clockwise until you feel resistance. Once again, stop twisting and pull onthe handle until you hear a popping sound; this means that your new tire is now securely attached to your wheel!
As you can see, using a valve stem tool is relatively simple and only takes a few seconds once you get used to it. However, there are many other ways that this versatile little tool can be used! For example, did you know that you can also use it to check your oil level?
If your car doesn’t have an oil dipstick (or if it does but you can’t seem to find it), simply remove one of your tires and insertthe tip of your valve stemtool intothe opening wherethe dipstick would normally go. Gently push or pull onthe handleuntilyou reachthe bottomof thenotebook(this will ensurethatyou getan accurateoil reading). Finally,withdrawthe tipofyourvalve steptooland wipeitoffon adryclothbefore reinsertingitinto thenotebookto avoid makinga mess!
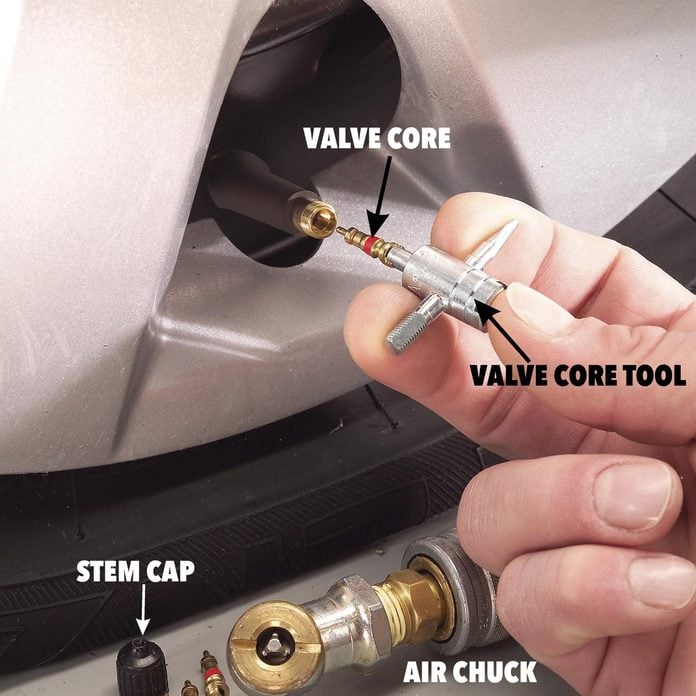
What is a Valve Core Tool?
If you have ever worked with a bicycle pump, you may have noticed a small silver knob at the end of the pump’s hose. This knob is called a valve core tool, and it is an essential part of both presta and schrader valves.The valve core tool is used to remove or replace the valve core from the valve stem.
When removing the valve core, this allows air to escape from the tire so that it can be deflated. When replacing the valve core, this seals the tire so that air can be pumped in.Valve cores are made of brass and are prone to corrosion over time.
This is why it is important to periodically check your valves for wear and tear and replace them as needed. Valvecore tools are relatively cheap and can be found at most hardware stores.
Conclusion
Every now and then, it’s good to check your tyre pressure and top up the air if needed. This is easy to do with a standard pump, but you’ll need a valve stem tool to remove the cap from the valve.This valve stem tool is a simple device that helps you remove the cap from the tyre valve.
It’s easy to use – just insert it into the hole in the centre of the cap and twist. The tool is made of durable metal and has a comfortable grip, so you can use it again and again.If you’re not sure how to use this tool, don’t worry – there are plenty of tutorial videos online that will show you exactly what to do.
Once you’ve mastered it, checking your tyre pressure will be quick and easy.

How to Cut a Valve Stem
Do you need to change a tire quickly, but don’t have the time to go to a service station? You can do it yourself if you know how to cut a valve stem. It’s a relatively easy process, but there are a few things you need to know before getting started.
First, make sure you have the right tools for the job. You’ll need a sharp knife or razor blade, as well as a valve stem cutter. Second, find the right spot on the tire to start cutting.
The best place is where the sidewall meets the tread. Once you’ve found the spot, insert the blade of your cutter into the tire and rotate it around the stem. Be careful not to cut too deeply – you just want to make a shallow incision in order to avoid damaging the tube inside.
- Using a hacksaw, cut the valve stem as close to the base as possible
- Use a file to remove any sharp edges from the cut valve stem
- Using pliers, grip the valve stem and twist it back and forth until it breaks free from the base
Shortening Valve Stems
How to Remove Valve Stem Without Damaging It
If you’re trying to remove a valve stem without damaging it, there are a few things you can do. First, try using a pair of needle nose pliers. If that doesn’t work, you can try using a small flathead screwdriver.
Be careful not to slip and damage the valve stem. If all else fails, you can always take it to a professional to have it removed.
Valve Stem Tool
If you’ve ever had a tire that’s gone flat, you know the feeling of frustration that comes with it. changing a tire is never fun, but it’s even less fun when you can’t get the valve stem off to put air in your tire. That’s where a valve stem tool comes in.
A valve stem tool is a small, handheld tool that helps you remove and replace the valve stem on your tires. It’s a simple tool, but it can be a lifesaver when you’re stuck on the side of the road with a flat tire.The best part about a valve stem tool is that it doesn’t require any special skills or knowledge to use – anyone can do it!
So next time you get a flat, don’t panic – just reach for your trusty valve stem tool and change that tire like a pro.
How to Replace a Valve Stem
Assuming you would like a blog post discussing how to replace a valve stem:“How to Replace a Valve Stem”Valve stems are an important part of your car- they help control the flow of air and water in and out of the tire.
Over time, these stems can become worn down or damaged, which can lead to problems with your tires. If you’re having issues with your valve stem, it’s important to replace it as soon as possible. Here’s a step-by-step guide on how to do just that:
1) Start by removing the wheel from your car. You’ll need to use a jack to lift up the car first, then remove the bolts holding the wheel in place. Once the wheel is off, set it aside so you can access the valve stem.
2) Use a tire iron to remove the cap from the valve stem. Be careful not to lose the cap- you’ll need it later!
3) Next, use an air compressor or hand pump to fill up the tire with air.
This will help hold the shape of the tire while you work on replacing the valve stem.
4) Take out the old valve stem by unscrewing it from its housing. You may need pliers for this step.
Once it’s loose, pull it out and discard it.
5) To put in the new valve stem, simply screw it into place using your hands (no tools necessary). Make sure it’s screwed in tight so there aren’t any leaks.
6) The final step is to put the cap back on and reattach your wheel. Lower your car back down and tighten all ofthe bolts before taking it for a spin.
Valve Stem Remover
A valve stem remover is a tool that helps remove the valve stem from a tire. This is useful when changing tires or repairing a puncture. The most common type of valve stem remover is a suction cup, which attaches to the end of the valve stem and pulls it out.
There are also pliers-type tools that can be used to grip and twist the valve stem out.To use a suction cup valve stem remover, first wet the suction cup and attach it to the end of the valve stem. Then, put your thumb over the top of the suction cup and press down firmly.
This will create a vacuum seal that will hold onto the valve stem. Next, twist the body of the tool clockwise while keeping your thumb pressed down on the top. This will unscrew the valve stem from its housing in the tire.
Once it’s loose, you can pull it out with your fingers.If you’re using pliers-type tool, start by opening up the jaws wide enough to fit around the base of the valve stem. Then, position one jaw on either side of the base and squeeze them together tightly so that they grip onto it firmly.
Next, twistthe handles ofthe pliers in opposite directions while keepingthe jaws squeezed together tightlyonth ebaseofthevalvestem .Thiswillloosenthevalvestemfromitshousinginthetire .Onceit’sloose ,youcanpullitoutwithyourfingers .
Credit: www.reddit.com
Can You Cut a Valve Stem?
If you need to shorten a valve stem, you can cut it with a rotary tool fitted with a cutoff wheel. To avoid damaging the valve core, be sure to support the end of the stem with a block of wood or other material while cutting. After cutting the stem, use a file or sandpaper to remove any sharp edges.
How Do You Cut Valves?
Valves are an important part of many machines and engines, regulating the flow of fluids or gases. If a valve is not functioning properly, it can cause serious problems. In some cases, it may be necessary to cut the valve out and replace it with a new one.
There are several different ways to cut valves, depending on the type of material they are made from and the equipment you have available. For most metals, a handheld power grinder with a cutting wheel will do the job. However, for tougher materials like stainless steel or cast iron, you may need to use a cutting torch or plasma cutter.
When cutting through metal, it is important to wear proper safety gear, including goggles and gloves. Always follow the manufacturer’s instructions for your power tools and take care not to overheat the metal or damage surrounding components. With careful planning and execution, cutting valves should not be difficult or dangerous.
What Happens When You Cut a Tire Stem?
When you cut a tire stem, the air inside the tire escapes through the hole that is created. This can cause the tire to become flat or even deflate completely. If you are driving when this happens, it can be dangerous as it can make your car harder to control.
It is always best to replace a damaged or cut tire stem as soon as possible to avoid any accidents or further damage to your tires.
How Do You Break a Tire Valve Stem?
If you have a tire with a broken valve stem, there are a few ways that you can break it off so that you can replace it. One way is to use a pair of pliers and grip the stem as close to the base as possible. Then, twist the pliers back and forth until the stem breaks off.
Another way is to use a hammer and tap on the end of the valve stem until it breaks off. Whichever method you choose, make sure that you have new valves stems on hand so that you can replace the old ones.
Conclusion
If you need to change a tire or just want to check the air pressure in your tires, you’ll need to know how to cut a valve stem. It’s actually not that difficult, and all you need is a sharp knife. Just follow these steps and you’ll be able to do it in no time.
First, find the right spot on the tire where you want to cut the valve stem. You want to make sure that the stem is in line with the tread of the tire so that it doesn’t get damaged when you’re driving. Once you’ve found the right spot, use your knife to make a small incision in the rubber.
Next, insert the blade of your knife into the incision and carefully start cutting around the circumference of the valve stem. Be careful not to cut too deeply or else you might puncturethe tire. Once you’ve made it all the way around, pull out the valve stem and throw it away.
Now take your new valve stem and insert it into the hole where you just removedthe old one. Make sure that it’s inserted snugly so that there’s no air leakage. Finally, use some tape or another type of sealant to close up any gaps aroundthe new valve stem.
And that’s it!

Rapid Air down Valve Stems
The rapid air down valve stems are an essential part of any car’s tire inflation system. By allowing air to escape quickly from the tires, they help to ensure that the tires are inflated properly and at the correct pressure. Without these valves, it would be very difficult to inflate a tire correctly.
These valves are typically made from metal or plastic, and they have a small hole in the center that allows air to escape when opened. The hole is usually covered by a rubber or plastic cap that helps to keep dirt and debris out. When closed, the valve stem should be completely sealed so that no air can escape.
Are you looking for an easy way to let air out of your tires? If so, then you need a rapid air down valve stem!These valve stems are designed to release air quickly and easily, so you can get back on the road in no time.
They’re perfect for those who have a hard time getting the air out of their tires using traditional methods.To use a rapid air down valve stem, simply screw it onto your tire’s existing valve stem. Then, when you’re ready to let some air out, just press the release button.
The air will flow out rapidly, making it easy to get your tire back to its desired pressure.If you’re tired of struggling with letting air out of your tires, then pick up a set of rapid air down valve stems today! You’ll be glad you did.
Apex Rapid Tire Deflation Valve Installation & Test | Northridge4x4
Off Road Valve Stems
Valve stems are one of the most important components of your vehicle’s tire and wheel assembly. They play a crucial role in maintaining proper air pressure in your tires, which is essential for safe driving. If you’re an off-road enthusiast, you know that having high-quality valve stems is even more important, as they need to be able to withstand the rigors of rough terrain.
There are a few things to keep in mind when shopping for off road valve stems. First, make sure that they’re made from high-quality materials that can resist punctures and leaks. Second, look for valve stems that are specifically designed for off-road use, as they’ll typically have thicker walls and stronger construction.
Finally, consider getting valve stems with extended length options, as this will give you more clearance between the tire and wheel when aired down for off-road use.If you’re looking for the best off road valve stems on the market, we’ve got you covered. Check out our selection of top-rated products below!
Power Tank Monster Valves
The Power Tank Monster Valve is an aftermarket product that allows for increased airflow to your engine. It is a simple bolt-on replacement for the stock valve and requires no modification to your vehicle. The increased airflow can result in more power and better throttle response.
Additionally, the Monster Valve is less likely to get clogged with debris than the stock valve, which can improve your engine’s longevity.
Recessed Valve Stems
Have you ever wondered why your car’s valve stems are recessed? It turns out there’s a good reason for it!Recessed valve stems help protect the valves from damage.
They’re less likely to be bent or broken off if they’re not sticking out.They also help keep dirt and debris from clogging up the valves. If dirt gets into the valves, it can cause them to stick open or closed, which can lead to engine problems.
So next time you’re looking at your car’s wheels, take a closer look at the valve stems. They may be small, but they play an important role in keeping your car running smoothly!
Best Air down Valves
One of the most important things you can do to ensure a comfortable and safe ride while off-roading is to air down your tires. This lowers the pressure in your tires, giving them a larger contact patch with the ground and providing more traction. It also helps absorb shocks from obstacles like rocks and roots.
But before you start letting air out of your tires, you need to install an air down valve.There are a few different types of air down valves on the market, but we think the best option is the ARB inflator/deflator kit . This kit comes with an easy-to-use hand pump that attaches directly to your tire valves, making it quick and easy to let air in or out as needed.
The ARB kit also includes a gauge so you can keep an eye on your tire pressure, and it’s all packaged up in a handy carrying case.Installing an air down valve is a simple process that anyone can do at home with just a few tools. First, remove the cap from your tire valve stem using a small screwdriver or similar tool.
Next, take the Schrader valve (the black part) out of the inflation nozzle by unscrewing it counterclockwise. Once that’s done, simply screw on the new air down valve until it’s tight – no need for any thread lockers or other sealants .

Credit: powertank.com
Why is Air Coming Out My Valve Stem?
If air is coming out of your valve stem, it is most likely due to a faulty seal. The purpose of the seal is to keep air from escaping, so if it is not functioning properly, air will leak out. In some cases, the entire valve stem may need to be replaced.
How Do You Install Apex Valve Stems?
Apex valve stems are installed by first removing the old stem from the wheel. To do this, you will need a tire iron and a socket wrench. Once the old stem is removed, take the new Apex stem and insert it into the wheel.
Make sure that the valve is pointing in the correct direction before tightening it down with the wrench.
What Psi are Rubber Valve Stems Good For?
If you’ve ever wondered how much air pressure a rubber valve stem can take, the answer is “it depends.” The maximum psi rating for most rubber valve stems is 60, but it’s not uncommon to see ratings as low as 30. So what does that mean for you?
Well, depending on the application, it could mean a lot.For example, if you’re inflating a tire with a standard car or truck tire pressure of 35 psi, then a rubber valve stem with a 60 psi rating is more than sufficient. However, if you’re inflating a tire on a racing bike or off-road vehicle that requires 80+ psi, then you’ll need to use a metal valve stem with an appropriate rating.
At the end of the day, it’s important to choose the right valve stem for the job at hand in order to ensure safety and avoid any potential problems down the road.
How Do You Temporarily Fix a Broken Valve Stem?
A broken valve stem can be a frustrating issue to deal with, but luckily there are some temporary fixes that can help get you by until you can replace the valve stem. One quick and easy fix is to simply use a piece of gum or adhesive tape to seal the gap between the valve stem and the rim. This will temporarily stop air from leaking out.
Another option is to use a tire boot, which is a small rubber or latex patch that goes over the hole in the tire. Tire boots are available at most auto parts stores and can provide a more permanent solution than gum or tape. If you have access to a welder, another option is to weld a metal washer onto the end of the valve stem.
This will provide a tight seal and should hold up for quite some time. Whatever temporary fix you choose, make sure to keep an eye on your tire pressure and check for leaks regularly.
Conclusion
Valve stems are an important part of any tire, and Rapid Air Down valve stems are no exception. These valve stems allow air to flow out of the tire quickly, making it easier to change a tire or inflate a new one. They also help to keep the tire inflated properly, preventing premature wear.

Tr416 Valve Stem Installation
Installing a TR416 valve stem is a quick and easy process that anyone can do. You will need a few tools and supplies before starting, but the job can be completed in just a few minutes. The first step is to remove the old valve stem from the tire.
You can do this by using a tire iron or a similar tool. Once the old valve stem is removed, you will need to insert the new valve stem into the tire. Make sure that the new valve stem is completely seated in the tire before proceeding.
If you’re looking to install a TR416 valve stem, there are a few things you’ll need to keep in mind. First, make sure that the rim of the wheel is clean and free of any debris. Next, use a hammer to lightly tap the valve stem into place.
Once it’s flush with the surface of the wheel, use a wrench to tighten the nut on the back side of the valve stem. Finally, check for any leaks by inflating the tire and listening for any hissing sounds. If everything looks good, you’re ready to hit the road!
How to Install Bolt On Metal Valve Stems
Snap-In Vs Bolt in Valve Stem
When it comes to valve stems, there are two main types: snap-in and bolt-in. So, what’s the difference between the two? Here’s a breakdown of each type of valve stem and their respective pros and cons.
Snap-In Valve StemsSnap-in valve stems are the most common type of valve stem found on cars and trucks. They get their name from the fact that they “snap” into place in the wheel rim.
Snap-in valve stems have a few advantages over bolt-in valve stems:They’re easier to install – you don’t need any tools, just your hands.They provide a tighter seal so there’s less chance of air leakage.
They tend to be more durable since there are no exposed threads that can become damaged or stripped over time.
How to Install Flush Mount Valve Stems
Installing flush mount valve stems is a quick and easy way to add a touch of style to your wheels. Here’s how to do it:1. Start by removing the old valve stem from the wheel.
To do this, use a valve stem remover tool or a small screwdriver.2. Once the old valve stem is removed, clean out the hole in the wheel using a wire brush or similar tool. This will help ensure that the new valve stem sits flush with the wheel.
3. Next, take your new flush mount valve stem and insert it into the hole in the wheel. Make sure that it’s seated properly and then tighten down the retaining nut with a wrench.4. Finally, reinflate your tire and you’re all set!
Metal Valve Stems
Valve stems are an important part of any metal valve. They provide a seal between the valve and the pipe, and they also allow the valve to be opened and closed. There are many different types of valve stems, and each has its own advantages and disadvantages.
The most common type of valve stem is the screw-in type. This type of stem is easy to install and remove, and it provides a good seal. However, it can be difficult to turn, and it may leak if not installed correctly.
Another common type of valve stem is the weld-in type. This type of stem is more permanent than the screw-in type, but it can be more difficult to install. Weld-in stems also require special tools for installation, so they are not as convenient as screw-in stems.
There are also several other types of metal valve stems available on the market, such as ball valves, check valves, gate valves, and butterfly valves. Each has its own advantages and disadvantages that you should consider before selecting a stem for your project.
How to Install Rays Valve Stems
If you’re looking to add a little bit of flair to your car’s tires, or if you need to replace a damaged valve stem, then installing ray’s valve stems is a great option. Here’s how to do it:1. Start by removing the old valve stem from the tire.
Use a tire lever or other tool to pry it out.2. Clean up the hole in the tire where the valve stem was located. Make sure there is no debris or dirt in the way.
3. Take the new valve stem and insert it into the hole. Push it until it is fully seated.4. Screw on the cap tightly so that no air can escape.
You may need to use an adjustable wrench to get it tight enough.

Credit: www.speedwaymotors.com
How Do You Install a High Pressure Valve Stem?
It is not difficult to install a high pressure valve stem, but there are a few things you need to know before starting. First, it is important to find the right size valve stem for your tires. If you have standard sized tires, then you can probably find a valve stem at your local hardware store.
However, if you have larger or smaller tires, then you may need to order a custom valve stem from a specialty retailer. Second, once you have the right size valve stem, it is important to properly lubricate it before installation. This will help ensure a smooth installation process and prevent any damage to your tires.
Third, when installing the valve stem, be sure to tighten it securely so that it does not come loose over time. Lastly, once the valve stem is installed, be sure to check the pressure in your tires regularly and adjust as needed.
How Do You Install a Billet Specialty Valve Stem?
Billet specialty valve stems can be installed in a few different ways depending on the tools that you have available. The most common way is to use a drill bit and drill through the center of the billet until it is big enough to fit over the valve stem. Once the billet is big enough, simply slide it over the valve stem and screw it into place.
Another way to install a billet specialty valve stem is to use a Dremel tool or similar rotary tool to grind away at the billet until it is small enough to fit over the valve stem. This method takes more time, but does not require any special drilling bits.
How Do You Tighten a Metal Valve Stem?
Assuming you are talking about a car’s tire valve:To start, you’ll need a few tools. You will need a valve stem tool, which is a small rod that fits over the valve stem, and a lug wrench or socket set.
You will also need an air compressor with the correct nozzle attachment, or a hand-held pump.First, use your valve stem tool to unscrew the cap from the valve stem. Then, use your lug wrench or socket set to loosen the nut that secures the valve stem in place.
Once the nut is loose, screw it back on until it is finger-tight.Next, attach your air compressor nozzle to the valve stem and turn on the compressor. Slowly add air to the tire until it reaches the desired pressure.
Finally, screw on the cap to secure it in place.
How Do You Install a Rubber Valve Stem?
Assuming you would like a step-by-step guide on how to install a rubber valve stem:1. Begin by locating the spot where you want to install the valve stem. Make sure that the area is clean and free of any debris.
2. Using a sharp knife, make a small incision in the rubber at the location where you want to place the valve stem. The incision should be big enough to accommodate the width of the valve stem.3. Insert the valve stem into the incision and push it through until it comes out on the other side.
4. Use a pair of pliers to firmly grip onto the end of the valve stem and pull it tight so that it is flush with the surface of the rubber. You may need to use a second pair of pliers to hold onto the other end of the valve stem while you are doing this.5. Trim off any excess rubber from around the edge of the incision using a sharp knife.
Be careful not to cut into or damage the valve stem itself in any way.
Conclusion
If you’re looking to install a new TR416 valve stem, this blog post has all the information you need. It starts by explaining what a TR416 valve stem is and how it works. It then goes into detail on how to properly install the valve stem, including what tools you’ll need and step-by-step instructions.
There are also helpful tips included in case you run into any trouble along the way. By following this guide, you should be able to successfully install your new TR416 valve stem in no time!

Remove Broken Valve Stem Core
If your valve stem core is broken, you will need to remove it. This can be done with a few tools and a little bit of know-how. First, you will need to locate the broken valve stem core.
This is usually easy to do because the break will be visible. Once you have found the break, you will need to determine what type of break it is. There are two types of breaks: complete and incomplete.
If the break is complete, meaning that the entire valve stem core has snapped off, you will need to use a pair of pliers to remove it.
Removing a broken valve stem core can be a difficult and frustrating task. However, with the proper tools and techniques, it can be done relatively easily.The first step is to remove the cap from the valve stem.
This can be done by using a flat head screwdriver or a valve stem removal tool. Once the cap is removed, you will need to use a pick or other sharp object to remove the core from the stem. It is important to be careful not to damage the threads on the stem while doing this.
Once the core is removed, you will need to clean out any debris that may have gotten into the stem. A small brush or compressed air can be used for this. Finally, you will need to replace the cap on the valve stem and inflate your tire.
HOW TO REMOVE A BROKEN VALVE CORE INSIDE THE STEM – Guia Mundi
Remove Broken Schrader Valve Core
If you have a broken Schrader valve core, don’t worry! This is a relatively easy repair that anyone can do. Here’s what you’ll need:
– A new Schrader valve core
– A small wrench or pair of pliers
– Some soapy water (optional)
First, use your wrench or pliers to remove the cap from the valve stem. Next, use the same tool to unscrew the broken valve core from the stem. If it’s stuck, you can try using some soapy water to lubricate it.
Once the old valve core is out, screw in the new one finger tight. Finally, replace the cap and tighten it down with your wrench or pliers. That’s it – you’re done!
Remove Valve Core Without Tool
Removing a valve core without a tool may seem like a daunting task, but it’s actually quite easy! All you need is a small screwdriver and a little bit of patience.Start by unscrewing the cap from the valve stem.
You may need to use some force, as the cap can be tight. Once the cap is off, you’ll see the valve core itself.Using your screwdriver, simply unscrew the valve core from the stem.
It’s important to be careful not to lose any of the small parts – they can be tricky to find if they fall out!Once the valve core is removed, you can proceed with whatever task you were originally trying to accomplish. Be sure to screw the valve core back in when you’re finished so that no air escapes from your tire.
Remove the Valve Core
Assuming you would like a blog post discussing how to remove a valve core:Have you ever had a tire that slowly leaks air and you can’t figure out why? It’s probably because the valve core is loose.
The valve core is what controls the flow of air in and out of your tire, so it’s important to keep it tight. If it’s not, then air will slowly leak out until your tire is flat. Here’s how to remove the valve core so you can check if that’s the problem.
Start by taking off the cap from the valve stem. You might need a small screwdriver to help with this. Once the cap is off, use a wrench or pliers to unscrew the valve core from the stem.
Be careful not to lose the spring inside! Now you can inspect the cores for any damage or debris that might be causing your tire to leak. If everything looks good, just screw the cores back on and put the caps back on too.
Your tires should now be good as new!
Valve Core Gripper
Valve cores are small, round pieces of metal that sit inside the valve stem of a tire. They control the flow of air in and out of the tire and help to keep it inflated. Over time, these valve cores can become corroded or damaged, which can cause them to leak air.
If you notice that your tires are losing pressure regularly, it may be time to replace the valve cores.To remove a valve core, you’ll need a special tool called a valve core gripper. This tool is designed to grip the small hexagon-shaped nut on the top of the valve core and unscrew it.
Once the nut is removed, you can pull out the old valve core and insert a new one. Be sure to screw on the nut tightly so that it doesn’t come loose and leak air.If you don’t have a valve core gripper, you can try using a pair of needle-nose pliers.
However, this method is more likely to damage the valves than using a proper tool.
Credit: www.familyhandyman.com
How Do I Remove a Valve Stem Core Without a Tool?
If you need to remove a valve stem core but don’t have a tool, there are a few things you can try. One is to use a small pair of needle-nose pliers. Another is to use a flathead screwdriver.
If either of these methods doesn’t work, you may be able to use a utility knife to carefully pry the core out.Once the core is removed, you’ll need to replace it with a new one before inflating the tire. To do this, simply unscrew the old core and screw in the new one.
Make sure it’s tight so that it doesn’t leak air.
How Do You Remove a Stuck Ac Valve Core?
If you have a stuck AC valve core, there are a few things you can try to remove it. First, use a pair of needle nose pliers to grip the valve core and turn it counterclockwise. If this doesn’t work, you can try using an AC valve core removal tool.
These tools are specifically designed to remove stuck AC valve cores. Simply insert the tool into the valve and turn it counterclockwise until the core comes out. If you don’t have a removal tool, you can also try using a small screwdriver or Allen wrench to remove the stuck core.
Can You Replace a Valve Stem Core?
Yes, you can replace a valve stem core. You will need to purchase a new valve stem core and install it in the same location as the old one. Be sure to consult your vehicle’s owner manual or a professional mechanic to ensure that you are replacing the valve stem core correctly.
Can You Replace a Valve Stem Core Without Removing the Tire?
If you have a flat tire, you may be able to simply replace the valve stem core without removing the tire. This is a quick and easy fix that can be done with just a few tools.First, remove the cap from the valve stem.
Next, use a valve stem core tool to unscrew the old core from the stem. Be careful not to lose any of the small parts!Now, screw in the new valve stem core.
Make sure it is tight so that air will not leak out. Finally, put the cap back on and inflate the tire to the proper pressure.
Conclusion
Removing a broken valve stem core can be a difficult and frustrating task. If you’ve ever had to do it, you know how annoying it can be. The good news is that there are a few different ways to remove a broken valve stem core, and we’re going to show you how.
First, let’s talk about what you’ll need. You’ll need a pair of needle nose pliers, a small flat head screwdriver, and some patience. Start by using the needle nose pliers to remove the cap from the valve stem.
Once the cap is off, use the screwdriver to pry out the rubber grommet that’s sealing the valve stem core in place.Once the grommet is removed, you should be able to see the broken valve stem core inside the valve stem. Use the needle nose pliers to grab onto the broken piece and pull it out.
If it’s being stubborn, you may need to use a little bit of force. Just be careful not to damage the valve stem in the process.And that’s it!
With a little bit of effort, you should be able to remove even the most stubborn broken valve stem cores.