- Home
- Blog

How to Cut Tires into Strips
Tire strips can be used for a variety of purposes, from crafting to disaster preparedness. While cutting tires may seem like a daunting task, it’s actually quite simple with the right tools and techniques. Here’s how to cut tires into strips.
- First, you will need to gather your supplies
- You will need a sharp knife, a cutting board, and an old tire
- Next, you will need to find a safe place to work
- You don’t want to be near any moving traffic while you are working with the knife and tire
- Place the tire on the cutting board and use the knife to cut it into strips
- Start at one end of the tire and make long cuts down the length of it
- Once you have cut all of the strips, dispose of them properly
HEAVY DUTY Bungee Cords. BEST use for old TIRES!
What is the Best Tool to Cut Rubber Tires?
When it comes to cutting rubber tires, there is no one “best” tool. The best tool for the job will depend on the specific tire you need to cut, as well as the thickness and material of the tire. For example, a very thick or tough tire may require a power saw or even a blow torch to cut through it, while a thinner tire can be easily cut with a utility knife.
If you need to cut multiple tires at once, or if you don’t have access to power tools, then a simple hand-held cutter may be your best bet. These are available at most hardware stores and can quickly and easily slice through most types of rubber tires. Just be sure to use caution when operating any type of cutting tool, and always wear protective gloves and eye gear.
How Do You Cut a Tire into Pieces?
Assuming you would like a blog post discussing how to cut a tire into pieces:“How do you cut a tire into pieces?”One way to cut a tire into pieces is to use a power saw with a blade designed for cutting rubber.
You can also use a utility knife or box cutter, but the power saw will be faster and easier. Just make sure to wear gloves and eye protection when using any type of blade.First, mark the spot where you want to make your cuts.
Then, start by making a shallow cut around the entire circumference of the tire. Be careful not to cut too deep – you just want to score the surface of the rubber. Once you’ve gone all the way around, start making deeper cuts until the tire splits in half.
From there, you can easily cut each half of the tire into smaller pieces if needed.
What Do You Use to Cut a Tractor Tire?
When it comes to cutting a tractor tire, there are a few different options that you can choose from. One option is to use a power cutter, which will quickly and easily cut through the thickest of tires. Another option is to use a hand-held cutter, which can be more difficult to maneuver but will still get the job done.
Finally, you can also use a sawzall or other type of reciprocating saw to cut through the tire. Whichever method you choose, make sure that you have the proper safety equipment before beginning.
Can You Cut a Tire With a Grinder?
A grinder is a powerful tool that can be used to cut through many materials, including metal and concrete. However, using a grinder to cut through a tire is not recommended. Tires are made of rubber, which is a soft material.
Grinders are designed to work with hard materials. Cutting through a tire with a grinder will cause the tire to become damaged and may even cause it to burst.

Credit: www.instructables.com
How to Cut Tires at Home
If you’re looking to save a few bucks by cutting your own tires at home, there are a few things you’ll need to know first. For starters, you’ll need to make sure you have the right tools. A sharp knife or box cutter will work fine, but for best results, we recommend using a tire razor.
Next, you’ll want to find a flat surface to work on. Your kitchen counter or coffee table will do the trick. Once you have your workspace set up, it’s time to start cutting!
Start by making a series of shallow cuts around the circumference of the tire. Be careful not to cut too deep – you don’t want to puncture the inner tube.Once you’ve made your initial cuts, it’s time to start shaping the tire.
Use your hands or a blunt object (like a hammer) to push down on the center of the tire. This will create a “V” shape in the tire that makes it easier to grip when riding. When you’re happy with the shape of your tire, use your knife or box cutter to make two final cuts along either side of the “V”.
These should be about 1-2 inches apart and run from one side of the tire all the way across to the other.And that’s it! You’ve now successfully cut your own tires at home – congrats!
What are Tires Made of
Tires are one of the most important parts of your car, and it’s important to know what they’re made of. Tires are made of rubber, which is a natural material that comes from trees. The rubber is then mixed with other materials like carbon black and vulcanized, which makes it strong and durable.
Tires also have treads, which are the grooves on the surface of the tire that help provide traction.
How to Deflate a Tire
It’s happened to the best of us – you’re out on the road and you get a flat tire. Whether it’s a slow leak or a complete blow-out, flat tires are always a pain. But knowing how to change a tire is only half the battle – you also need to know how to properly deflate a tire.
Here are some tips on how to safely and effectively deflate a tire:1. Park your car in a safe, level area before beginning. This will make changing your tire much easier.
2. Locate the valve stem on your tire. This is the part of the tire that allows air to flow in and out.3. Use an appropriate tool (usually a wrench) to loosen the cap on the valve stem.
Be careful not to lose the cap, as it will help keep dirt and debris out of the valve stem.4. Once the cap is off, use your tool to depress the pin inside the valve stem. This will allow air to flow out of the tire and begin deflating it.
Conclusion
In this blog post, the author explains how to cut tires into strips. First, the author marks the tire with a pencil to indicate where they will make the cuts. Second, the author uses a saw to cut along the marked lines.
Third, the author removes any sharp edges from the cut strips using a file or sandpaper. Finally, the author measures and cuts the strips into desired lengths.

How to Break in Rc Tires
If you are new to the world of RC (radio controlled) cars, one of the first things you will need to do is break in your tires. This is a process that helps to ensure that your tires are properly conditioned for racing. While there are a few different ways to break in your tires, the most common method is known as the “scuff and roll” method.
Here’s what you need to know about how to break in rc tires using this method:Start by scuffing up the surface of your tires with sandpaper or a file. This will help to create a rougher surface on the tire which will grip the track better.
Once you have scuffed up all four tires, it’s time to start rolling them. The best way to do this is by putting your car on a piece of carpet or another soft surface and then rolling it back and forth for about 10 minutes. This will help to soften up the rubber and prepare it for racing conditions.
- Inflate your RC tires to their maximum PSI rating
- This will make them as hard as possible, which is what you want for breaking in new tires
- Place your RC on a smooth surface such as concrete or asphalt
- Avoid using dirt or grass, as these surfaces can be too soft and will cause the tires to wear down too quickly
- Drive your RC around in a figure 8 pattern at medium speed for about 10 minutes
- This will help to evenly distribute the heat throughout the tire and ensure that all areas of the tire are being broken in properly
- After 10 minutes, stop and check the temperature of the tires
- They should be warm to the touch but not hot
- If they are hot, then you are driving too fast and need to slow down
- If they are not warm, then you need to drive faster in order to generate more heat within the tire compound
- Allow the tires to cool completely before repeating steps 3-4 two more times for a total of three cycles
How To: Break in R/C Tires for Indoor Off-Road Racing
How Do You Break in New Rc Drag Tires?
When breaking in new RC drag tires, it is important to use a controlled environment such as a smooth, level surface. Begin by making several slow passes back and forth across the surface. As the tires start to heat up, you can increase the speed of your passes.
Once the tires are warmed up, you can make some full throttle passes down the straightaway. Be sure to let the tires cool down between runs. After a few heat cycles, your new RC drag tires should be broken in and ready for racing!
How Do You Soften a Rc Tire?
A lot of people ask how to soften RC tires, and the answer is actually quite simple. All you need is a little bit of patience and the right tools. Here’s a step by step guide on how to soften RC tires:
1) Start by heating up your tires with a heat gun or hair dryer. You want to get them nice and warm, but be careful not to melt the rubber.2) Once they’re warmed up, use a tire softening agent like WD-40 or Liquid Wrench.
Spray it liberally on the tires and let it soak in for a few minutes.3) Next, use a stiff brush to scrub the softened rubber into the treads of the tire. This will help increase grip and traction.
4) Finally, let the tires cool down before you put them back on your car. And that’s it! With just a little bit of effort, you can significantly improve the performance of your RC car simply by softening its tires.
How Do You Break in a Clay Rc Tire?
There are a few ways that you can break in your clay RC tires. The most common way is to simply run them on a track for a few laps. This will help to break in the tread and make it more flexible.
You can also use a drill to break in the clay. This is done by spinning the tire on the drill at high speed. This will help to soften the clay and make it more pliable.
Finally, you can use a heat gun to break in the clay. This is done by heating up the outside of the tire with the heat gun. This will help to make the tread more compliant and allow for better grip on the track.
How Do You Break in Tires Faster?
There’s no one-size-fits-all answer to this question, as the best way to break in tires may vary depending on the type of tire and the driving conditions. However, here are a few tips that may help you break in your tires faster:1. Avoid hard acceleration and braking: When breaking in new tires, it’s important to avoid sudden, hard acceleration or braking.
This can cause premature wear and tear on the tires. Instead, accelerate and brake gradually when possible.2. Drive on varied surfaces: Another way to help break in your tires is to drive on different types of surfaces.
This will help evenly distribute the wear across the tire tread. So instead of just sticking to highways or city streets, try driving on some back roads too.3. Don’t overload your vehicle: Overloading your vehicle can put extra strain on your tires, so be sure not to exceed the weight limit for your car or truck.
This information can usually be found in your owner’s manual.4. Inspect your tires regularly: Be sure to inspect your tires regularly, especially during the first few hundred miles of use. Look for any signs of excessive wear or damage and have them addressed promptly by a professional if necessary.

Credit: www.youtube.com
Rc Tire Break in Tool
If you’re new to the RC world, or just getting back into it after a long break, you may be wondering what the best way is to break in your new tires. Look no further than the RC Tire Break in Tool! This simple and easy-to-use tool will help you quickly and easily break in your new tires so that they’re ready for action.
The RC Tire Break in Tool is designed to work with all popular brands of 1/8 scale off-road buggy tires. Simply insert the tool between the tire and wheel, and rotate the wheel to start breaking in the tire. The unique design of the tool applies pressure evenly across the entire surface of the tire, allowing for a more uniform break-in process.
After just a few minutes of use, you’ll notice a significant difference in how your tires perform.So if you’re looking for an easy and effective way to break in your new RC tires, be sure to pick up an RC Tire Break in Tool!
Conclusion
If you’re looking to break in your new RC tires, there are a few things you can do to ensure they perform at their best. First, clean the tires and wheels with dish soap and water to remove any mold release agents. Next, use a drill or Dremel tool to scuff up the surface of the tire.
Be sure to not go too deep – you just want to rough up the surface so that it will grip the track better. Finally, apply some traction compound to the tires and allow them to dry before racing. Following these steps will help you get the most out of your new RC tires!

How to Destroy Car Tires
The best way to destroy car tires is to puncture them with a sharp object. This can be done with a knife, screwdriver, or any other sharp instrument. Once the tire is punctured, it will slowly deflate and eventually burst.
Tire Vandal
- Find a secluded area away from people or buildings
- Park the car on a level surface and engage the emergency brake
- Remove the hubcap or wheel cover from the tire you wish to destroy
- Use a crowbar or similar tool to pry the tire off of the wheel rim
- Turn the tire so that the tread is facing up and use a sharp object to puncture it in several places around the circumference
- Alternatively, if you have access to a power drill, drill holes around the circumference of the tire tread
- 7 Once the tire is punctured, deflate it by pressing on one of the valves with a sharp object
How to Puncture a Car Tire Silently
If you’re looking to puncture a car tire silently, there are a few things you’ll need to do. First, you’ll need to find a sharp object that can pierce through the tire. Next, you’ll need to locate the valve stem on the tire.
Once you’ve found the valve stem, simply insert your sharp object into it and twist until the tire is punctured. And that’s it! With just a few simple steps, you can puncture a car tire without making any noise.
How to Puncture a Tire With a Nail
Most people know that it’s possible to puncture a tire with a nail. But what many don’t realize is just how easy it is to do. In fact, all you need is a sharp object like a nail and the right amount of pressure.
Here’s how to puncture a tire with a nail:1. Start by finding a suitable spot on the tire. The ideal spot is usually near the edge of the tread.
2. Next, take your nail and insert it into the tire at a 45-degree angle.3. Apply pressure to the nail until you feel it penetrate the tire. You may need to wiggle the nail back and forth slightly to get it started.
4. Once the nail has pierced the tire, remove it and move on to the next step.5. Now, use your thumb or another finger to push down on the hole in the tire (this will help prevent air from escaping). Alternatively, you can place a piece of tape over the hole.
Soda Can under Car Tire
If you’re like most people, you’ve probably had the experience of driving over a soda can and hearing the tell-tale “ping” as it’s crushed under your car’s tire. While this may not seem like a big deal, it can actually be quite dangerous.Soda cans are made of thin aluminum, which means they can easily be punctured by sharp objects like nails or glass.
If you drive over one of these cans, the sharp edges can puncture your tire, causing a flat. Even worse, if the can is lodged in your wheel well, it could cause your car to lose control.So next time you see a soda can on the road, resist the urge to crush it.
It’s better to be safe than sorry!
Best Nails to Flatten Tires
There are a few different ways that you can flatten tires, but the best nails to use are actually screwdrivers. This may seem counterintuitive, but the long, thin shape of a screwdriver is perfect for puncturing tires. The sharp point will easily pierce through the rubber, and the length of the handle will give you plenty of leverage to drive it in deep.
Of course, you can also use regular nails, but they won’t be as effective. They’ll be more likely to bend or break when you’re trying to drive them into the tire, and they won’t penetrate as deeply. So if you’re looking for the best way to flatten tires, go with screwdrivers.
How to Slash Tires
Slashing tires is a crime in most states, but there are still people who do it. Whether it’s for revenge, or just to be destructive, tire slashing can leave a victim stranded and out of luck. Here’s how to do it.
First, you’ll need a sharp object. A knife or box cutter will work fine. You’ll also need to be able to reach the tire easily.
If the car is on the ground, you may need to lie on your back to reach the tires.Once you have your sharp object, simply make a long cut across the sidewall of the tire. The deeper the cut, the better – you want to make sure that air can escape from the tire so that it goes flat quickly.
And that’s all there is to it! Slashing tires is simple but incredibly annoying (and expensive) for the victim.

Credit: www.agefotostock.com
What Will Destroy Tires?
There are a few things that can destroy tires. First, if the tires are not inflated to the proper pressure, they can become damaged. Second, if the tires are driven on rough roads or in potholes, they can also become damaged.
Finally, if the vehicle is involved in an accident, the tires can be destroyed.
How Do You Damage Someone’S Tires?
There are a few ways that you can damage someone’s tires. One way is to puncture the tire with a sharp object. This will cause air to leak out of the tire and it will eventually go flat.
Another way to damage a tire is to overinflate it. This can cause the tire to burst or blowout.
What Chemical Can Damage Tires?
There are a few chemicals that can damage tires, but the most common one is road salt. Road salt is used to melt ice and snow on roads, but it can also cause tire damage. The salt can corrode the metal parts of the tire, including the treads.
This can cause the tire to leak air or even fail completely. If you live in an area where road salt is used, be sure to have your tires inspected regularly and replace them if necessary.
What’S the Easiest Way to Puncture a Car Tyre?
One of the easiest ways to puncture a car tire is to use a sharp object. This can be anything from a knife to a screwdriver. All you need to do is insert the sharp object into the tire and twist it around until the tire deflates.
Conclusion
If you’re looking to destroy a car tire, there are a few different methods you can use. One popular method is to simply drive over nails or other sharp objects. This will puncture the tires and cause them to go flat.
Another option is to use a power drill to make holes in the tires. This will also cause them to go flat and be unusable. Finally, you can pour corrosive liquids on the tires, which will eat away at the rubber and eventually cause them to fall apart.

How to Cut Tires off Rims
If you’re looking to save money on a new set of tires, you can cut the old ones off the rims. This is a relatively easy process that anyone can do with the right tools. Here’s what you’ll need:
– A pry bar or crowbar
– A hammer
– A chisel
– A tire iron
– Safety glassesFirst, use the pry bar or crowbar to loosen the bead of the tire from the rim.
You may need to work your way around the entire circumference of the tire to get it started. Once you have a section of the bead lifted, insert the chisel between the bead and rim and tap it with the hammer to release more of the bead. Continue this process until you can completely remove one side of the tire from the rim.
Repeat on the other side.
- If the tire is still inflated, use a tire iron to loosen the bead of the tire from the rim
- Insert the blade of a utility knife between the bead and the rim
- Pry the bead of the tire over the edge of the rim with a screwdriver or pry bar
- Repeat steps 2 and 3 around the entire circumference of the tire until it is completely off the rim
The best and safest way to remove tire from Rim for scrap
How Do You Cut a Tire off a Rim at Home?
If you’ve ever had a flat tire, you know the feeling of frustration that comes with it. Luckily, changing a tire is something that most people can do at home with the right tools. Here’s what you need to know about cutting a tire off a rim.
The first thing you’ll need is a good tire iron. You’ll use this to loosen the lug nuts that hold the wheel in place. Once the lug nuts are loose, you can remove the wheel from the car.
Next, take your tire iron and insert it between the bead of the tire and the rim. You’re going to want to pry the two apart so that you can get access to the inner tube. Once you have enough space, use your hands to pull out the inner tube completely.
Now comes the tricky part: getting rid of the old tire without damaging the new one. The best way to do this is to use a utility knife or razor blade to cut through the sidewall of the old tire. Be careful not to damage anything else in process!
Once your new tire is free from its old casing, simply put it back onthe rim and inflate it using an air compressor or bike pump. Make sure to re-tighten those lug nuts before taking your car for a spin!
What is the Easiest Way to Get a Tire off a Rim?
There are a few ways to remove a tire from a rim, but the easiest way is to use a tire iron. First, loosen the lug nuts that hold the tire on the rim. Then, place the flat end of the tire iron under the edge of the tire and pry it up.
Once you have enough of the tire lifted off of the rim, you can pull it off entirely by hand.
How Do You Get a Tire off a Rim Without a Machine?
Assuming you don’t have access to a tire machine, there are still a few ways that you can get a tire off of a rim. One way is to use two levers, such as screwdrivers, to pry the tire off of the rim. You can also use a large nail or another sharp object to puncture the tire and then deflate it so that it comes off of the rim more easily.
Finally, if you have access to an air compressor, you can use that to blow the tire off of the rim.
How Do You Cut off Old Tires?
It’s important to know how to cut off old tires, especially if you’re planning on recycling them. Here are a few steps to help you get started:1. Start by ensuring that the tire is completely flat.
If it isn’t, use a tire iron or another tool to loosen the air valve and let all the air out.2. Once the tire is flat, use a sharp knife or utility blade to make a clean cut around the circumference of the tire. Be sure to cut through both the inner and outer layers of the tire.
3. With the tire now fully severed, gently pull it away from the rim. You may need to use some force, but be careful not to damage the rim in the process.4. And that’s it!
Your old tire is now ready to be recycled or disposed of properly.
Credit: www.reddit.com
How to Cut Through a Tire Bead
If you’ve ever had a flat tire, you know the frustrating feeling of being stranded on the side of the road. Even if you have a spare tire, changing it can be a difficult and time-consuming process. If you’re in a hurry or don’t have a spare, you may be tempted to just cut through the tire bead and drive on.
However, this is not advisable. Cutting through a tire bead can damage your wheel and potentially cause an accident. It’s always best to replace your tire with a new one as soon as possible.
If you do find yourself in a situation where you need to cut through a tire bead, there are some things you should keep in mind. First, use gloves to protect your hands from the sharp metal. Second, use a strong cutting tool like an angle grinder or sawzall.
Third, make sure to cut evenly around the entire circumference of the tire so that it comes off evenly. Finally, once the bead is cut, carefully remove it from the wheel using pliers or another tool.Once the bead is removed, you can then proceed to change your tire or drive on until you can get to a safe place to change it.
Just remember that driving on a damaged wheel is dangerous and could lead to an accident. So be sure to take all necessary precautions when cutting through a tire bead!
Can You Cut a Tire off a Rim
Most people don’t know that you can cut a tire off a rim. But, with the right tools, it’s actually quite easy! Here’s how to do it:
First, you’ll need a sharp knife and a sturdy pair of pliers. Start by slicing through the tire all the way around the circumference of the rim. Then, use the pliers to pull the tire away from the rim.
With the tire removed, you’ll be able to see the inner workings of the wheel and get at any debris or rocks that may be lodged in there. Simply brush everything out and then reassemble your wheel.It’s really that simple!
So next time you get a flat tire, don’t go running to the nearest service station – just grab your knife and pliers and take care of it yourself.
Removing Tires from Rims for Scrap
If you’re looking to scrap your tires, the first step is to remove them from the rims. This can be a difficult and dangerous task if you don’t know what you’re doing, so it’s important to be prepared before you get started.There are a few different ways that you can remove tires from rims, but the most common method is using a tire iron.
First, make sure that the tire is completely deflated before starting. Next, insert the tire iron between the rim and tire and pry outward until the bead of the tire pops out of place.Once the bead is popped out, continue working around the circumference of the tire until it is completely off of the rim.
If you have difficulty getting one side of the bead over the lip of the rim, try using two tire irons or a pry bar to help Leverage The Situation And Help You Finish The Job! Finally, carefully remove any remaining pieces of rubber or metal from The Tire Itself As Well As From The Rim To Prevent Any Accidents Down The Road!
Conclusion
If you’re looking to remove tires from rims, there are a few different methods you can use. The most common is to use a tire iron or a lug wrench. You’ll need to loosen the lug nuts that hold the tire in place, and then you can pry the tire off of the rim.
Another method is to use a impact gun. This is a power tool that can be used to loosen the lug nuts. Once they’re loose, you can remove the tire from the rim.
If you don’t have either of these tools, you can also take the wheel and tire to a local shop and they can remove it for you.

How to Detail Model Car Tires
Model car tires are one of the most important aspects of any model car. They can make or break the look of your model, and can be very difficult to get right. Here are a few tips on how to detail model car tires.
The first thing you need to do is choose the right size tire for your model. There are many different sizes and styles of tires out there, so you need to make sure you pick the ones that will fit your car best. You also need to consider the type of terrain your model will be driven on.
If you’re only going to be driving it on pavement, then you don’t need to worry about getting too fancy with the tires. However, if you’re planning on taking your model off-road, then you’ll want to choose tires that are designed for that purpose.Once you’ve chosen the right size and style of tire, it’s time to start detailing them.
The first step is to apply some primer to the tire surface. This will help the paint adhere better and will also give you a nice even surface to work with. Once the primer is dry, it’s time to start painting.
You can use either an airbrush or a paintbrush for this task, but an airbrush will give you a much smoother finish. When painting tires, it’s important to use thin layers of paint so that they don’t end up looking thick and clumpy.
NASCAR MODEL HOW TO: Tips to easily improve your 1/24 NASCAR tires and wheels for models or diecast.
- Begin by washing the tires with a mild soap and water solution
- Rinse the tires thoroughly and dry them with a clean towel
- Apply a thin layer of tire dressing to the sidewalls of the tires
- Allow the tire dressing to dry for several minutes before driving the car
How to Make Model Tires
One of the most popular model car kits is the Model T Ford. The kit usually contains a set of four white wall tires. Many people have trouble painting these tires to look realistic.
Here are some tips on how to make your own Model T tires.The first step is to gather the materials you will need. You will need a set of four white wall tires, some black paint, and a small brush.
You may also want to have some masking tape handy to help keep the paint from getting on other parts of the car.Once you have all of your materials, it’s time to start painting! Begin by painting the entire tire black.
Be sure to get good coverage and avoid any missed spots. Once the black paint is dry, it’s time to add the white stripes.To create thewhite stripes, simply apply a strip of masking tape around the tire just below where you want the stripe to be placed.
Then, using your brush, paint over top of the masking tape with white paint until you have achieved the desired width for your stripe. Carefully remove the masking tape and voila! You’ve created a perfect white wall tire!
Model Car
Model cars are miniature replicas of real-life vehicles. They come in a wide range of sizes, from small die-cast models to large plastic or resin kits. Some modelers build models for display purposes only, while others race them on tracks or use them in role-playing games.
Whether you’re a seasoned modeler or just getting started, there’s a model car out there for you. In this blog post, we’ll take a look at some of the different types of model cars available, as well as tips and tricks for building and painting your own.Die-cast models are usually the most detailed and realistic type of model car.
They’re also the most expensive, due to the high quality materials and craftsmanship involved in their production. If you’re looking for a challenge, die-cast models are definitely the way to go.Plastic or resin kits are less expensive than die-cast models, but they often require more work to assemble and paint.
These types of kits usually come with pre-painted parts, which can make things easier if you’re not confident in your painting skills. However, keep in mind that these parts may not fit together as snugly as those on a die-cast model.If you’re just getting started in the world of model cars, electric slot cars might be a good option for you.
These battery-operated vehicles run on special tracks with grooves that guide their wheels; all you need to do is steer! Slot car racing is a fun way to get into the hobby without having to deal with glue or paint fumes.
Model Car Kits for Adults
Are you a car enthusiast? Do you like assembling things? If you answered yes to both of these questions, then you’ll love model car kits for adults!
Model car kits are great for anyone who loves cars and enjoys spending time building things. They’re also a great way to bond with friends or family members who share your interests.There are many different types of model car kits available on the market, ranging from simple to complex.
Whether you’re a beginner or an experienced builder, there’s a kit out there that’s perfect for you.Here are some things to keep in mind when choosing a model car kit:– Level of difficulty: Choose a kit that matches your skill level.
If you’re a beginner, look for something simple and straightforward. If you’re more experienced, opt for something more challenging.
– Type of vehicle: There are all sorts of vehicle types available, from classic cars to race cars and everything in between.
Pick the type of vehicle that appeals to you most.– Budget: Model car kits can range in price from around $20 to $200 or more. Decide how much you want to spend before narrowing down your options.
Plastic Model Car Kits
Plastic model car kits are a fun and rewarding hobby. There is a wide variety of kits available, from simple to highly detailed. Whether you’re a beginner or an experienced modeler, there’s a kit out there for you.
The most important thing to keep in mind when choosing a kit is the level of difficulty. If you’re a beginner, it’s best to start with a simple kit that doesn’t have too many parts. As you become more comfortable with the modeling process, you can move on to more complex kits.
Another factor to consider is the scale of the kit. Kits are available in various scales, from 1:24 to 1:8. The smaller the scale, the more detail you’ll be able to include in your model.
However, smaller scale kits can be more challenging to build than larger ones.Once you’ve selected a kit, it’s time to get started! Read through the instructions carefully before beginning assembly.
When painting your model, use thin coats of paint and allow plenty of time for each coat to dry before moving on to the next step. With patience and attention to detail, your finished product will be an impressive work of art!

Credit: www.amazon.com
How Do You Make a Model Tire Look Flat?
It’s easy to make a model tire look flat – all you need is some black paint and a steady hand! Just follow these simple steps:1. Begin by painting the entire tire black.
This will be your base color.2. Once the black paint is dry, start adding thin lines of gray paint around the edge of the tire. These lines should be irregular and not too perfect – this will give your tire a worn-down look.
3. To finish up, add a few more black dots or smudges on the tire for extra realism. And that’s it! Your model tire should now look convincingly flat.
How Do You Paint White Letters on a Model Tire?
There are a few different ways that you can paint white letters on a model tire. One way is to use a white paint pen or a white Sharpie. Another way is to use white hobby paint and a small brush.
If you are using a paint pen or Sharpie, the best way to do it is to first sketch out the lettering with a pencil. This will help you get the spacing and proportions right before you start painting. Once you have your pencil lines drawn, go over them with the paint pen or Sharpie, pressing firmly so that the color is nice and opaque.
If necessary, go over the letters a second time to make sure they’re fully covered.If you’re using hobby paint, again start by sketching out your letters with a pencil. Then load up your small brush with some white paint and carefully fill in the letters.
It’s important not to put too much paint on your brush at once, otherwise it will run and create messy edges. Go slowly and take your time filling in each letter until they’re completely covered.
How Do You Polish a Car Model?
Car models can be polished using a variety of methods, including hand-polishing, machine polishing, and chemical polishing. Hand-polishing is the most common method used to polish car models. This involves using a soft cloth or brush to gently buff the surface of the model.
Machine polishing is done with a power buffer and can be used to remove more stubborn dirt and grime from the model’s surface. Chemical polishing uses chemicals specifically designed to clean and polish car models. This method is typically used on larger scale projects, such as restoring an entire fleet of cars.
Do You Have to Sand a Model Car before Painting?
If you want to get a really smooth paint job on your model car, then sanding is definitely something you’ll want to do beforehand. By lightly sanding the surface of the car, you’ll be able to create a more even foundation for the paint to adhere to. This will help prevent any unwanted imperfections or brush strokes from showing up in the final product.
Now, that’s not to say that sanding is always necessary. If you’re happy with a slightly rougher finish, then feel free to skip this step. Just know that if you do choose to sand, it’s important to use a very fine grit paper so as not to damage the plastic or resin surface of your car.
Conclusion
Assuming you would like a summary of the blog post titled “How to Detail Model Car Tires”:This post goes over how to detail model car tires. The author starts by stating that most people don’t spend time detailing their car’s tires, but it can make a big difference in the overall look.
They then go on to list the supplies needed, which are: tire shine, old toothbrush, and paper towels. Next, they give step-by-step instructions on how to detail the tires. First, you spray the tire shine onto the tires and let it sit for a few minutes.
Then, you use the toothbrush to scrub any dirt or grime off of the tires. Finally, you wipe off any excess product with paper towels. The author concludes by saying that this is a quick and easy way to make your car look better.

How to Cut Tractor Tires for Pulling
Assuming you would like tips on cutting tractor tires for pulling:One of the most important aspects of a successful pull is having the right size and type of tire on your tractor. The size and tread pattern of the tire will largely be determined by the conditions in which you’ll be pulling.
If you’re pulling in dry, hard conditions, you’ll want a larger, more aggressive tread pattern. If you’re pulling in softer conditions, you’ll want a smaller tire with less tread. Regardless of the condition, though, all tires must be properly cut to ensure they grip the track correctly and provide enough traction to make the pull successful.
When cutting tractor tires for pulling, there are a few things to keep in mind. First, always use a sharp knife or razor blade – never try to cut through a tire with anything that’s not razor sharp as it will just tear the rubber and make an uneven cut. Second, make sure all cuts are perpendicular to the sidewall – if they’re not perfectly straight, it will throw off the balance of the tire and could lead to problems down the road.
Finally, take your time – rushing through this process could result in an improperly cut tire that doesn’t provide enough traction or grip when you need it most.
- Place the tractor tire on a cutting surface
- Use a sharp knife to cut through the tread of the tire
- Cut around the circumference of the tire
- Remove the inner tube from the tire
- Cut the inner tube into strips that are about 1 inch wide
- Wrap the strips around the outside of the tire treads, making sure that they are evenly spaced apart
How to sharpen tractor pulling tires
How Do You Cut Tractor Tyres?
There are a few things you need to take into consideration when cutting tractor tyres. The type of tyre, the size of the tyre and the tread pattern are all important factors to consider.The most common type of tractor tyre is the radial tyre.
Radial tyres have a steel belt that runs around the circumference of the tyre. The tread pattern on radial tyres is usually continuous or has very little gaps between the tread blocks.The second type of tractor tyre is the bias ply tyre.
Bias ply tyres have criss-crossing fabric cords that run from one side of the tyre to the other. The tread pattern on bias ply tyres is usually interrupted or has large gaps between the tread blocks.The third type of tractor tire is the belted bias ply tire.
Belted bias ply tires have a layer of steel cord running around the circumference of the tire beneath the tread surface. The belts help reinforcethe sidewall and prevent punctures. The tread pattern on belted biasply tires is usually interrupted or has large gaps between thetread blocks.
When cutting tractor tyres, it is important to use a sharp knife or saw blade designed for cutting rubber.
How Do You Cut a Tractor Tire off the Rim?
If you need to cut a tractor tire off the rim, the first thing you need to do is remove the wheel from the tractor. To do this, you will need to loosen the bolts that hold the wheel on. Once the bolts are loose, you can then take the wheel off of the axle.
Next, you need to deflate the tire. You can do this by using a tire iron or a similar tool to push down on the valve stem and release all of the air from the tire.Once the tire is deflated, you can begin cutting it off of the rim.
You will want to use a sharp utility knife or a razor blade for this task. Start by making a small cut around the circumference of the tire. Once you have made your initial cut, you can then begin peeling backthe tire fromthe rim.
Continue cutting and peeling backthe tire until it is completely removed fromthe rim. Onceyou have successfullyremovedthetirefromtherim,you can then proceedtoinflatea newtireandmountitbackonthewheel.
How Do You Cut Turf Tires?
There are a few ways to cut turf tires, but the most common and effective method is to use a rotary cutter. This type of cutter has a rotating blade that cuts through the tire material as it spins. To use a rotary cutter, simply position the blade against the tire surface and turn on the power.
The rotary cutter will do all of the work for you, making it quick and easy to get a clean cut on your turf tires.
How Far is a Full Pull in Tractor Pulling?
Tractor pulling is a competitive motorsport in which modified tractors attempt to pull a heavy sled along a 100 meter (330 ft) course. The objective is to achieve the longest distance within a set amount of time, or to pull the sled the furthest distance over a set fixed length.There are several classes of competition, each with different weight limits and equipment restrictions.
In general, the heavier the tractor, the more powerful its engine, and the greater its advantage over lighter tractors.The most common pull distances are 300 feet (91 m), 330 feet (100 m), and 400 feet (122 m). A full pull is defined as maintaining traction over the entire length of the course without slipping or going off course.
If a tractor loses traction or goes off course before reaching the end of the track, it is said to have “broke” or “blown”.
Credit: www.millertire.com
Tractor Pulling Tire Cutting Tools
If you’re into tractor pulling, then you know that having the right tire cutting tools is essential. After all, you need to be able to make quick and clean cuts in order to get your tractor ready for competition.So, what are the best tire cutting tools on the market?
Here are our top three picks:1. The first tool on our list is the Tire Cutting Knife from Pro-Line Racing. This knife is specifically designed for making clean cuts in tires, and it features a comfortable handle that makes it easy to use.
2. Next up is the Xtreme Bladez Tire Cutting Tool from RC4WD. This tool is made from high-quality materials and features a sharp blade that makes quick work of any tire cutting job.3. Finally, we have the Ultimate Tire Cutting Tool from Losi.
This tool features a durable construction and an extra-sharp blade that can easily cut through even the thickest tires.No matter which tool you choose, make sure you’re getting one that’s specifically designed for tire cutting – otherwise you might not be happy with the results!
Pulling Tractor Tire Cutting Machine for Sale
If you are in the market for a Pulling Tractor Tire Cutting Machine, there are a few things to consider before making your purchase. There are many different brands and models of machines available on the market, so it is important to do some research to find the one that best suits your needs. Here are a few tips to help you choose the right machine for sale:
1. Determine what type of machine you need. There are two main types of Pulling Tractor Tire Cutting Machines: those that cut through the sidewall of the tire and those that cut through the tread of the tire. If you will be using your machine primarily for cutting through sidewalls, then look for a model that has a powerful motor and blade combination.
If you plan on mostly cutting through treads, then look for a machine with multiple blades that can handle different thicknesses of tires.2. Consider the size of tires you will be cutting. Some machines are only designed to handle smaller tires while others can accommodate larger ones.
Be sure to read the specifications carefully to make sure the machine you select can handle the size range of tires you plan on working with.3. Decide how portable you need your machine to be. Some models are designed to be used in one location while others come with wheels so they can be easily moved around as needed.
Consider how often you will need to move your machine and choose accordingly.4 . Compare prices from different suppliers .
Just like any other product , there will be variations in price depending on where you purchase your Pulling Tractor Tire Cutting Machine . Be sure t o compare prices from several different sources before making your final decision .
Pulling Tractor Tires
There are a few different ways that you can pull tractor tires. The most common way is with a chain and come-along. This method works well, but can be difficult if the tire is very large or heavy.
Another option is to use a winch. This method is much easier, but you need to have a strong winch and good anchor point.If you’re using a chain and come-along, start by attaching the come-along to the tire.
Then, run the chain around the axle of the tractor and hook it back onto the come-along. Once everything is secure, start cranking the handle on the come-along until the tire starts to move. If it’s very stubborn, you may need to get someone to help you hold onto the tire while you crank.
If you’re using a winch, start by attaching one end of the cable to the winch and running it through an eyehook on the tire. Then, attach the other end of the cable to an anchor point that’s strong enough to hold up under tension. Once everything is secure, start cranking on the winch handle until the tire starts moving.
Conclusion
If you’re looking to save some money on your tractor tires, you can try cutting them yourself. It’s not as difficult as it sounds, and with a little practice, you can get the job done quickly and easily. Here’s a step-by-step guide on how to cut tractor tires for pulling:
1. Start by removing the valve stem from the tire. This will let the air out and make the tire easier to work with.2. Use a sharp knife to cut around the edge of the tire, following the tread pattern.
Be careful not to cut too deep – you just want to cut through the rubber, not into the metal rim beneath.3. Once you’ve gone all the way around the tire, use a strong piece of wire or rope to pull out the center section of the tire (the part that’s now missing its tread). This should leave you with an empty ring of rubber that’s ready to be pulled onto your tractor’s wheel.
4. If necessary, trim off any excess rubber from around the edge of your new “tire” so that it fits snugly on your wheel rim. You’re now ready to start using your tractor with its new set of DIY tires!

How to Determine Age of Motorcycle Tires
One of the most important aspects of motorcycle maintenance is keeping an eye on your tires. Not only do they play a big role in your safety while riding, but they also can affect your bike’s performance. It’s important to know how to determine the age of motorcycle tires so you can replace them when necessary.
Debunking The Tire Age Myth | The Shop Manual
- The following steps can help you determine the age of your motorcycle tires: 1
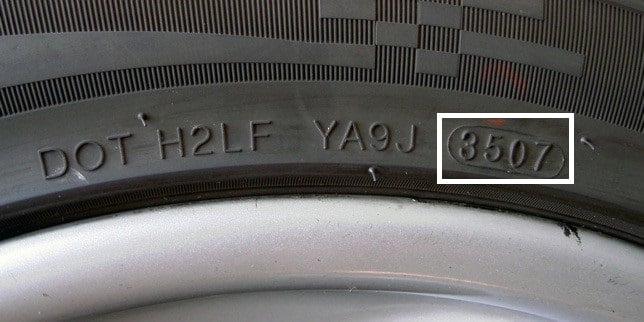
- Check the DOT code on the sidewall of the tire
- This code will have a series of numbers and letters that represent the week and year the tire was manufactured
- The first two digits represent the week and the last two digits represent the year
- For example, if the code reads DOT 1319, this means that the tire was manufactured during week 13 of 2019
- Examine tread wear and look for any cracks or cuts in the rubber
- Tires that are starting to show signs of wear may need to be replaced, even if they are not yet at their expiration date
- Check for any dry rot, which is a type of deterioration that causes cracking and crumbling in rubber tires
- This is a common issue with older tires that have not been properly stored or maintained
Motorcycle Tire Age Limit
Most motorcycle riders are aware that their tires have a limited lifespan and need to be replaced periodically. But how often should you really replace your motorcycle tires?The answer, unfortunately, is not as straightforward as we would like.
It depends on a number of factors, including tire type, riding habits, and storage conditions. In general, however, most experts agree that you should replace your motorcycle tires every 3-5 years.If you’re a casual rider who only takes their bike out for leisurely weekend rides, your tires may last closer to the 5-year mark.
If you’re a more hardcore rider who uses their bike for commuting or long-distance touring, you may need to replace your tires more frequently – perhaps as often as every 2-3 years.And if you don’t ride your bike very often but still want to keep it in good condition (just in case), it’s best to err on the side of caution and replace your tires every 3 years or so – even if they look like they could probably last longer. Remember: it’s better to be safe than sorry when it comes to motorcycle safety!
So there you have it: the general consensus on how often to replace motorcycle tires is every 3-5 years. Of course, this is just a guideline – ultimately, it’s up to you to inspect your own tires regularly and make the call when it’s time for a change.
Are 14 Year Old Motorcycle Tires Safe
Most 14 year old motorcycle tires are safe. However, it is always important to check the condition of your tires before you ride. If you see any cracks or damage, it is best to replace them.
Motorcycle Tire Age Code
If you’re a motorcycle enthusiast, then you know that taking care of your bike is important. One aspect of maintenance that is often overlooked is the age of your tires. Most people don’t realize that tires have an expiration date and using expired tires can be extremely dangerous.
The age of a tire can be determined by looking at the DOT code on the sidewall. This code includes a 4 digit number followed by a 2 digit number. The first 4 digits represent the week and year the tire was manufactured and the last 2 digits represent the plant code.
For example, if the DOT code on your tire says 1210, this means that the tire was manufactured in week 12 of 2010.Tires typically have a lifespan of 5-10 years, but this can vary depending on how often they are used and how well they are taken care of. If you frequently ride in hot weather or on rough roads, your tires will wear out faster than if you ride in cooler conditions or stick to paved roads.
Additionally, properly inflated and rotated tires will last longer than those that are not cared for as well.If you’re unsure about when your tires were manufactured or how many miles they’ve been ridden, it’s best to err on the side of caution and replace them sooner rather than later. Riding on old, expired tires is dangerous and can lead to blowouts or other accidents.
So next time you go to check your bike’s fluids or adjust the chain, take a look at your tires too and make sure they’re still in good condition!
10 Year Old Motorcycle Tires
Are you looking to buy new tires for your motorcycle? If so, you may be wondering how long motorcycle tires last. The answer is that it depends on a number of factors, but generally speaking, you can expect motorcycle tires to last for about 10 years.
Of course, this is just an estimate – some tires may last longer while others may need to be replaced sooner. There are a few things that will affect the lifespan of your motorcycle tires, including:• The type of tire: There are different types of motorcycle tires available on the market, and each type has its own lifespan.
For example, bias-ply tires typically last longer than radial tires.• How often you ride: If you use your motorcycle regularly, your tires will wear down faster than if you only ride occasionally.• Your riding style: Aggressive riders tend to put more wear and tear on their tires than those who take it easy when they’re out on the road.
• The conditions you ride in: Tires can also be affected by the weather and road conditions. Riding in hot weather or on rough roads can shorten the life of your tires.
Motorcycle Tire Date Code Dunlop
Motorcycle Tire Date Code DunlopWhen shopping for motorcycle tires, you may notice a series of numbers and letters on the side of the tire. This is the tire date code, and it provides important information about when the tire was made.
If you’re considering purchasing used tires, it’s especially important to check the date code to make sure the tires are still safe to use. Here’s a look at what the date code on Dunlop motorcycle tires means.The date code on Dunlop motorcycle tires consists of four digits followed by a letter.
The first two digits indicate the week of production, while the second two digits represent the year. The letter at the end indicates which plant in Fort Wayne, Indiana produced the tire. Here’s an example: 1210J
The first two digits (12) tell us that this particular tire was produced during Week 12 of 2010. The second two digits (10) tell us that it was manufactured in 2010. And finally,the letter J tells us that it came from Plant J in Fort Wayne, Indiana.
It’s important to note that just because a tire has a recent date code doesn’t necessarily mean that it’s in good condition. Tires can deteriorate over time even if they’re not being used, so always inspect used tires carefully before purchasing them.
Credit: www.utires.com
Do Motorcycle Tires Have an Expiration Date?
Yes, motorcycle tires have an expiration date. Tires are made of rubber, which deteriorates over time. The rate of deterioration depends on many factors, such as exposure to sunlight and heat, storage conditions, and the type of rubber used.
Most manufacturers recommend replacing motorcycle tires every five years or so. Some tire experts believe that six to seven years is a more realistic lifespan for most riders.
How Do I Check How Old My Tires Are?
It’s important to know how old your tires are so you can replace them before they become too worn down. There are a few ways to check the age of your tires.One way is to look at the tire tread.
If the tread is shallow, it means the tire has been used for a while and needs to be replaced. You can also use a penny to check the depth of the tread – if the top of Lincoln’s head is visible, it means the tread is shallow and you need new tires.Another way to tell how old your tires are is by looking at the sidewall.
There should be a four-digit code that indicates when the tire was manufactured. The first two digits represent the week of production and the last two digits represent the year. For example, if the code reads “1210,” it means that tire was made in week 12 of 2010.
If you can’t find this code on your sidewall, it might be on your vehicle’s doorjamb or inside its glove compartment. Once you know when your tires were manufactured, you can figure out how long they’ve been in use and determine if they need to be replaced.
Are 4 Year Old Motorcycle Tires Still Good?
Are 4 year old motorcycle tires still good? This is a question that we get asked a lot here at the shop. And, while there is no easy answer, there are a few things to keep in mind when making your decision.
First and foremost, you should always consult your owner’s manual. There will be specific guidance in there regarding how often to replace your tires. That said, most manufacturers recommend replacing motorcycle tires every 3-5 years, regardless of tread depth.
One reason for this is that tire rubber can degrade over time, even if the tire isn’t being used. Sunlight and heat can cause the rubber to harden and crack, which can affect its performance and potentially lead to a blowout. If you live in an area with hot summers or ride your bike frequently in direct sunlight, it’s especially important to check your tires regularly for signs of damage.
Another thing to consider is the type of riding you do. If you mainly stick to paved roads, your tires will last longer than if you frequently ride off-road or on gravel roads. The latter two surfaces are much harder on tires, causing them to wear down faster.
If you’re not sure whether your 4 year old motorcycle tires are still good, it’s always best to err on the side of caution and replace them.
How Do You Read a 3 Digit Tire Date Code?
When you see a three-digit code on a tire, it usually signifies the manufacturer’s production date for that tire. The first two digits represent the week of the year, and the last digit signifies the year. For example, if you see “203” stamped on a tire, it means that the tire was produced during the 20th week of 2003.
Most tires have a “shelf life” of around six years from their date of manufacture. After that point, they may begin to degrade and lose some of their properties. This is why it’s important to pay attention to the production date when buying new tires.
If you have an older car with bias-ply tires, you may see a four-digit code instead of three digits. The first two digits in this case signify the month (01 would mean January, 02 would mean February, and so on), while the last two digits represent the year. So, a code like “0203” would mean that the tire was manufactured in February 2003.
Conclusion
One way to tell how old your motorcycle tires are is to check the DOT code on the sidewall. This code will have four digits followed by a slash and then three more digits. The first two digits of the code represent the week of manufacture, and the last two digits represent the year.
For example, if the code reads 1210, that means the tire was manufactured in the 12th week of 2010.
Another way to determine age is by looking at treadwear. Tires will usually have a wear bar running perpendicular to the tread grooves; when the tread has worn down to this level, it’s time for a new tire.
You can also do a penny test; place a penny head-first into several tread grooves across the tire; if you can see all of Lincoln’s head, you need new tires.
How to Cut Tread on Tires
The first thing you need to do is find a safe place to work. You’ll need to be able to see what you’re doing, and have enough room to move around the tire. Once you’ve found a spot, take off the wheel and set it on a couple of blocks so it’s stable.
Next, use a chalk line or marker to draw a line around the circumference of the tire. This will be your guide for cutting the tread.
- Using a utility knife, score the tire tread around the circumference of the tire
- Insert the blade of a putty knife into the scored line and pry up on the tread to detach it from the tire
- Cut away any excess rubber with the utility knife until you have a clean cut all around the tire
- Repeat steps 1-3 on the other tires
How to cut through the steel of a tire's tread
How Do You Cut Tire Treads?
Assuming you would like tips on how to cut tire treads:One way to extend the life of your tires is to rotate them regularly. This helps evenly distribute the wear and tear they endure over time.
But even with regular rotation, eventually the tread on all four tires will start to show signs of wear.When it’s time to replace your tires, you can take them to a professional or do it yourself. If you choose to DIY, here’s how to cut tire treads.
First, use a utility knife or box cutter to score the circumference of the tire about an inch from the edge of the tread all the way around. You want to make sure your cuts are straight so that when you remove the outer layer of rubber, the inner layer is exposed in one continuous line. If your cuts are curved or jagged, it will be more difficult (and potentially dangerous) to remove the outer layer later on.
Once you’ve scored all around the tire, use a screwdriver or other sharp object to pry up small sections of rubber along your cuts until you can peel back the entire outer layer in one piece. Be careful not to damage the inner layer as you work. If any part of the outer layer resists being peeled away, go back and check your cuts—they may not be deep enough.
Once you’ve removed all of the excess rubber, smooth out any rough edges with sandpaper so that there are no sharp points remaining before moving on.Now it’s time to start cutting away at the inner layer of rubber until you reach desired depth of tread for your needs—a common depth is about ¼ inch (0.6 cm). Again, use a utility knife or box cutter for this step and make sure your cuts are straight so that removal is easier later on.
Start by scoring small sections at a time and then peeling them back until you have removed as much material as necessary from inside the tire. Remember that less is more when removing material from inside a tire—it’s difficult (if not impossible)to add more rubber back once it has been removed!
What Can I Use to Cut Rubber Tires?
Assuming you want to know what tools can be used to cut rubber tires:You can use a utility knife, handsaw, power saw or rotary tool to cut rubber tires. The best way to cut a tire is by using a power saw with a blade designed for cutting rubber.
You can also use a rotary tool with a cutting disc or blade attachment.
Why Do People Cut Tread off Tires?
Most people think that cutting the tread off tires will make them go faster. However, this is not true. Cutting the tread off tires actually makes them more likely to slip and lose traction.
In addition, it can also cause the tire to overheat and fail.So why do people still do it? Well, some people believe that it improves the look of their car or truck.
Others think that it makes their vehicle sound louder and tougher. Whatever the reason,cutting the tread off your tires is definitely not worth the risk.
What’S the Best Way to Cut a Tire in Half?
If you’re looking to cut a tire in half, the best way to do it is with a power saw. You’ll want to use a saw with a blade that’s specifically designed for cutting rubber, like a carbide-tipped blade. Make sure the tire is properly inflated before beginning the cut.
Start by cutting through the tread of the tire. Once you’ve made your way around the entire circumference of the tire, you can then move on to cutting through the sidewall. It’s important to go slowly and carefully so you don’t damage the rim or wheel underneath.
Once you’ve cut all the way through both the tread and sidewall, you should be able to easily pull the two halves of the tire apart. If necessary, use a utility knife to clean up any remaining bits of rubber that are clinging to either half of the tire.
Homemade Tire Grooving Tool
It’s been a while since I’ve had to do any tire grooving, but when I was first starting out in racing, it was something that I had to do quite often. Back then, there wasn’t the wide variety of tire prep tools that are available today, so we had to get creative. One tool that we used quite often was a homemade tire grooving tool.
To make this tool, you will need:-A length of 3/8″ diameter rod (I used an old piece of rebar)-A grinder with a cut-off wheel attached
-A drill motor with a 1/4″ drill bit attachedFirst, take your length of rod and mark out where you want your cuts to be. You’ll want to make sure that the cuts are evenly spaced around the circumference of the rod.
Once you have your marks made, use the grinder to cut them into the rod. Make sure not to cut too deeply, or else you’ll weaken the structure of the rod.
Tire Tread Cutting Tool
There are many different ways to change a tire, but one of the most important things you need is a tire tread cutting tool. This tool allows you to cut the old tire tread off so that you can start fresh with new tires.There are many different types of tire tread cutting tools on the market, but they all essentially do the same thing.
You’ll want to choose a tool that is comfortable for you to use and that will make clean cuts through the tire tread.Some tips for using a tire tread cutting tool:– Make sure the area around the tire is clear before you start cutting.
You don’t want anything to get in the way of the blade as it’scutting through the tire.– Cut slowly and evenly around the entire circumference of the tire. If you cut too quickly, you might end up with an uneven cut or even damagethe blade itself.
Tire Cutting Tool
Are you looking for an easy way to cut tires? If so, then you need a tire cutting tool. There are many different types of tire cutting tools on the market, but they all have one thing in common – they make it easy to cut tires.
One type of tire cutting tool is the handheld rotary cutter. This type of cutter is powered by a battery and has a rotating blade that cuts through the tire. The advantage of this type of cutter is that it’s portable and easy to use.
Another type of tire cutting tool is the benchtop model. This type of cutter is larger and more powerful than the handheld rotary cutter, but it’s not as portable. The advantage of this type of cutter is that it can handle bigger tires and can be used with a variety of different blades.
No matter which type of tire cutting tool you choose, you’ll be able to quickly and easily cut tires. So if you’re looking for an easy way to do Tire Cutting, then get yourself a Tire Cutting Tool today!
Conclusion
If you’re looking to cut tread on your tires, there are a few things you’ll need to keep in mind. First, you’ll need to make sure that you have the right tools for the job. A sharp knife or a rotary tool with a cutting attachment will work well.
Next, you’ll need to decide how much tread you want to remove. You can do this by measuring the width of the tire with a tape measure or ruler. Once you know how much tread you want to remove, mark it off with a piece of tape so that you don’t accidentally cut too much.
Finally, start cutting the tread off of the tire using your chosen tool. Be careful not to cut into the sidewall of the tire as this could cause serious damage. Cut slowly and evenly around the entire circumference of the tire until you’ve removed the desired amount of tread.

How to Bolt Tires Together
Bolting tires together is a common way to connect two or more tires together. There are many different ways to bolt tires together, but the most common way is to use a drill and thread the bolts through the holes in the tire. This method is simple and effective, but it does require some knowledge of how to properly drill and thread the bolts.
- First, clean the area where the tire will be bolted together
- This will ensure a good connection between the two surfaces
- Next, apply a generous amount of tire adhesive to one side of the connection
- Then, bolt the two tires together using four bolts evenly spaced around the circumference of the connection
- Finally, torque the bolts down to specifications using a torque wrench
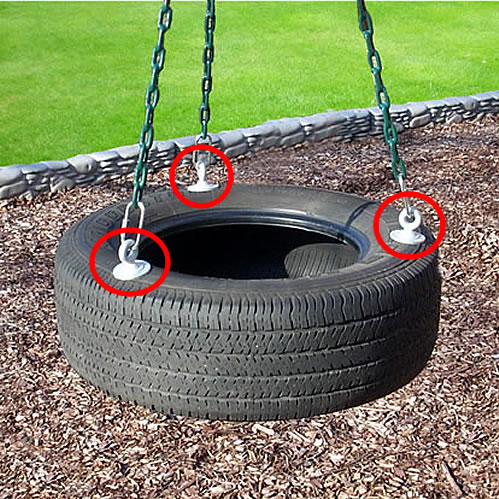
Credit: swingsetpartspro.com
How Do You Bolt Tyres Together?
Bolting tyres together is a process that can be done at home with the right tools and a little bit of know-how. It’s a relatively simple process, but it’s important to follow the steps carefully in order to avoid damaging the tyres or causing an accident.The first step is to clean both surfaces of the tyre that will be bolted together.
Use a wire brush or other abrasive tool to remove any dirt, debris, or rust from the surface. Once the surface is clean, apply a thin layer of lubricant to help prevent binding during the bolting process.Next, align the holes in both tyres so that they are lined up correctly.
Start by threading one of the bolts through both tyres, then add a washer and nut on each side and tighten them down snugly. Repeat this process for each bolt until all of the bolts are in place.Finally, inflate both tyres to their recommended pressure levels using a air compressor or hand pump.
Once inflated, check all of the bolts to make sure they are tight before taking your vehicle out for a test drive.
How Do You Join Tires Together?
There are a few different ways that you can join tires together. The most common method is to use a tire vulcanizing machine. This machine heats the two tires that you want to join together and then press them together with a mold.
This creates a strong bond between the two tires.Another method is to use adhesive tape. This tape is specially made for joining tires together and is very strong.
You will need to clean both surfaces of the tire before applying the tape. Then, apply the tape around the circumference of one tire and fit the other tire on top. Press down on the tire so that the adhesive makes good contact.
A third method is to use cable ties. This method is not as common because it does not create as strong of a bond as the other methods, but it can be done in a pinch if you have no other options. Start by cleaning both surfaces of the tire where you want to join them together.
Then, fit one end of a cable tie through the hole in one side of the tire and pull it tight so that there is about an inch (2-3 cm) of slack left over. Do this again with another cable tie on the other side of the tire opposite from where you started so that you have two cable ties holding each side of one tire together in an X shape across its middle section . Now take your second tire and fit it over top ofthe first one so that its end holes line up withthe slack portionof eachofthe firsttire’scableties.
(Youmayneedtojigglethingsa bit togeteverythingto lineup.)Nowjustpulleachofthesecableties tightuntilthesecondtireis securelyinplace atopthefirstoneandyou’redone!
How Do You Screw a Tire Back In?
When you get a flat tire, the first thing you need to do is unscrew the lug nuts that hold the wheel in place. To do this, you’ll need a wrench – either a socket wrench or an open-end wrench will work. Once the lug nuts are loose, you can remove the wheel and set it aside.
Take your new tire and line it up with the holes in the wheel well. Then, start screwing in the lug nuts by hand to make sure they’re started before you use the wrench to tighten them all the way. Once all of the lug nuts are tight, lower your car back down to the ground and give them another turn with the wrench to make sure they’re secure.
How Do You Bead a Tire at Home?
If you’ve ever had a flat tire, you know the feeling of frustration that comes with it. You’re either stranded on the side of the road or have to pay for expensive repairs at a mechanic. But what if there was a way to fix your tire at home, without having to call a tow truck or spend money on repairs?
There is! It’s called beading and it’s a relatively simple process that anyone can do.The first step is to remove the tire from the wheel.
This can be done with a tire iron or by using an air compressor to release the pressure in the tire. Once the tire is off, use a wire brush to clean any debris or dirt from the surface of the bead. Next, apply a bead sealer around the edge of the bead.
This will help create a seal between the bead and rim when you put everything back together.Now it’s time to start beading! Begin by threading one end of your bead wire through the valve stem hole in your tire.
Then, start wrapping the wire around the circumference of the tire, making sure to keep it tight against the bead as you go. When you get back to where you started, cut off any excess wire and tuck it into place so it doesn’t come loose.Now all that’s left to do is inflate your tire and reattach it to your wheel!
Beading is quick, easy, and inexpensive – not to mention much less frustrating than dealing with a flat tire onthe road. So next time you get a flat, don’t panic – just grab some wire and get beading!
How To Replace Broken Lug Bolt In 5 Minutes
Drill Bit for Rubber Tires
If you’ve ever had a flat tire, you know the feeling of dread that comes with it. Not only is it a pain to change a tire, but it can also be costly if you have to pay someone to do it for you. But what if I told you that there was a way to avoid all of that?
With a drill bit for rubber tires, you can easily and quickly fix your own flat tires. All you need is a drill and this handy little tool, and you’ll be back on the road in no time.The best part about using a drill bit for rubber tires is that it’s so simple anyone can do it.
Just follow the instructions that come with the tool, and soon enough you’ll have your tire patched up and good as new. So next time you get a flat, don’t reach for your wallet – reach for your drill!
Conclusion
If you are looking for a way to bolt your tires together, there are a few things that you need to know. First, you need to make sure that the bolts are the right size. Second, you need to make sure that the bolts are tightened properly.
Third, you need to make sure that the bolts are in the correct order. fourth, You also want to make sure that there is enough space between each of the bolts. Finally, you want to make sure that the bolt heads are pointing in the same direction.

How to Determine If Tires Will Rub
When you’re shopping for new tires, it’s important to make sure they will fit your car without rubbing. If the tires rub, it can damage your car and cause a dangerous situation while driving. Here are a few things to keep in mind when determining if tires will rub:
– Check the width of the tire. The width should be similar to the width of the existing tires on your car.– Make sure there is enough clearance between the tire and suspension components.
You can measure this by using a tape measure or ruler.– Ask about offset and backspacing. These measurements will affect how close the tire is to the suspension components.
If you’re unsure about whether or not a particular tire will fit your car, it’s always best to consult with an expert before making a purchase. They can help you choose the right size and type of tire for your vehicle.
How To PREVENT Rubbing Issue With WIDER Tires!
- Check the width of your tires
- If they are wider than the stock tires, they may rub on the body or fenders of your car
- Check the offset of your wheels
- If they have a higher offset than the stock wheels, they may rub on the suspension components or brakes
- Test fit the tires and wheels on your car
- Put them on and see if there is any interference with suspension components, brake calipers, or bodywork
Will My Tires Rub Calculator
If you’re like most car enthusiasts, you’ve probably wondered at some point whether or not your tires will rub on your car. It’s a valid question, and one that can be easily answered with a Will My Tires Rub Calculator.This calculator is a simple tool that allows you to input the width of your tires, the offset of your wheels, and the clearance of your suspension.
With this information, the calculator will tell you if there is a chance that your tires will rub on your car.Of course, this is just a tool and it cannot account for everything. Ultimately, it’s up to you to determine if your tires will rub or not.
But if you’re looking for a quick and easy way to find out, the Will My Tires Rub Calculator is a great place to start.
Front Tires Rubbing When Turning
If you have a car with front-wheel drive, then you may have experienced your tires rubbing when turning. This is because the front wheels are responsible for both steering and propelling the car forward. When you turn the steering wheel, the front wheels must turn as well.
However, they also need to maintain contact with the ground in order to continue propelling the car forward. If the front wheels lose contact with the ground, then your car will likely stall or come to a stop.One way to prevent your tires from rubbing when turning is to make sure that your tires are properly inflated.
If your tires are underinflated, then they will be more likely to lose contact with the ground when you turn. Additionally, you should avoid making sharp turns at high speeds. If you take a turn too quickly, then your wheels may skid and lose traction.
Instead, take turns slowly and smoothly in order to keep your tires in contact with the road.
How Much Tire Rub is Too Much
Tire rub is a common issue for many car owners. It can be caused by a number of things, but most often it’s the result of an alignment problem or worn out suspension components. While a little tire rub is nothing to worry about, too much can cause big problems.
If you’re hearing a lot of tire squeal when you turn corners or go over bumps, that’s a sign that your tires are rubbing against something they shouldn’t be. This can damage your tires and potentially cause a blowout. It can also lead to premature wear on your suspension components, which will need to be replaced sooner than they would otherwise.
If you suspect you have too much tire rub, the best thing to do is take your car to a qualified mechanic or alignment shop and have them take a look. They’ll be able to diagnose the problem and make the necessary repairs so you can get back on the road without worry.
Will an Alignment Fix Tire Rubbing
If your car is pulling to one side or the other, an alignment can help. If your tires are wearing unevenly, or if you notice that your steering wheel isn’t level when you’re driving straight ahead, it’s likely that your car needs an alignment.Most mechanics will check the alignment for free, so it doesn’t hurt to have it checked out.
Even if it turns out that your car doesn’t need an alignment, the mechanic can usually spot other problems that might be causing tire wear or steering issues.
Why is My Tire Rubbing When I Turn
If your tire is rubbing when you turn, it’s likely due to one of two issues: either your tires are misaligned or your suspension is damaged.Misaligned tires can cause a number of problems, including abnormal tire wear and decreased fuel efficiency. They can also lead to your car pulling to one side when you drive.
If you suspect that your tires are misaligned, the best course of action is to take your car to a qualified mechanic or tire specialist for an inspection.Damage to your suspension can also cause tire rub. This could be due to something as simple as a loose wheel nut or a more serious issue like a broken spring.
If you hear any strange noises coming from your suspension while driving, or if your car feels like it’s bouncing more than usual, have it checked out by a professional as soon as possible.
Credit: www.newroads.ca
Will Bigger Tires Rub?
Bigger tires will rub, but it depends on a few factors. First, the width of the tire. Second, the offset of the wheel.
And third, the suspension setup.If you have a wider tire, it’s going to be more likely to rub than a narrower one. That’s because there’s simply more material there to potentially come into contact with your car’s bodywork.
The same goes for wheels with a higher offset – since they sit further outwards, they can cause rubbing even with narrower tires.Finally, it also depends on your suspension setup. If you have very little clearance between your tires and your car’s bodywork (or if your suspension is particularly stiff), then you’re more likely to experience rubbing than someone with softer suspension or more clearance.
Does Tire Height Or Width Cause Rubbing?
Most people believe that tire height or width causes rubbing, when in fact it is the offset of the wheel that is the main culprit. The offset is the distance from the hub to the centerline of the wheel. If this measurement is too far out, it can cause the tire to rub on suspension components or bodywork.
To avoid this, make sure you check the offset of your wheels before purchasing them.
What Causes My Tires to Rub?
When your car’s tires rub against something, it’s usually because the tire is too wide for the wheel well. The width of the tire can cause it to hit the suspension components or body of the car when you turn. This can create a lot of noise and may eventually damage your tires or wheels.
If you’re having this problem, you’ll need to get new tires that are narrower. You may also need to adjust your suspension to give more clearance.
Will Wheel Spacers Stop My Tires from Rubbing?
If you have a car with big wheels, then you may have experienced the problem of your tires rubbing against the fenders or suspension components. This can be annoying and even dangerous, as it can cause your tires to wear out prematurely. One way to solve this problem is to install wheel spacers.
Wheel spacers are devices that are installed between the wheel and the hub. They effectively push the wheels outwards, away from the suspension and bodywork. This extra space prevents the tires from rubbings against these parts, solving the problem.
There are a few things to consider before installing wheel spacers though. Firstly, they will affect the handling of your car – it will become slightly less precise. Secondly, they put additional stress on your suspension components so if these are already worn then they could fail sooner than without spacers fitted.
Overall though,wheel spacers can be a helpful solution if you’re having trouble with tire rubbings. Just make sure you weigh up the pros and cons before making a decision!
Is a Little Tire Rub Okay?
If you notice your car is rubbing against the tires while driving, it’s important to take care of the problem as soon as possible. While a little bit of tire rub may not seem like a big deal, it can actually cause major damage to your car if left unchecked.Tire rub occurs when the edge of your tire makes contact with something on the road while you’re driving.
This can happen if your tires are misaligned, if there’s something sticking out from under your car, or if you hit a pothole or other object in the road. When this happens, it can wear down the tread on your tires and potentially cause a blowout. Additionally, tire rub can also damage your car’s suspension and alignment.
If you suspect that your car is experiencing tire rub, the best thing to do is bring it into a mechanic or Tire Shop for an inspection. They’ll be able to take a look at your tires and determine whether they need to be replaced or adjusted. In some cases, simply realigning your tires will solve the problem.
However, if there is significant damage to your tires, you may need to get them replaced altogether.Bottom line: If you notice any tire rub while driving, don’t ignore it! Bring your car into a professional so they can take a look and make sure everything is okay.
How Do You Make Your Tires Stop Rubbing?
If your tires are rubbing against your car, there are a few things you can do to fix the problem. First, check the alignment of your wheels. If they’re not aligned properly, they can rub against the side of your car.
You can usually tell if your wheels are out of alignment if they’re pointing in different directions when you’re driving straight. If this is the case, take your car to a mechanic or tire shop and have them adjust the alignment.Another thing you can check is the air pressure in your tires.
If they’re inflated too much, they can rub against the side of your car as well. You can find out what the proper air pressure for your tires should be by looking in your car’s owner’s manual or on the sticker inside the driver’s doorframe. Once you know what it should be, use a tire gauge to check the pressure in each tire and inflate or deflate them accordingly.
If neither of these solutions solves the problem, there may be something wrong with your suspension system. This is something best checked by a mechanic since it involves more than just adjusting tire pressure or wheel alignment.
Conclusion
If you’re considering installing wider tires on your car, it’s important to make sure they won’t rub against the fenders or suspension components. There are a few ways to do this:1. Check the owner’s manual to see what size tires are recommended for your car.
2. Measure the width of your existing tires and compare it to the width of the new tires you’re considering.3. Take your car for a test drive with the new tires installed (if possible). This will give you a chance to see how they feel and if there’s any rubbing.