- Home
- Archive: August, 2023
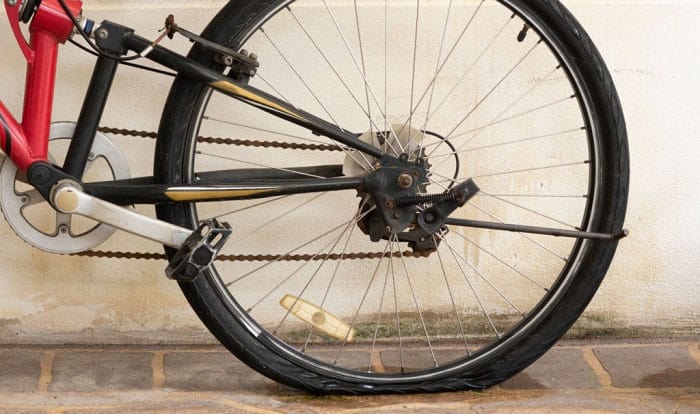
How to Stop Getting Flat Tires on My Bike
Bike riders know the feeling all too well – you’re out for a leisurely ride or commuting to work when suddenly, you hear that tell-tale hissing noise. You’ve got a flat tire. While it’s not the end of the world, flat tires are definitely a pain, and they can ruin your day if you’re not prepared.
So what can you do to prevent flats in the first place?
- Check your bike tires regularly for any objects that may be embedded in the tread and causing flats
- Use a tire lever to remove the object if found
- Check the air pressure in your bike tires often
- Keep them inflated to the recommended PSI levels to avoid flats
- Avoid riding over sharp objects or on rough terrain as much as possible
- Both can cause punctures in your bike tires
How To Stop Getting Punctures On Your Mountain Bike | No More Flat Tyres
How Do You Prevent a Bike Tire Puncture?
There is no one definitive answer to this question as there are a few different ways that you can help prevent your bike tires from puncturing. One of the best ways to avoid flats is to keep your tires properly inflated. This means checking your tire pressure regularly and topping off air as needed.
Another way to help reduce the risk of flats is to avoid riding over sharp objects or debris whenever possible. If you do ride over something sharp, inspect your tires afterwards for any signs of damage. Additionally, investing in some quality tire liners can also help protect against punctures caused by sharp objects on the road.
Why Do I Keep Getting Flat Tires on My Motorcycle?
If you’re a motorcycle rider, you know that flat tires are just part of the game. But if you’re finding that you’re getting flats more often than you’d like, there could be a few reasons why. Here are some of the most common causes of flat tires on motorcycles:
1. Punctures from road debrisOne of the most common causes of flat tires on motorcycles is punctures from road debris. This can include everything from nails and glass to rocks and small pieces of metal.
When these things penetrate your tire, they cause a leak that can quickly lead to a flat.2. Tire pressure issuesAnother common cause of motorcycle flats is tire pressure issues.
If your tires are consistently under-inflated, it puts them at risk for punctures and other damage. On the other hand, over-inflating your tires can also cause problems. It can lead to premature wear and tear on the sidewalls, which can eventually result in a blowout or flat tire.
3. Poorly maintained wheels and tiresIf you don’t regularly maintain your motorcycle’s wheels and tires, it can put them at risk for flats and other damage. Be sure to clean your wheels and inspect your tires often for any signs of wear or damage.
And if you do notice any problems, have them fixed as soon as possible before they turn into bigger issues down the road.
How Do I Stop Getting Flat Tires?
There are a few things you can do to stop getting flat tires. First, make sure you regularly check your tire pressure and inflate your tires as needed. Second, avoid driving over potholes or other sharp objects that could puncture your tires.
Third, invest in quality tires that are less likely to go flat. And finally, be careful not to overload your vehicle or trailer, as this can also cause tire failure.
Credit: biketoworkday.us
I Keep Getting Flat Tires on My Bike
We’ve all been there – you’re out on a ride, enjoying the fresh air and scenery, when suddenly you hear that telltale hissing sound. Your heart sinks as you realize you’ve got a flat tire. Again.
It can be frustrating, especially if it happens often. But don’t despair, there are ways to prevent flat tires, or at least reduce the likelihood of getting one.Here are some tips:
1. Check your tires regularly for wear and tear, and replace them when necessary. Worn-out tires are more susceptible to flats.2. Keep your tires properly inflated.
Under-inflated tires are more likely to get punctured by sharp objects on the road.3. Avoid riding in areas where there is a lot of debris or glass on the ground – these can cause flats even if your tires are in good condition. If you must ride in such areas, try to stick to the center of the lane where there is less debris.
Bike Tires That Don’T Go Flat
Tired of flat bike tires? Here are three tire options that don’t go flat, so you can keep riding all season long!1. Schwalbe Marathon Plus Tire: This tire is puncture-resistant and has a reflective stripe for extra safety.
It’s available in a variety of sizes to fit most bikes.2. Continental Grand Prix 4-Season Tire: This tire is designed for year-round riding, with a special tread compound that resists wear in all weather conditions. It’s available in a variety of sizes to fit most bikes.
3. Specialized All Condition Armadillo Tire: This tire is extremely resistant to flats, thanks to its “armadillo” casing. It’s available in a variety of sizes to fit most bikes.
Best Way to Prevent Bike Flats
Bike flats are one of the most frustrating things that can happen to a cyclist, but there are some simple ways to prevent them. The best way to prevent bike flats is to regularly check your tires for wear and tear, and to keep them inflated to the proper pressure. Additionally, using tire liners or sealant can help to prevent punctures from happening in the first place.
If you do get a flat while out on a ride, don’t panic! There are plenty of ways to fix a bike flat, and with a little practice you’ll be back on the road in no time.
Conclusion
Flat tires are one of the most common problems that cyclists face. They can be caused by a variety of things, including punctures, glass, and debris on the road. There are a few simple steps you can take to help prevent flat tires.
First, make sure your tires are properly inflated. This will help to prevent punctures and make your ride smoother. Second, avoid riding over glass or other sharp objects.
If you can’t avoid them, try to ride in a straight line so that they don’t catch your tire. Finally, regularly inspect your tires for any signs of wear or damage. If you see anything suspicious, replace your tire before it gets too bad.

How to Make Car Tires Shiny
Car tires are often overlooked when it comes to cleaning and polishing the car. However, making your car tires shine is an important part of keeping your car looking its best. Here are a few tips on how to make your car tires shiny:
Use a tire cleaner – First, you will need to use a tire cleaner specifically designed for cars. Apply the cleaner to the tires using a sponge or cloth and scrub in a circular motion. Rinse the tires with water and dry them off with a clean towel.
Polish the tires – After cleaning the tires, you will need to polish them in order to make them shine. You can use either liquid or paste wax for this step. Apply the polish evenly over the surface of the tire using a clean cloth.
Allow the polish to dry before buffing it off with another clean cloth.
- Purchase a tire shine product of your choice
- Clean the tires with soap and water to remove any dirt or debris
- Dry the tires completely with a towel
- Apply the tire shine product evenly to the surface of the tires
- Allow the product to dry for the recommended amount of time before driving or exposing the tires to moisture
What is the Best Homemade Tire Shine
There are many ways to make your tires shine, but what is the best way? It really depends on what you are looking for. If you want a long lasting shine, then you will need to use a product that contains Carnauba wax.
This type of wax will provide a deep shine and protection against the elements. If you are just looking for a quick fix, then any type of tire shine will do the trick.

Credit: avalonking.com
What Product Makes Tires Shiny?
There are a few products that can make tires shiny. One is called tire shine, which is a spray that you can apply to your tires to give them a glossy look. Another product is called tire gel, which is a thick gel that you can apply to your tires to give them a more pronounced shine.
And finally, there is tire polish, which is a liquid polish that you can use to buff your tires and give them a high-gloss finish.
How Do I Make My Tires Look New?
If your tires are looking a little lackluster, there are some easy ways to make them look new again. First, start by giving them a good cleaning. Use a tire brush to scrub away any dirt and grime build-up.
If you don’t have a tire brush, you can use an old toothbrush or even a rag. Just be sure to get all of the nooks and crannies.Once they’re clean, it’s time to add some shine.
You can use tire gel, spray wax, or even baby oil. Just apply a small amount to each tire and rub it in with a cloth. The goal is to make your tires look wet without actually making them slippery.
Finally, stand back and admire your handiwork! Your tires should now look shiny and new – just like they did when you first drove your car off the lot.
Can Wd 40 Be Used As Tire Shine?
No, WD 40 is not recommended for use as tire shine. While it may provide a temporary shiny appearance, it can actually damage and degrade the rubber on your tires over time.There are many products on the market specifically designed to clean and protect your tires.
These products will help keep your tires looking their best and lasting longer.
Can I Use Cooking Oil for Tire Shine?
No, you cannot use cooking oil for tire shine. While it may temporarily make your tires look shiny, it will eventually damage the rubber and lead to premature aging. There are many products on the market specifically designed for tire shine that will do a much better job and be safer for your tires in the long run.
Give your Tires a Deep, Black Shine that Lasts a Year Long
Conclusion
If you want your car to look its best, it’s important to keep the tires clean and shiny. Here are some tips on how to make your car tires look their best:1. Use a tire cleaner specifically designed for use on automobiles.
You can find these cleaners at most auto parts stores.2. Apply the cleaner to the tires using a brush or sponge. Make sure to get all sides of the tire, including the treads.
3. Rinse the tires thoroughly with water.4. Dry the tires with a clean cloth or towel.5. Apply a tire protectant to help keep them looking shiny and new longer.

How to Keep My Bike Tires from Going Flat
If you are like most cyclists, you have probably had the frustrating experience of coming out to your bike, ready for a ride, only to find that one or both of your tires are flat. There are a few things that you can do to help prevent this from happening. First, check your tires regularly for any nails or other sharp objects that may have become lodged in them.
If you find anything, remove it and patch up the hole with a tire repair kit. Second, keep your tires inflated to the correct pressure. You can find this information on the side of your tire.
Third, if you know you will be storing your bike for an extended period of time, put it on a bike stand so that the weight is not resting on the tires. This will help prevent them from going flat. By following these simple tips, you can help ensure that your bike tires stay inflated and ready for riding!
- Assuming you want tips on how to avoid flat tires:1
- Check your tire pressure regularly- at least once a week
- Use a reliable gauge to get an accurate reading
- Keep your tires inflated to the correct pressure
- Overinflated and underinflated tires are more susceptible to flats
- Inspect your tires before each ride for any sharp objects or debris that may have become lodged in the tread or sidewall
- Remove anything that could cause a puncture
- If you ride regularly, consider getting thorn-resistant tubes or tubeless tires, which seal around the rim and don’t require inner tubes altogether
- When changing a tire, be sure to use fresh glue or tape on tubeless tire systems, and make sure the bead of the tire is properly seated all the way around the rim before inflating it
Tips to NEVER getting a Flat Tire again!
Why Do I Keep Getting Flat Bike Tires?
If you keep getting flat bike tires, there are a few possible reasons. It could be that you have a leaky valve stem or your tires are old and need to be replaced. You might also be riding on rough terrain that is causing your tires to go flat.
Whatever the reason, it’s important to get to the bottom of it so you can avoid having flats in the future.One common reason for getting flat bike tires is a leaky valve stem. If air is leaking out of your tire, it’s only a matter of time before the tire goes flat.
To fix this, you’ll need to replace the valve stem with a new one. This is usually a pretty easy fix and something that any bike shop can help you with.Another possibility is that your tires are just old and need to be replaced.
Tires wear down over time and eventually they’ll reach the point where they’re no longer able to hold air properly. If you’ve been using the same tires for awhile, it might be time for an upgrade. When shopping for new tires, look for ones that are specifically designed for the type of riding you do most often.
This will help ensure that your new tires can handle whatever terrain you throw at them.Finally, if you ride on rough terrain often, this could also be causing your flats. Rocks, glass, and other debris can puncture your tire if you’re not careful.
To avoid this, try to stick to smooth surfaces as much as possible and watch out for sharp objects when you’re riding. If you do end up getting a flat while out on a ride, don’t worry – just walk your bike back home or to the nearest repair shop and get it fixed up so you can hit the road again soon!
How Do I Stop My Mountain Bike from Going Flat?
It is inevitable that, at some point, your mountain bike’s tires will go flat. While this may be a cause for frustration, there are some easy steps you can take to prevent it from happening too often. Here are four tips to help you keep your mountain bike’s tires inflated:
1. Check your tire pressure regularly.The first step to preventing flat tires is to check the pressure of your tires on a regular basis. You can do this with a simple tire pressure gauge.
Ideally, you should check the pressure before every ride. If you notice that the pressure in one or both of your tires is low, inflate them to the recommended psi (pounds per square inch).2. Invest in quality tubes and sealant.
When it comes time to replace your mountain bike’s tubes, don’t skimp on quality. Spend a few extra dollars on puncture-resistant tubes and sealant. This will help to prevent flats caused by sharp objects piercing through the tube.
Additionally, make sure that the sealant is fresh and has not expired.3 . Use wider tires for added protection against flats .
One way to further reduce your risk of getting flats is to use wider tires. Mountain bike tires typically range in width from 2 inches (51 mm) up to 3 inches (76 mm). Wider tires provide more surface area , which helps protect against sharp objects puncturing the tube .
They also have less rolling resistance , which can help you conserve energy on long rides . 4 . Avoid riding in areas with lots of debris . To further reduce your risk of getting flats , try to avoid riding in areas where there is a lot of debris such as glass or nails . If you must ride in these conditions , be extra cautious and go slowly to minimize the chance of something puncturing your tire .
Credit: roadbikebasics.com
Bike Tire Keeps Going Flat But No Puncture
If you’ve ever been out for a bike ride and had your tire go flat, only to find that there’s no puncture in the tire, you’re probably wondering what’s going on. There are a few things that could be causing this issue.One possibility is that the valve stem in your tire is damaged or not installed properly.
This can cause air to leak out of the tire even when there’s no hole for it to escape through. Another possibility is that there’s something wrong with the rim of your wheel. If the rim is bent or damaged in any way, it can also cause air to leak out of the tire.
If you’re having this issue, it’s best to take your bike into a shop so they can take a look at it and figure out what’s going on. In most cases, it’s an easy fix like replacing a valve stem or truing up a bent rim. But if you ignore the problem, it will only get worse and could eventually lead to a punctured tire.
So don’t wait – if you think something might be wrong with your bike, take it in and have someone take a look!
Tire Keeps Going Flat But No Puncture
If your tire keeps going flat but there’s no puncture, it could be due to a leak in the wheel rim. A leaking wheel rim can cause the tire to lose air gradually over time. To fix a leaking wheel rim, you’ll need to take it to a mechanic or tire shop to have it repaired or replaced.
In the meantime, you can try inflating your tire with a hand pump or compressed air.
My Rear Bike Tire Keeps Going Flat
If you’re a bike rider, you know the feeling of dread that comes when you realize your rear tire is flat. It’s not fun to deal with, but it’s something that happens to everyone at some point. Here are some things to keep in mind if you find yourself dealing with a flat rear tire:
– Check for any nails or other sharp objects that may have caused the puncture. If you see anything, remove it and patch up the hole.– Make sure your tires are properly inflated.
If they’re not, this can cause flats.– Inspect your rims for any cracks or damage. This is another common cause of flats.
– Be mindful of the roads you’re riding on. Potholes and other rough surfaces can lead to flats.If you keep these things in mind, you can hopefully avoid getting a flat rear tire in the future!
Conclusion
If your bike tires are going flat, there are a few things you can do to keep them inflated. First, check the air pressure in your tires regularly and add air as needed. You can also try using a tire liner, which is a thin layer of material that goes between the tire and tube to help prevent punctures.
Finally, make sure you have the right size tires for your bike; if they’re too small, they’ll be more likely to go flat.

How to Tell Snow Tires from Regular Tires
In the winter, it’s important to have the right tires on your car. Snow tires are designed to give you better traction in snow and ice. They’re not just regular tires with treads that look like they could handle snow.
There are some key differences between snow tires and regular tires. Here’s how to tell them apart.First, take a look at the tread pattern.
Snow tires typically have deeper treads than regular tires. This helps them grip the road better in slippery conditions. The treads on snow tires also tend to be wider, which gives you more contact with the road surface.
Another way to tell snow tires from regular tires is by looking at the sidewalls. Snow tire sidewalls are softer than those on regular tires. This makes them more flexible and able to grip icy surfaces better.
Finally, check for special markings on the tire that indicate it’s a snow tire. These markings will vary depending on the manufacturer, but they might say “M+S” or “Snow.”
- Look at the tread pattern on the tire
- Snow tires typically have a more aggressive tread pattern than regular tires
- This helps provide better traction in snow and ice
- Look for the words “snow” or “winter” on the sidewall of the tire
- These are usually indicators that a tire is a snow tire
- Check the speed rating of the tire
- Snow tires often have a lower speed rating than regular tires, as they are designed for use in colder temperatures and aren’t meant for high-speed driving
What you need to know about winter tires
How Do I Know If My Tire is a Snow Tire?
It’s easy to tell if a tire is a snow tire – just look for the little mountain and snowflake symbol on the sidewall. This symbol means that the tire meets specific criteria for traction in snow and ice, set by the Rubber Manufacturer’s Association.All-season tires are also designed for use in winter weather, but don’t have this symbol.
That doesn’t mean they’re not good in the snow, just that they haven’t been specifically designed or tested for it.If you live in an area with regular snowfall, it’s a good idea to invest in a set of dedicated winter tires. They’ll give you better traction and grip on icy roads, and could even help you avoid an accident.
How Do You Tell If a Tire is All Season Or Winter?
There are a few things you can look for to tell if a tire is all season or winter. All season tires typically have deeper tread depths than winter tires. They also have more sipes, or small cuts in the tread, which help provide traction on wet and icy roads.
Winter tires often have a softer rubber compound than all season tires, which helps them grip better in cold weather. The tread pattern on winter tires is also designed to channel snow and slush away from the contact patch for better traction.
How Do I Know What Kind of Tires I Have?
Your car’s tires are one of the most important parts of your vehicle, and it is important to know what kind you have. Here are a few ways to determine what type of tires you have:1. Check the sidewall of your tire.
The sidewall is the part of the tire that faces out when it is mounted on your vehicle. On this sidewall, there should be some markings that indicate the size, load rating, speed rating, and other information about the tire.2. Compare your tires to those in the owner’s manual or online for your specific vehicle make and model.
This will help you confirm the size and other specifications of your tires.3. Use a tire identifier tool like Michelin’s Tire Selector tool or Bridgestone’s Tire Finder tool. These can help you identify your tires based on their size and other specifications.
4. Take your car to a trusted mechanic or tire professional who can help you identify your tires if you’re still unsure.
How Do I Know If My Tires are Summer Or Winter?
If you live in an area with harsh winter weather, it’s important to make sure your tires are up to the task of dealing with snow and ice. But how can you tell if your tires are summer or winter tires? Here are a few tips:
1. Check the tread pattern: Winter tires typically have a deeper tread than summer tires, which helps them grip the road better in icy or snowy conditions.2. Look for the snowflake symbol: Most winter tires will have a special symbol on the sidewall that indicates they’re designed for winter driving. This is usually a small snowflake within a circle.
3. Check the rubber compound: The rubber compound used in winter tires is designed to stay flexible in cold temperatures, which helps them grip the road better than summer tires.If you’re not sure whether your tires are summer or winter, it’s always best to err on the side of caution and go with winter tires. They may cost more upfront, but they could save you from an expensive accident down the road.

Credit: www.vikingmotors.ca
All Season Tyres With Snowflake Symbol
When it comes to choosing tyres, there are a few important things to consider. One is the type of terrain you’ll be driving on. Another is the climate.
And if you’re planning on doing any winter driving, then you’ll need to make sure you have tyres with the snowflake symbol.All season tyres with the snowflake symbol are designed for winter driving conditions. They have a special tread pattern and compound that helps provide good traction in snow and ice.
They’re also rated for lower temperatures, so they won’t harden up and lose grip when the mercury dips.If you live in an area that gets frequent snowfall or experience very cold winters, then all season tyres with the snowflake symbol are a good choice for your vehicle. They’ll help keep you safe on the roads and get you where you need to go – even when Mother Nature throws a curveball.
How to Identify Summer Tires
When the weather gets warm, many drivers begin to think about summer tires. But what are summer tires? And how can you tell if your vehicle needs them?
Summer tires are designed to provide better grip and handling on warm, dry roads. They typically have a lower tread depth than all-season or winter tires, which helps to improve traction. The tread pattern on summer tires is also often different than other types of tires, with more grooves or sipes that help channel water away from the contact patch.
So how can you tell if your vehicle would benefit from summer tires? If you live in an area with hot summers and little rainfall, then switching to summer tires makes sense. You’ll get better performance out of your vehicle, and you won’t have to worry about hydroplaning on wet roads.
If you’re not sure whether or not summer tires are right for you, talk to your local tire dealer or mechanic. They can help you make the best decision for your driving needs.
Tire Symbols Meaning
Tire symbols are the pictograms that can be found on the sidewall of a tire. They provide important information about the tire, such as its size, load rating, and speed rating. Some symbols also indicate whether the tire is suitable for use in winter conditions.
The most common tire symbols are:
-P: Indicates the width of the tire in millimeters.
-R: Refers to the diameter of the wheel that this particular tire can be used with, also expressed in inches.
– Load index: A number that corresponds to the maximum weight that can be safely carried by the tire. The higher the load index, the greater the weight capacity of the tire.
– Speed symbol: A letter that indicates how fast a vehicle can travel while using this tire without exceeding its speed rating.
The faster a vehicle is driven,the greater stress placed on tires, so it’s important not to exceed a tire’s speed limit.When shopping for new tires, it’s important to pay attention to these symbols so you choose a set of tires that will be safe and appropriate for your vehicle.
Conclusion
If you live in an area where it snows, you know that having the right tires can make all the difference. But how can you tell if a tire is a snow tire? In this blog post, we’ll give you some tips.
One way to tell if a tire is a snow tire is by looking at the tread pattern. Snow tires typically have deeper treads than regular tires, which helps them grip the road better in snowy and icy conditions. You may also see snow tires with studs, which provide even more traction on slippery surfaces.
Another way to tell if a tire is a snow tire is by looking for the “mountain/snowflake” symbol on the sidewall of the tire. This symbol indicates that the tire meets certain standards for use in winter conditions.If you’re not sure whether or not a particular tire is a snow tire, be sure to ask your Tire Shop before making your purchase.

How to Add Traction to Power Wheels Tires
One of the easiest ways to add traction to Power Wheels tires is to simply add weight to the toy car. This can be done by filling up the car’s battery compartment with sand, rocks, or anything else that will add weight. Another way to add traction is to cut small treads into the tires with a knife.
This will help the tires grip the ground better, but it may also make them more likely to get punctured.
- Buy some traction strips or chains specifically designed for Power Wheels tires
- Read the instructions that come with the strips or chains to determine how many you’ll need for your specific model of Power Wheels vehicle
- Clean the tires on your Power Wheels car or truck thoroughly with soap and water to remove any dirt or debris
- Dry the tires completely with a clean towel before proceeding
- Place the strips or chains around the circumference of each tire, following the manufacturer’s instructions carefully
- Test drive your Power Wheels vehicle on a variety of surfaces to see how well the traction strips or chains are working before taking it out on rougher terrain
EZ Power Wheels Tire Traction Fix!
How Do You Add Traction to Plastic Tires?
There are a few ways to add traction to plastic tires. One way is to add treads or spikes to the tires. This can be done with either aftermarket products or by modifying the tires themselves.
Another way to increase traction is by adding weight to the vehicle, which will help keep the tires from spinning on slippery surfaces. Finally, making sure the tires are properly inflated will also help with traction.
How Do You Add Traction to a 12V Ride on Toy?
There are a few ways to add traction to a 12v ride on toy. One way is to add weight to the back of the vehicle. This will help keep the rear wheels from spinning out when going up hills or accelerating.
Another way is to add chains or studs to the tires. This will provide extra grip on slippery surfaces like snow or ice. Finally, you can also install larger, more powerful motors in the front and rear wheels.
This will give the vehicle more pulling power and help it climb hills more easily.
How Do You Put Rubber Tires on a Power Wheels?
If you have a Power Wheels vehicle with rubber tires, you may be wondering how to put them on. Here are the steps:1. Remove the plastic caps from the tire rims.
2. Place the rubber tires onto the rims. Make sure that the tread is facing in the correct direction.3. Replace the plastic caps onto the tire rims.
How Do I Add Traction to My Peg Perego Gator?
If your Peg Perego Gator is slipping or sliding on wet or icy surfaces, you may be looking for a way to add traction. Here are a few ways that you can do this:1. Use tire chains.
Tire chains are a great way to add traction to your vehicle, and they’re relatively easy to install. Simply put the chains around the tires and secure them in place. This will give your Gator much better traction on slippery surfaces.
2. Use sandbags. Sandbags can be placed in the bed of your Gator, behind the rear wheels. This will help keep the rear end of the vehicle from sliding around on slippery surfaces.
3. Install studded tires. If you plan on using your Gator in snowy or icy conditions regularly, studded tires may be a good option for you. These tires have metal studs embedded in them which provide excellent traction on slick surfaces.
Credit: www.hoslotcarracing.com
Traction Bands for Plastic Wheels
Do you have a plastic wheeled vehicle that needs more traction? You may be able to improve traction by adding traction bands to the wheels. Traction bands are available in different widths and lengths to fit many different sized wheels.
They can also be trimmed to fit if needed.Traction bands work by increasing the contact area between the tire and the ground. This gives the vehicle more grip on slippery surfaces, making it easier to move around.
Traction bands can be especially helpful in snow and ice. They can also help if your vehicle is having trouble getting traction on a sandy or muddy surface.Adding traction bands to your wheels is a relatively easy process.
First, clean the surface of the wheel where the band will be applied. This will help ensure that the adhesive sticks properly. Next, place the band around the circumference of the wheel and trim it to size if necessary.
Traction Bands for Power Wheels Jeep
If your child has a Power Wheels Jeep, you may be wondering if you need to buy traction bands for it. The short answer is: maybe. It depends on the terrain your child will be driving on and how much weight the Jeep is carrying.
If your child will be driving on grass or other soft surfaces, traction bands are not necessary. The Jeep’s tires will provide enough grip and traction on these surfaces. However, if your child will be driving on hard surfaces like concrete or pavement, traction bands can help provide better grip and prevent slipping.
This is especially important if the Jeep is carrying a lot of weight (such as another child).Traction bands are relatively inexpensive and easy to install, so they’re worth considering if you think your child will need them. You can find them at most toy stores or online retailers that sell Power Wheels parts and accessories.
How to Add Traction to Plastic Wheels
If your plastic wheels are slipping, there are a few things you can do to add traction. First, try roughing up the surface of the wheel with sandpaper. This will provide more grip for the tire.
If that doesn’t work, you can try using a clear silicone adhesive to glue treads or strips of rubber onto the wheel. Just be sure to clean and dry the surface of the wheel before applying any adhesive.
Conclusion
One way to add traction to Power Wheels tires is to use a product called Traction Magic. This is a powder that you sprinkle on the tires before you drive. It makes the tires sticky and helps them grip the road better.
Another way to improve traction is to add weight to the car. This can be done by adding sandbags or other heavy objects in the trunk or backseat. The extra weight will help keep the wheels from spinning on slippery surfaces.
You can also try using chains on the tires. This will provide extra traction, but it may also damage your lawn or driveway if you’re not careful.Finally, make sure that your Power Wheels are properly inflated.
Tires that are underinflated will have less contact with the ground and won’t grip as well.

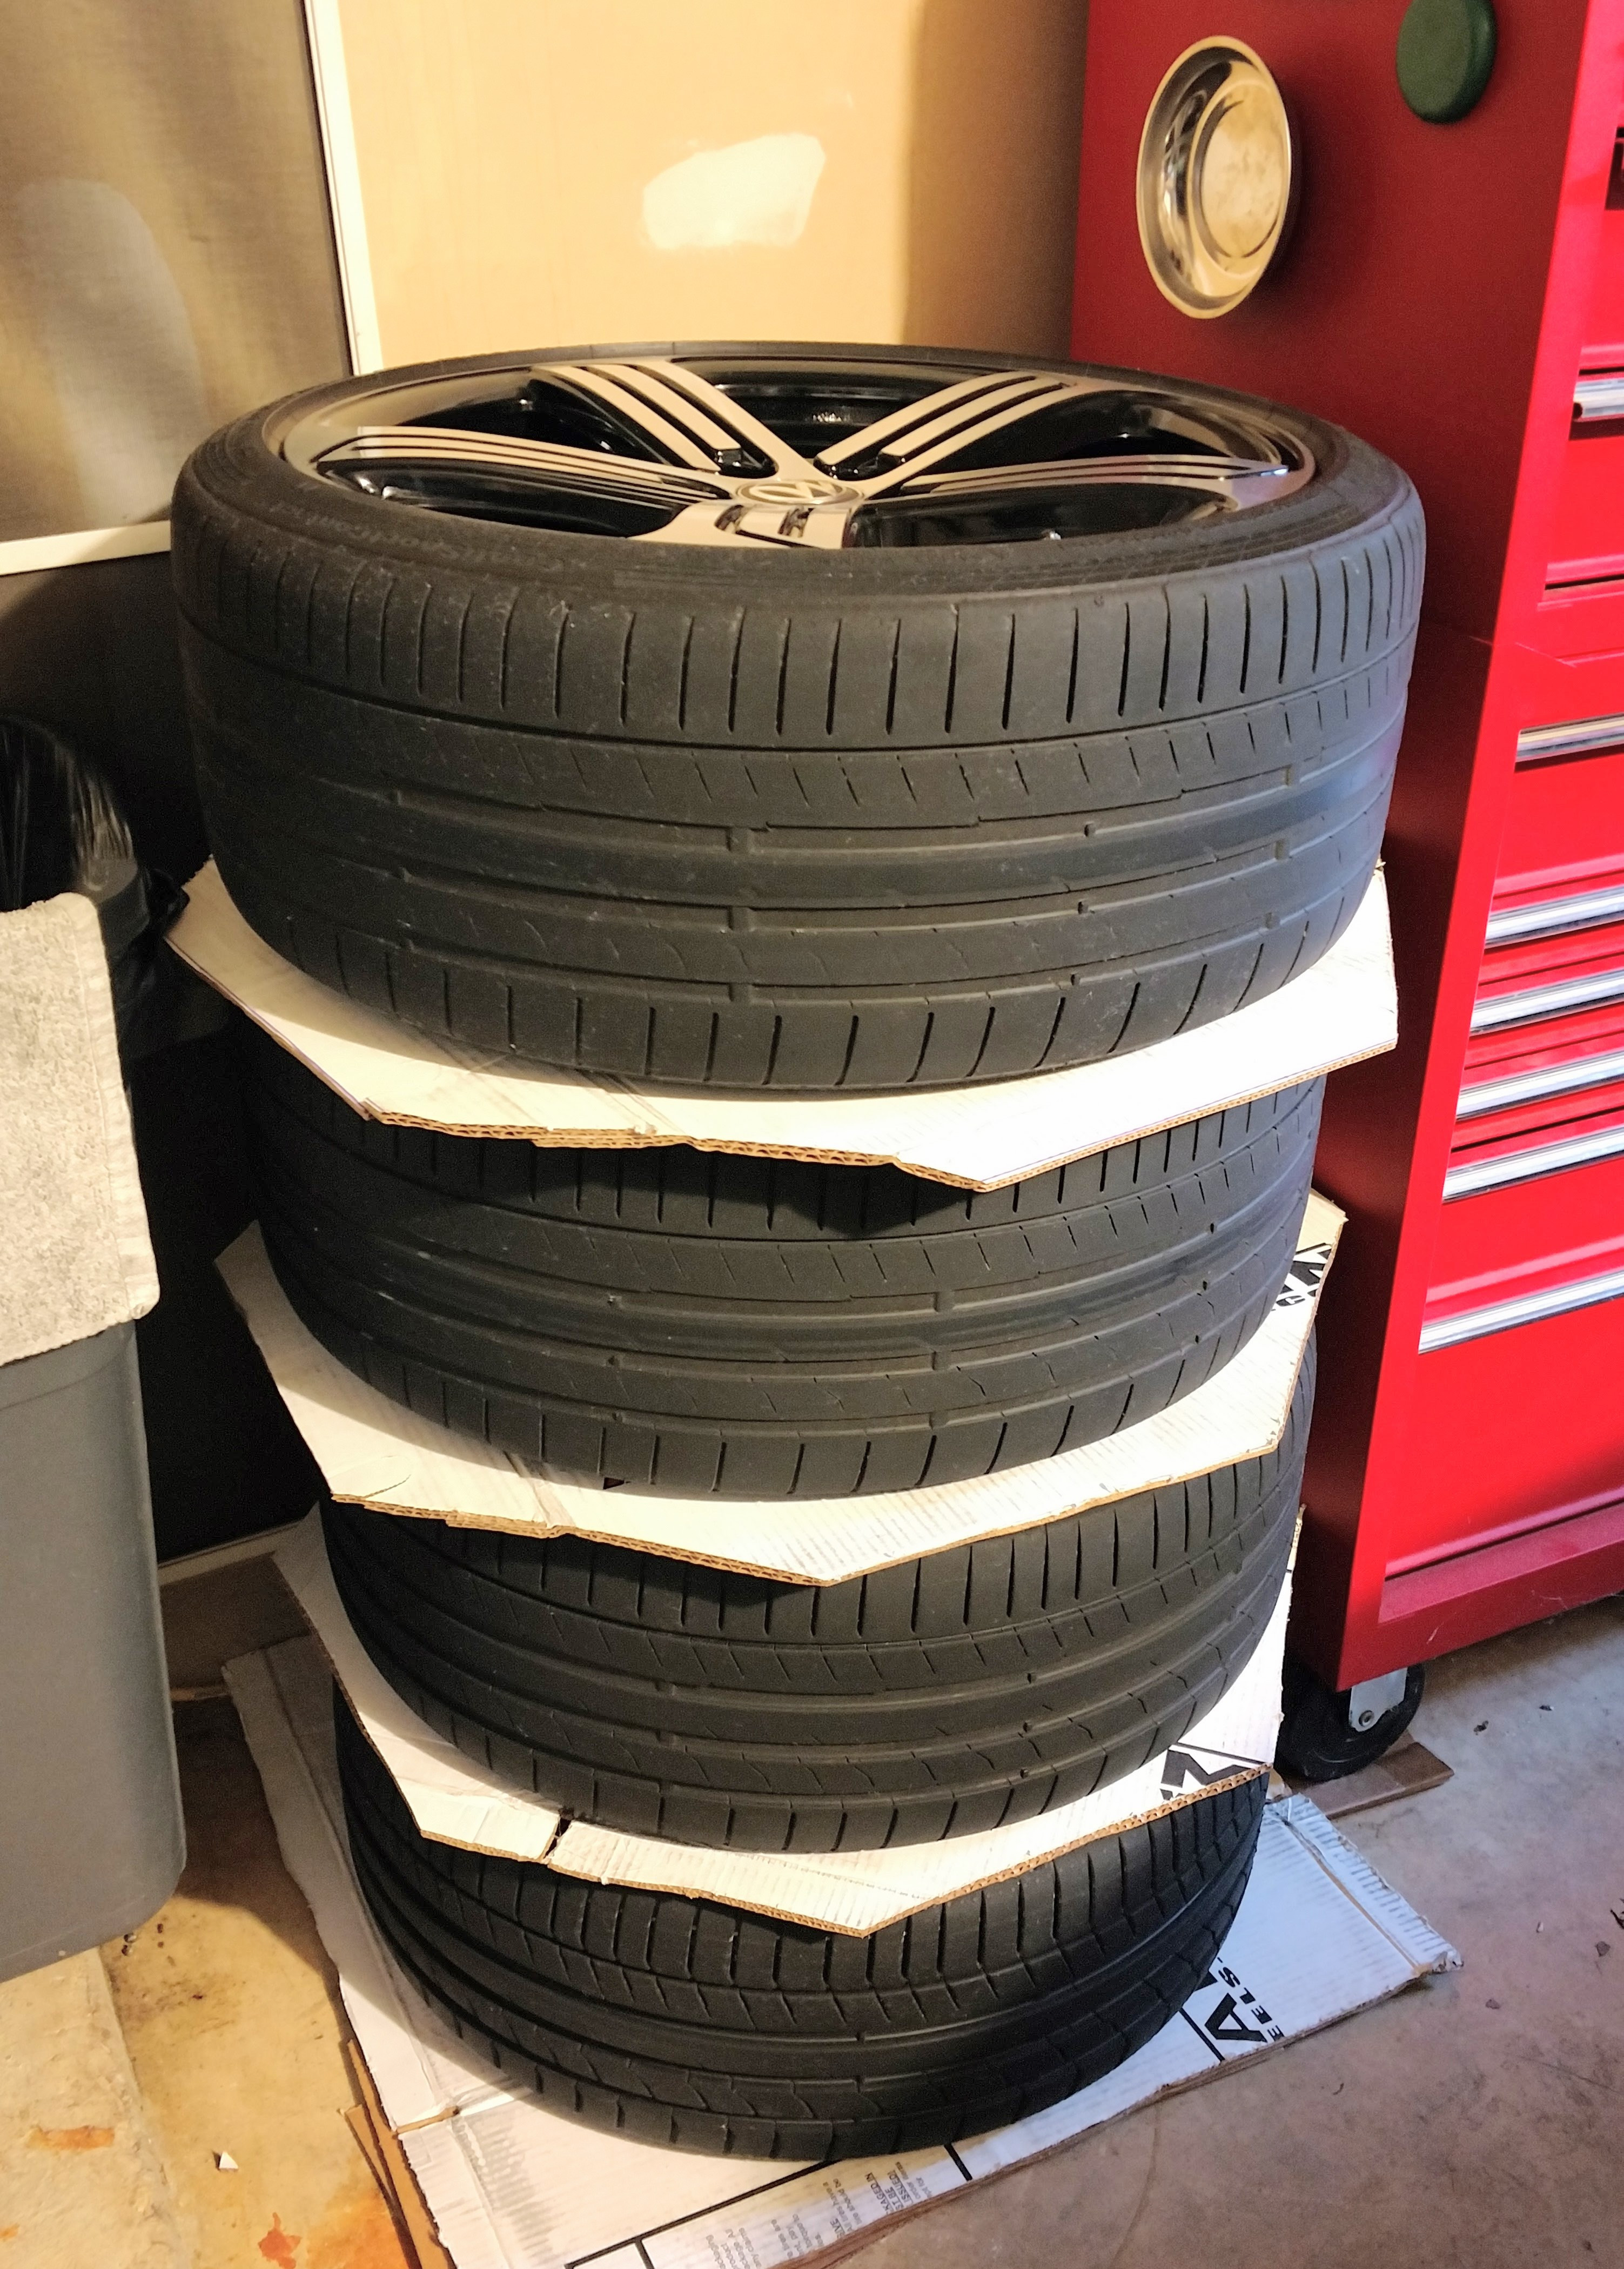
How to Stack Tires With Rims
Whether you are looking to store your tires for the winter or simply want to keep them organized in your garage, learning how to stack tires with rims is a handy skill. While it may seem like a daunting task, with a little bit of know-how and some elbow grease, you can have your tires neatly stacked in no time.
- Remove the tires from the vehicle
- Stack the tires on top of each other with the rims facing out
- If desired, tie or strap the tires together to keep them in place while transporting or storing them
Top 10 Tips For Storing Your Tires
Is It Ok to Stack Wheels And Tires?
If you’re looking to save space in your garage or simply want to change up your wheel and tire combinations without having to break out the power tools, you might be wondering if it’s okay to stack wheels and tires. The answer is yes, but there are a few things you need to keep in mind in order to do so safely.First, when stacking wheels and tires, make sure that the weight of the top stack is evenly distributed on the bottom stack.
This will help prevent the stacks from tipping over.Second, use a piece of cardboard or another soft material between each layer of wheels and tires to prevent scratching.Finally, don’t forget to label each stack so you know which ones go together!
With these tips in mind, stacking your wheels and tires is a great way to save space and mix up your tire/wheel combinations.
How Do You Store Tires on Rims?
If you have ever wondered how to store tires on rims, wonder no more! There are a few different ways that you can do this, and it really depends on what type of tire and rim you have. For example, if you have a car with alloy wheels, then you can just stack the tires on top of each other in your garage or storage shed.
However, if you have steel wheels, then it is best to hang the tires from the ceiling or rafters so they don’t rust. Whichever way you choose to store your tires on rims, just make sure that they are out of the way and not in danger of being damaged.
How High Can You Stack Tires on Rims?
Tire stacking is a popular way to give your vehicle a lifted look without having to install a larger suspension system. But how high can you stack tires on rims before it becomes unsafe?The answer depends on the width of your tires and the size of your rims.
A good rule of thumb is that you can safely stack tires that are up to 2 inches wider than your rims. So, if you have 8-inch wide rims, you could safely stack 10-inch wide tires.However, it’s important to note that tire manufacturers do not recommend stacked tires for highway use.
This is because the increased height makes the tire more susceptible to punctures and blowouts. Therefore, if you’re planning on using stacked tires on the highway, it’s important to check with your tire manufacturer first to make sure they approve of this practice.
Can You Stack Tires on Top of Each Other?
When it comes to stacking tires, there are a few things you need to keep in mind. First, make sure that the tires are the same size and type. If they’re not, then they may not stack evenly and could potentially topple over.
Second, you’ll want to use a tire rack or some other type of support to keep the tires steady. Simply stacking them on top of each other without any support is asking for trouble. Third, be aware of the weight of the tires you’re stacking.
If they’re too heavy, again, they could topple over. With all that said, if done correctly, stacking tires can be a space-saving way to store them. Just be careful and use common sense!
Credit: www.wolfeden.org
Store Tires Vertically Or Horizontally
When it comes to storing your tires, you have two options: vertical or horizontal. But which is the best way to store them?There are pros and cons to both methods.
Storing your tires vertically takes up less space, but it can be harder to access them when you need to change a tire. Horizontal storage is easier to access, but it takes up more space.Ultimately, the best way to store your tires is the way that works best for you.
If you have the space, horizontal storage is probably the best option. But if space is tight, vertical storage will work just fine.
Conclusion
If you’re looking to stack your tires with rims, there are a few things you need to know. First, make sure that the rims you’re using are designed for stacking. There are special stacking rims available that will make the process easier and prevent damage to your tires.
Next, when stacking the tires, be sure to alternate between the inner and outer rim. This will help keep the balance of your tire stack and prevent it from tipping over. Finally, once your tire stack is complete, secure it with straps or chains to prevent it from coming undone.

Stranded Deep How to Get Tires Out of Ship
If you’re anything like me, then you’re always on the lookout for new and interesting ways to get stranded deep. And what better way to do so than by getting tires out of a ship? That’s right, with this method, you can easily become stranded deep without having to worry about finding a way back to shore.
If you find yourself stranded deep in the middle of the ocean, there’s a good chance you’ll come across a shipwreck at some point. And if that shipwreck has tires on it, you may be wondering how to get them off.The first thing you need to do is assess the situation.
Is the shipwreck in danger of sinking? If so, then you need to get off of it as quickly as possible and find another way to get the tires off. If not, then you can take your time and figure out the best way to remove them.
There are a few different ways to remove tires from a shipwreck, but one of the most effective is by using a grappling hook. You can throw the hook over one of the tire’s spokes and then use it to pull the tire off of the shipwreck. Just be careful not to damage the tire in the process.
Once you have removed all of the tires from the shipwreck, it’s time to start thinking about what to do with them. You can use them as flotation devices, or even fashion them into makeshift rafts. Whatever you decide, just make sure that you don’t leave them behind on your next adventure!
Stranded Deep – Those Tyres (Tires) Can Be Acquired
Can You Put Tires in Your Inventory Stranded Deep?
There is no inventory in Stranded Deep, so you cannot put tires in it.
What are Tires for in Stranded Deep?
Tires are one of the key ingredients in Stranded Deep. They are used to make the game’s roads, which allow players to travel between different areas on the island. Tires can be found scattered around the island, or they can be crafted by combining rubber and metal.
Where Do You Find Tyres in Stranded Deep?
In Stranded Deep, tyres can be found scattered around various locations on islands and atolls. They can also be looted from shipwrecks.Tyres are a valuable resource in Stranded Deep as they can be used to craft various items, such as the crafting table, sleeping bag, campfire and raft.
They can also be used as fuel for fires.
How Do You Get a Shipwreck in Stranded Deep?
There are a few ways to get a shipwreck in Stranded Deep. The most common way is to find one in the open water. Shipwrecks can also be generated by the game when certain conditions are met, such as if the player character dies and respawns at sea.
Finally, players can create their own shipwrecks using the game’s editor tools.
Credit: arstechnica.com
Stranded Deep Cargo Ship
The SS Cotopaxi was a cargo ship that was built in 1919. The ship set sail from Charleston, South Carolina on November 29, 1925 and was headed to Havana, Cuba. The ship never reached its destination and was found stranded deep in the Bermuda Triangle on December 5, 1925.
The ship’s captain, George W. Gorman, and his crew were never seen or heard from again.There have been many theories as to what happened to the SS Cotopaxi and her crew. One theory is that the ship hit a submerged reef which caused it to sink.
Another theory is that the ship encountered bad weather which caused it to sink. Whatever the case may be, the SS Cotopaxi remains one of the most mysterious maritime disappearances in history.
Stranded Deep Tires
If you’ve ever been driving and had a tire blowout, you know how frightening it can be. You may have even had to change a tire on the side of the road. But what if you were stranded in the middle of nowhere with a flat tire?
What would you do?Stranded Deep is a game that simulates this scenario. In Stranded Deep, you are stranded on a deserted island after your plane crashes.
You must use your wits and resources to survive until rescue arrives.One of the key elements of survival in Stranded Deep is having functional tires on your vehicle. If your tires are damaged, you will not be able to travel far or move quickly, making it difficult to find food and water.
In addition, damaged tires can make it difficult to escape from dangerous situations such as wildfires or floods.To avoid being stranded with damaged tires, it is important to regularly check your tires for wear and tear. Look for any cracks or bulges in the sidewalls of the tire.
Also, check the tread depth to ensure that there is enough tread remaining to provide traction on wet or icy roads. If you notice any damage, replace the tire immediately.In Stranded Deep, there are three types of terrain: sand, mud, and water.
Each type of terrain requires different tires in order to traverse safely. Sand requires all-terrain tires which have deeper treads for better traction on loose surfaces like sand or gravel.
Conclusion
If you’re lucky enough to find a shipwreck while exploring in Stranded Deep, you may be wondering how to get the tires out. Here’s a quick guide!First, swim down to the wreck and enter through one of the holes.
Once you’re inside, look for the room with the tires in it. You can usually find this room by following the tire tracks on the floor.Once you’ve found the room, simply swim up to one of the tires and press E to detach it from the ship.
You can then swim back up to the surface with your prize!

When Does the Low Tire Pressure Light Come on
The low tire pressure light is an important safety feature in modern cars. It is designed to come on when the tire pressure is too low, alerting the driver to a potentially dangerous situation. There are a few different things that can cause the low tire pressure light to come on, and it is important to understand what these are so that you can take action if it happens to you.
If your car has a Low Tire Pressure Light, it will come on when the tire pressure in one or more of your tires is low. The light may come on while you’re driving, or it may come on when you turn on the ignition. Either way, it’s important to pay attention to it and take action as soon as possible.
If the light comes on while you’re driving, stop at the nearest service station and check your tires’ pressure levels. If any of them are low, fill them up to the recommended level. If the light comes on when you turn on the ignition, check your tires’ pressure levels before you start driving.
Again, if any of them are low, fill them up to the recommended level. Low tire pressure can lead to decreased fuel efficiency and increased wear and tear on your tires, so it’s important to keep an eye on your tires’ pressure levels and top them off as needed.
My Car Says Low Tire Pressure But the Tires are Fine
If you’ve ever gotten in your car only to have a message pop up on your dash telling you that your tire pressure is low, you know how frustrating it can be. You check your tires and they seem fine, so what gives? There are a few possible explanations for this phenomenon.
First, it’s possible that the sensors in your tires are just dirty or covered in debris. This can happen if you drive on gravel roads often or live in an area with a lot of dust in the air. Simply cleaning the sensors with some rubbing alcohol can often fix the problem.
Another possibility is that one of your tires is actually low on air, but not by much. Your car’s sensor may be more sensitive than the pressure gauge at your local gas station, so it’s picking up on something that you might not notice. Inflating your tires to the proper pressure should take care of this issue.
Finally, it’s also possible that there’s a problem with the sensor itself. If none of the above solutions work, then it may be time to take your car into the shop and have them check out the sensor to see if it needs to be replaced.
At What Psi Does Low Tire Pressure Light Come On?
The low tire pressure light comes on when the tire pressure drops below a certain level. This level is typically around 25-30 PSI.
How Long Do You Have When Your Tire Pressure Light Comes On?
If your tire pressure light comes on, you should stop and check your tires as soon as possible. Depending on the severity of the problem, you may have a few days or even weeks before it becomes dangerous to drive on. If the light is flashing, that means the problem is more urgent and you should fix it as soon as possible.
Can I Drive With Low Tire Pressure Light On?
It is never a good idea to drive with low tire pressure. The low tire pressure light is there for a reason – to indicate that your tires are not properly inflated. This can lead to decreased fuel efficiency, increased wear and tear on your tires, and even blowouts. If you see the low tire pressure light come on, be sure to stop and inflate your tires as soon as possible.
Why is My Tire Pressure Light on But My Tires are Fine?
If you’re like most people, you probably don’t think much about your tires until there’s a problem. So, when you see the tire pressure light on your dash, it’s natural to wonder what’s going on. There are a few reasons why this light may come on, even though your tires may seem fine.
First, it could be that the sensor that monitors tire pressure is malfunctioning. This isn’t necessarily a big deal, and can usually be fixed with a simple reset. Another possibility is that one or more of your tires is actually low on air.
This is more likely if the light comes on after you’ve been driving for a while, as the heat from friction can cause the air in your tires to expand slightly and escape. Checking and inflating your tires to the proper pressure should take care of this problem. Finally, it’s possible that there is a leak in one of your tires.
This is obviously more serious than the other two possibilities and will require a trip to the mechanic to get fixed. However, it’s still important to keep an eye on your tire pressure and make sure it doesn’t get too low in the meantime. So, if you see the tire pressure light come on but everything seems normal with your tires, don’t panic!
Frequently Ask & Questions
When does the low tire pressure light come on?
The low tire pressure light typically comes on when the tire pressure in one or more of your vehicle’s tires drops below a certain threshold. Most modern vehicles are equipped with a tire pressure monitoring system (TPMS), which constantly monitors the air pressure in the tires. When the pressure in any tire falls below the recommended level, usually around 25% below the manufacturer’s recommended pressure, the TPMS triggers the low tire pressure warning light on the dashboard.
What causes the low tire pressure light to come on?
There are several factors that can cause the low tire pressure light to illuminate. The most common reasons are gradual air loss due to punctures, leaks, or valve stem issues. Additionally, extreme changes in ambient temperature can also affect tire pressure. Over time, tires can naturally lose pressure due to normal permeation through the rubber. It’s important to address the cause promptly as driving on underinflated tires can lead to decreased fuel efficiency, poor handling, and increased risk of tire failure.
Can the low tire pressure light come on during cold weather?
Yes, the low tire pressure light can come on during cold weather. Cold temperatures can cause the air inside the tire to contract, resulting in a decrease in tire pressure. If the pressure drops below the TPMS threshold, the low tire pressure light will activate. It’s essential to check and adjust tire pressure during colder months to maintain proper inflation and ensure optimal vehicle performance and safety.
What should I do when the low tire pressure light comes on?
When the low tire pressure light comes on, the first step is to find a safe place to pull over and inspect your tires. Using a tire pressure gauge, check the pressure in all four tires, including the spare tire if your vehicle has one. If you find any underinflated tires, inflate them to the recommended pressure specified in your vehicle’s owner’s manual or the sticker on the driver’s side door jamb. If you are unsure or unable to resolve the issue yourself, it’s best to visit a qualified mechanic or tire shop for a professional inspection and repair.
Can the low tire pressure light come on if my tires are not punctured?
Yes, the low tire pressure light can come on even if your tires are not punctured. As mentioned earlier, various factors can cause tire pressure to drop, including temperature changes, leaks around the tire bead or valve stem, or gradual air loss due to tire aging. Sometimes, the TPMS sensor itself may malfunction, leading to false readings. In such cases, it is advisable to have your tires and TPMS system checked by a professional to determine the exact cause and perform any necessary repairs or replacements.
Conclusion
It’s always frustrating when your car starts acting up and you can’t figure out why. One common issue is the low tire pressure light coming on. But when does this happen, and what does it mean?
The short answer is that the low tire pressure light comes on when your tires are 25% below the recommended pressure. This usually happens because of a slow leak or because you drove over something sharp that punctured the tire. Either way, it’s important to take care of the problem as soon as possible.
If you’re not sure how to check your tire pressure, most gas stations have machines that can do it for you. Just put in your zip code and it will tell you where the nearest one is. Once you know the correct pressure, use a pump or air compressor to get your tires back up to where they need to be.
In summary, the low tire pressure light comes on when your tires are 25% below the recommended pressure. This can be caused by a slow leak or a puncture. Be sure to check your tire pressure regularly and inflate them as needed to avoid any problems down the road!

How to Fill Rv Tires With Air
If you have ever been on a long road trip, you know how important it is to have properly inflated tires. If your tires are low on air, it can not only be uncomfortable for the ride, but it can also put unnecessary wear and tear on your RV. Luckily, filling up your RV tires with air is a relatively easy process that can be done in just a few minutes.
Here is a step by step guide on how to fill RV tires with air:First, locate a nearby gas station or tire center that has an air compressor. Many of these places will have an air hose that you can use for free or for a small fee.
Once you have located an air compressor, park your RV next to it and turn off the engine. Next, find the valve stem on your tire and unscrew the cap.
How To Inflate RV Tires The Easy Way (Hint: Use a Viair 400P-RV )
- Locate the air valve stem on your RV tire
- It is typically located near the edge of the tire
- Unscrew the cap from the valve stem
- Insert the nozzle of your air compressor into the valve stem and turn on the compressor
- Fill the tire with air to the recommended pressure level and then remove the nozzle from the valve stem
- Screw the cap back onto the valve stem to close it off and prevent air from escaping
How to Inflate Dual Rv Tires
If you have a dual RV tire setup, you will need to know how to inflate them properly. Here are some tips on how to do just that:1. Make sure that the valve stems on both tires are pointing in the same direction.
This will ensure that air flows evenly into both tires.2. Use a good quality air compressor to fill up your tires. Do not overfill them – just fill them up to the recommended pressure level.
3. Once the tires are inflated, check the tread and sidewalls for any damage or wear. If everything looks good, you’re all set!
Credit: www.doityourselfrv.com
How Do You Put Air in a Dual Rv Tire?
There are a few different ways that you can put air in a dual RV tire. The first way is to use a standard air compressor. You will need to attach the air hose to the tire valve and then turn on the compressor.
The second way is to use an air tank. These are usually found at gas stations or truck stops. You will need to fill up the tank with air and then attach it to the tire valve.
The third way is to use a hand pump. This is probably the most difficult way, but it can be done if you don’t have access to an air compressor or an air tank.
Should Rv Tires Be Inflated to Max Psi?
RV tires should be inflated to the manufacturer’s recommended pressure, which can be found on a sticker on the RV or in the owner’s manual. Over-inflating tires can lead to tire failure and blowouts, so it’s important to follow the recommendations.
How Much Air Do You Put in Rv Tires?
RV tires need to be inflated to the correct pressure in order to function properly and provide a comfortable ride. Overinflating or underinflating your RV tires can cause issues like uneven wear, decreased fuel efficiency, and a rougher ride. So how much air should you put in RV tires?
The short answer is that most RV tires need to be inflated to around 80 psi. However, it’s always best to consult your RV’s owner’s manual or the tire manufacturer for specific inflation recommendations.Underinflated tires are more likely to suffer from flats and blowouts, as well as increased rolling resistance which leads to decreased fuel efficiency.
Overinflated tires may experience premature tread wear and can make your RV less stable on the road.It’s important to check your RV tire pressure regularly – at least once a month – using a reliable tire gauge. Be sure to check all four tires (including the spare) and inflate or deflate as needed until all four are at the same pressure.
Should Rv Tires Be Filled With Nitrogen?
Most people believe that nitrogen-filled tires are the best way to go when it comes to RVing. There are several reasons for this belief, but the two most common ones are that nitrogen-filled tires last longer and they hold their pressure better than regular air-filled tires. Let’s take a closer look at each of these claims.
One of the main benefits of using nitrogen in your RV tires is that it can help them last longer. This is because nitrogen does not break down as quickly as oxygen, so it can help prevent tire degradation. Additionally, because nitrogen does not expand and contract as much as air does with changes in temperature, it can also help reduce tire wear.
Another big benefit of using nitrogen in your RV tires is that they will hold their pressure better than regular air-filled tires. This is because nitrogen molecules are larger than oxygen molecules, so they don’t escape from the tire as easily. This means that you won’t have to add air to your tires as often, which can save you time and money over the long run.
Overall, there are many benefits to using nitrogen-filled tires on your RV. However, it’s important to keep in mind that they do require more initial investment than regular air-filled tires.
Conclusion
If you own an RV, then you know that one of the most important maintenance tasks is to keep the tires inflated. Not only does this help with fuel economy, but it also helps to extend the life of your tires. Unfortunately, many people don’t know how to fill RV tires with air and end up overinflating or underinflating them.
In this blog post, we’ll show you how to properly fill RV tires with air so that they are at the correct pressure. We’ll also give you a few tips on how to check your tire pressure and what to do if your tires are low on air.

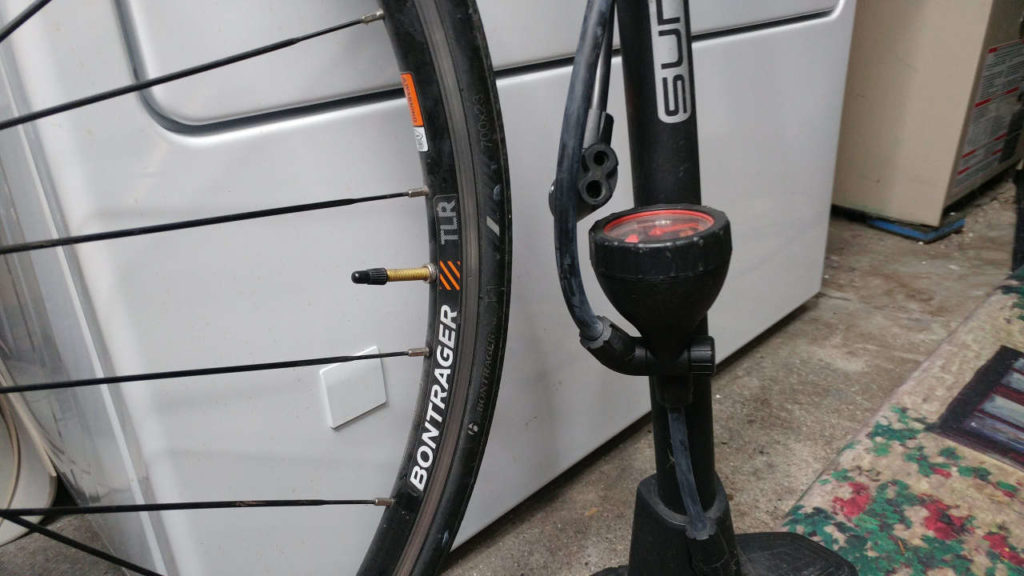
How to Pump Road Bike Tires With Hand Pump
If you’ve ever been out on a long bike ride only to have your tire go flat, then you know the importance of keeping a pump with you. While it’s possible to use a hand pump to inflate your road bike tires, it does take some effort. Here’s how to do it:
Start by attaching the pump to the valve on your tire. For Presta valves, unscrew the cap and push the end of the pump onto the valve stem. For Schrader valves, unscrew the cap and pull out the center pin before pushing on the pump.
Once the pump is attached, start pumping until you reach your desired pressure. If you’re not sure what that should be, consult your bike’s owner’s manual or look for markings on the side of your tires. It’s important not to overinflate them, as this can cause problems when riding.
Detach the pump from the valve and screw on any caps that were removed earlier. You’re now ready to hit the road!
How To Pump A Bike Tyre
- Inflate the tire to about 80% of its maximum pressure using a track pump or floor pump
- This will make it easier to get started with the hand pump
- screw the hand pump onto the valve, making sure that the valve is in the open position 3
- start pumping by pressing down on the handle and pull up on the handle at the same time
- You should feel resistance as you do this
- continue pumping until you reach your desired pressure
How to Pump a Bike Tire With Hand Pump
Assuming you don’t have a fancy bike pump with a gauge, here’s how to inflate your tires using a hand pump:1. Start by unscrewing the cap at the top of the tire valve. If there’s a little black knob, unscrew that too.
2. Put the nozzle of the hand pump onto the valve and start pumping. It might take a few tries to get a good seal.3. Once you start seeing air coming out of the tire, put your thumb over the end of the nozzle to keep air from escaping while you finish pumping up the tire.
Depending on how flat your tire was, it might take 30-50 pumps to get it fully inflated.4. Once the tire is pumped up, screw on the cap (and black knob if there is one) and you’re ready to ride!
How to Pump a Bike Tire With a Presta Valve
If you have a road bike, then you’re probably familiar with Presta valves. These valves are thinner than Schrader valves and have a small nut that needs to be unscrewed before air can be added. Some people find them difficult to use, but they’re actually not that hard once you get the hang of it.
Here’s a step-by-step guide on how to pump a bike tire with a Presta valve:1. Unscrew the cap at the top of the valve and pull out the inner tube’s valve stem.2. Place the tip of your pump onto the valve and make sure that it’s tight.
If it’s not, air will leak out as you try to pump.3. Start pumping! You might need to prime the pump first by giving it a few strokes without anything attached.
Once you start pumping, keep going until the tire is inflated to its desired pressure.4. Remove the pump tip from the valve and screw on the cap quickly so that air doesn’t escape. That’s it!
How to Pump a Bike Tire With a Ball Pump
It is very important to know how to pump a bike tire with a ball pump. This will come in handy if you ever have a flat tire or need to inflate your tires before a ride. Here are step-by-step instructions on how to do this:
1. Remove the valve cap from the valve stem on your tire.2. Place the nozzle of the ball pump onto the valve stem. Make sure that it is snug and secure so that air does not leak out while you are pumping.
3. Start pumping the ball pump up and down until you feel resistance. This means that the Tire is full of air and you can stop pumping. If you want to check the pressure, use a pressure gauge or ask someone at a bike shop to help you out.
They will usually have one that you can borrow or buy cheaply.4. Once you are finished, put the valve cap back onto the valve stem to keep dirt and debris out.
Road Bike Pump Portable
A road bike pump is a necessity for any cyclist who wants to be able to keep their tires inflated while on the go. There are many different types and brands of road bike pumps, but they all serve the same purpose: to inflate your tires so you can keep cycling.Most road bike pumps are made of aluminum or steel and have a variety of different inflation settings.
Some have a Presta valve adapter, while others have a Schrader valve adapter. Be sure to check what type of valves your tires have before purchasing a pump!Road bike pumps usually come in two different styles: floor pumps and hand pumps.
Floor pumps are larger and require you to stand on them while pumping, but they can inflate your tires much faster than a hand pump. Hand pumps are smaller and can be carried with you on your bike, but they take longer to inflate your tires.When choosing a road bike pump, consider how often you will need to use it and how quickly you need to be able to inflate your tires.
If you only ride occasionally, a hand pump may be sufficient. However, if you ride frequently or compete in Races, you’ll want a floor pump that can get the job done quickly.
Hand Pump for Bike Tires
A hand pump is an ideal tool for quickly and easily inflating your bike tires. A good quality hand pump will have a durable construction that can withstand being dropped or banged around, and it will have a comfortable grip so you can pump without fatigue. Look for a hand pump with a gauge so you can accurately measure the air pressure in your tires.
Some hand pumps also come with a built-in light, which can be helpful when pumping in low-light conditions.

Credit: roadcyclinguk.com
How Do You Hand Pump a Road Bike?
Assuming you don’t have a flat tire and just need to pump up your bike tires:To hand pump a road bike, you will need either a frame pump or a mini pump. A frame pump is the larger of the two options and can be attached to your bike frame, while a mini pump is smaller and more portable.
If you have a Presta valve, which is common on road bikes, you will also need an adapter.To start, open the valve on your tire by unscrewing the cap and pulling out the small metal pin in the center. For a Presta valve, this will allow air to flow into the tire.
If you’re using a frame pump, attach the hose to the valve and start pumping. You may need to hold down the valve with one finger as you Pump so that air doesn’t escape. For a mini Pump, first screw on The adapter (if using Presta valves), then attach The Pump directly to The Valve And start pumping away.
Inflate The tires To Your Desired Pressure And re-screwThe cap ontoThe Valve before detachingThe Pump.
How Do You Pump Up a Road Bike Tire?
If you have a road bike, you know that keeping your tires properly inflated is crucial to having a good ride. You also know that pumping up your tires can be a bit of a pain, especially if you don’t have the right equipment. Here’s a step-by-step guide to pumping up your road bike tires so you can get back on the road and enjoy the ride.
1. Get the right tools: You’ll need a good quality hand pump or an air compressor with an adapter for Presta valves. If you’re using a hand pump, make sure it has a pressure gauge so you can accurately inflate your tires to the recommended pressure.2. Remove the cap: Unscrew the cap from your tire valve and pull it out so you can access the valve itself.
3. Insert the pump: Put the tip of your hand pump or air compressor adapter onto the valve and screw it on tightly. If you’re using an air compressor, turn it on now and set it to the correct pressure (usually around 80 psi for road bike tires).4. Pump away: Start pumping until your tire is at the desired pressure.
If you’re using a hand pump, this will take some time and elbow grease – be patient! If you’re using an air compressor, simply wait until it shuts off automatically when it reaches the correct pressure. Don’t overinflate – remember that most road bike tires should be between 80 and 130 psi.
How Do You Manually Pump a Bike Tire?
Assuming you don’t have a flat and just need to pump up your bike tire, you’ll need a bike pump. There are different types of bike pumps, but the most common is the hand-held pump. To use one of these, start by opening the valve on your tire – there are two types of valves, Presta and Schrader, so make sure you know which type you have before you start (they’re not compatible).
Once the valve is open, fit the end of the pump onto it and start pumping. It’s important to get a good seal so that air doesn’t escape as you’re pumping. You can usually tell if you have a good seal if the handle of the pump is hard to push down – if it feels easy, air is probably escaping.
To get an accurate reading of how much air is in your tire, use a pressure gauge (most pumps will have one built in). Check your tires’ sidewalls to see what range of pressures they can take – too much pressure and they could burst; too little and they’ll be more likely to get punctured. When you’ve reached the desired pressure, close off the valve on your tire to prevent any air from escaping, then detach the pump.
How Do You Pump Up a Presta Valve With a Hand Pump?
Assuming you don’t have an adapter to convert your hand pump to fit a Presta valve, here are the steps:1. Unscrew the cap at the top of the Presta valve.2. Place the tip of the hand pump onto the exposed part of the valve stem.
3. Pump the handle up and down to build up air pressure in the tire. You may need to do this for a minute or two before enough air is in the tire.4. Once you’ve reached your desired air pressure, screw the cap back onto the top of the Presta valve to hold in the air.
Conclusion
If you’re new to road biking, you might be wondering how to pump up your bike tires using a hand pump. It’s actually not that difficult, but there are a few things you need to know before you get started.First, make sure that your hand pump is compatible with the valves on your bike tires.
There are two main types of valves – Presta and Schrader – and most pumps will work with both, but it’s always best to check before you start pumping.Once you’ve determined that your pump will work with your valves, open the valve by unscrewing the cap or breaking the seal. For Presta valves, you’ll need to unscrew the small knobby knob at the top of the valve stem before you can start pumping.
For Schrader valves, just push down on the small pin in the center of the valve stem.Now it’s time to start pumping! Put the barrel of the pump over the valve and start pushing down on the handle.
You’ll want to Pump Road Bike Tires With Hand Pump until you reach your desired tire pressure. Most road bike tires require 80-100 PSI, but it’s always best to check your owner’s manual or tire label for specific recommendations.Once you’ve reached your desired pressure, simply close the valve by screwing on the cap (for Presta valves) or pushing in The Center Pin (for Schrader valves).
That’s all there is to it! Now get out there and enjoy your ride!