- Home
- Blog

How to Make Your Tires Shine Homemade
Assuming you would like a blog post about how to make your tires shine:If you’re looking for a way to make your tires shine without spending a lot of money, this DIY method is for you. All you need is some WD-40 and an old rag.
First, spray the WD-40 onto the tire. Then, use the rag to rub the product into the tire until it’s evenly coated. Let it sit for a few minutes so that the WD-40 can penetrate into the rubber.
Finally, use a clean cloth to buff the tire until it’s shiny.
- You will need the following supplies: dish soap, water, vinegar, baking soda, and a sponge or brush
- Mix together one part dish soap with two parts water in a bucket
- Add 1/2 cup of vinegar to the mixture and stir well
- Wet your tires with the soapy mixture using a sponge or brush
- Be sure to get all sides of the tire including the treads
- Sprinkle baking soda onto each tire and scrub with a brush or sponge until it forms a foamy paste
- Rinse tires with clean water when finished and dry completely with a towel
Best Homemade Tire Shine
Tire shine is an important part of keeping your car looking its best. But buying tire shine can be expensive, and many commercial products contain harsh chemicals that can damage your tires. Luckily, there are a few easy ways to make your own tire shine at home using natural ingredients.
To make a simple tire shine, mix equal parts water and vinegar in a spray bottle and spritz it on your tires. Let the solution sit for a few minutes, then wipe it off with a clean cloth. For a more durable shine, mix one part water with two parts white vinegar, and add a tablespoon of olive oil or lemon juice.
Again, spritz it on your tires and let it sit for several minutes before wiping it off.If you want to get really fancy, you can make a paste out of one part baking soda and two parts water. Rub this paste onto your tires with a sponge or brush, then rinse it off.
This method will leave your tires looking shiny and new without any harmful chemicals!

Credit: www.truckingmonitor.com
What is the Best Homemade Tire Shine?
There are a few different ways that you can make your own tire shine at home, and which one is best for you will likely depend on what materials you have on hand and how much time you’re willing to spend. Here are three methods to try:1. The quickest and easiest way to get a temporary shine on your tires is to simply spray them with some WD-40.
This won’t last very long, but it’s a good option if you’re in a hurry and don’t have any other products on hand.2. For a more durable shine, mix together equal parts of water and white vinegar. Use an old rag or sponge to apply the mixture to your tires, then let them air dry or wipe them down with a clean cloth.
This method takes a bit longer than using WD-40, but the results will last longer.3. If you want your tires to really stand out, try making a paste out of equal parts of water, baking soda, and lemon juice. Apply this paste to your tires with an old rag or sponge, then let it sit for about 30 minutes before rinsing it off with water.
Your tires should be left with a deep, glossy shine that will last for weeks!
How Can I Make My Tires Super Shiny?
To make your tires super shiny, you’ll need to clean them thoroughly and then apply a tire shine product. First, wash your tires with soap and water to remove any dirt or grime. Then, dry them off with a towel.
Next, apply a generous amount of tire shine to each tire. You can either use a sponge or brush to work the product into the tires. Finally, let the tire shine dry for a few minutes before driving away.
Can I Use Cooking Oil for Tire Shine?
No, you should not use cooking oil for tire shine. While it may seem like a good idea at first, cooking oil can actually damage your tires and make them more susceptible to cracking and other wear and tear. Additionally, cooking oil can be difficult to remove from your tires, which can leave behind a messy residue.
Can You Use Wd40 As Tire Shine?
If you’re looking for a quick and easy way to make your tires look shiny and new, you might be tempted to reach for the WD-40. But is this product actually safe to use on tires?Here’s what you need to know about using WD-40 as tire shine.
First, it’s important to understand that WD-40 is not designed for use on tires. This product is actually a multi-purpose lubricant and cleaner that can be used for a variety of tasks around the house, garage or workshop.While it can help to clean and protect your tires from corrosion, it’s not specifically designed for this purpose.
As such, it may not provide the best possible results.In addition, WD-40 can be quite messy if not applied carefully. It’s important to avoid getting any of this product on your car’s paintwork as it can cause staining or other damage.
So, while you can technically use WD-40 as tire shine, there are better products out there that are specifically designed for this purpose. We recommend using a dedicated tire dressing or gel instead ofWD-40for the best results.
NEVER BUY TIRE SHINE AGAIN! Cheap DIY Homemade $1 Tire Shine for $1
Conclusion
If you want your tires to shine, you don’t need to buy expensive products. You can make a homemade solution that will leave your tires looking great. All you need is some water, vinegar, and dish soap.
Just mix these ingredients together and apply them to your tires with a sponge or cloth. Then rinse the solution off and enjoy your newly shiny tires!

How to Clean Anki Overdrive Car Tires
If you have Anki Overdrive cars, you know that they’re a blast to race around the track. But did you know that there’s more to keeping your cars in top condition than just making sure the batteries are charged? One important part of taking care of your Anki Overdrive cars is cleaning the tires.
- Unplug the car from the power source
- Use a soft cloth to wipe down the tires
- Be sure to get any dirt or debris that may be on them
- Once the tires are clean, dry them off with a towel or microfiber cloth
- If there are any stubborn spots on the tires, use a toothbrush or cotton swab to clean them off
Anki Overdrive Cars
Anki Overdrive is a line of toy cars that can be controlled by an app on your smartphone or tablet. The cars are very fast and can perform all sorts of stunts. You can race against friends or computer-controlled opponents, and the app keeps track of your progress and stats.
Anki Overdrive is a lot of fun, and it’s also very addictive!

Credit: www.ebay.com
What is the Best Way to Clean Rubber Tires?
It is important to clean your rubber tires on a regular basis to maintain their lifespan and prevent them from drying out, cracking, or peeling. There are a few different ways you can clean your tires, but the best way is to use a tire cleaner specifically designed for cleaning rubber.To clean your tires with a tire cleaner, simply spray the cleaner onto the tires and then wipe it off with a clean cloth.
You may need to scrub stubborn dirt or grime with a brush before wiping it away. Once you’ve cleaned all of the surface dirt off of your tires, rinse them off with water to remove any residue from the tire cleaner.After cleaning your tires, be sure to apply a tire protectant or dressing to help keep them moisturized and looking new.
Tire dressings will also help repel water and dirt, making it easier to keep your tires clean in between washes.
How Do You Get Oxidation off Tires?
If you’ve ever noticed a black film on your car tires, it’s most likely oxidation. Oxidation occurs when the rubber in tires is exposed to oxygen and other elements like water and sunlight. Over time, this exposure causes the tire rubber to harden and crack.
There are a few ways to remove oxidation from tires. One way is to use a commercial tire cleaner or polish that contains chemicals that break down the oxidized layer on tires. You can also try using a mild abrasive like WD-40 or white vinegar to scrub away the oxidation.
If you have stubborn oxidation, you may need to sand your tires with fine-grit sandpaper until the oxidized layer is removed.Once you’ve removed the oxidation from your tires, be sure to protect them from further damage by applying a coat of tire wax or sealant. This will create a barrier against oxygen and other elements, helping to keep your tires looking new for longer.
How Do I Fix My Anki Overdrive Car?
If you’re having trouble with your Anki Overdrive car, there are a few things you can try to fix the issue. First, make sure that the batteries in your car are charged. If they’re not, charge them for at least 30 minutes before trying to use your car again.
If the batteries are charged and you’re still having trouble, try resetting your car by pressing and holding the power button for 10 seconds. If that doesn’t work, try restarting your Anki Overdrive app. Finally, if none of those solutions work, contact customer support for more help.
How to clean an anki overdrive tire cleaner
Conclusion
If you have an Anki Overdrive car, you know that the tires can get dirty pretty quickly. Here’s a quick and easy way to clean them:1. First, remove the wheels from the car.
You’ll need a screwdriver for this.2. Next, use a damp cloth to wipe down the tires. Be sure to get in all the nooks and crannies!
3. Once the tires are clean, dry them off with a second cloth.4. Finally, put the wheels back on the car and enjoy your clean Anki Overdrive!

How Often to Rotate Bridgestone Tires
Bridgestone is one of the most popular tire brands on the market. They offer a variety of tires for different vehicles and driving conditions. But how often should you rotate your Bridgestone tires?
The answer may surprise you.According to Bridgestone, you should rotate your tires every 6,000 miles or sooner if you notice uneven tread wear. This may seem like a lot, but it’s actually not that difficult to achieve if you stay on top of it.
You can easily add an extra 1,000 miles or so between oil changes by rotating your tires every time you get your oil changed.
How often to rotate Bridgestone tires? It is generally recommended to rotate your tires every 5,000 miles. However, always refer to your specific vehicle’s owner’s manual for the manufacturer’s recommendation.
Why is it important to rotate your tires? Over time, tires naturally wear down in certain areas more than others due to weight distribution and the way we drive. Regularly rotating your tires helps prevent uneven wear, which can lead to premature tire failure.
Additionally, rotating your tires can help extend their overall lifespan.If you have any questions about how often to rotate your Bridgestone tires, or any other brand of tire, feel free to contact our team of experts at Tire Rack. We would be happy to help!
Is Tire Rotation Necessary
Most car owners know that they should get their oil changed regularly, but many don’t realize the importance of tire rotation. Tire rotation is a vital part of preventive maintenance for your vehicle. By rotating your tires on a regular basis, you can extend their life and ensure that they wear evenly.
This can save you money in the long run by preventing premature tire replacement.There are several different schemes for tire rotation, but the most common is to rotate them front-to-back and side-to-side. This means that the front tires are moved to the back position and the back tires are moved to the front position.
The side-to-side rotation simply swaps the left and right tires.The reason for this pattern is that different areas of your car put different amounts of stress on your tires. For example, turning puts more wear and tear on the outside edges of your tires than driving straight ahead does.
So by Rotating them front-to –back and side -to –side it evens out or balances these differences .As well as helps prevent irregular tread wear which can lead to a blowout .
It’s generally recommended that you rotate your tires every 5,000 miles or so.
However, you should check your owner’s manual for specific guidance, as some cars have different recommendations.

Credit: www.bridgestonetire.com
How Often Should Bridgestone Tires Be Rotated?
Assuming you are talking about passenger vehicles:Bridgestone tires should be rotated every 5,000 miles.
How Often Should I Rotate My Brand New Tires?
It is important to rotate your brand new tires as soon as you can and then every 5,000 miles. This will help ensure even wear and tear on the tires.
What Mileage is Recommended to Rotate Tires?
Most carmakers recommend tire rotation every 5,000 to 7,500 miles, although this varies depending on the type of vehicle and tires you have. All-wheel drive and front-wheel drive vehicles usually require different intervals for tire rotations. Check your owner’s manual for specific recommendations.
Tire rotation is important because it helps ensure even wear on all four tires. As your tires roll down the road, they flex and deform slightly. This can cause uneven wear patterns, with some areas of the tread wearing down faster than others.
Rotating your tires regularly helps distribute the wear more evenly and prolongs the life of your tires.In most cases, you can rotate your own tires at home with just a few tools. But if you’re not comfortable doing it yourself, or don’t have the time, you can always take them to a professional mechanic or tire shop.
Can I Rotate My Tires Every 10000 Miles?
It is generally recommended that you rotate your tires every 5,000 to 7,000 miles. However, some manufacturers recommend rotating your tires every 10,000 miles. So, can you rotate your tires every 10,000 miles?
The answer is maybe. If you primarily drive on highways and have a light vehicle load, then rotating your tires every 10,000 miles may be fine. However, if you do a lot of city driving or have a heavy vehicle load, then it’s best to stick to the shorter rotation interval.
Rotating your tires more often will help them wear evenly and last longer. It’s also a good idea to check your tire pressure and tread depth regularly (at least once a month), and to have your alignment checked if you notice any unusual tire wear patterns.
Tire Rotation | Bridgestone
Conclusion
Bridgestone tires are one of the most popular brands on the market, and for good reason. They offer a great ride, long lasting tread life, and are generally very reliable. However, like all tires, they will eventually need to be replaced.
The question then becomes, how often should you rotate Bridgestone tires?The answer depends on a few factors, such as the type of vehicle you drive and how you use it. For instance, if you have a light duty car that is mostly used for commuting, you can probably get away with rotating your Bridgestone tires every 5-6 months or so.
On the other hand, if you have a heavier duty vehicle that sees a lot of off-road use, you may need to rotate your Bridgestone tires more frequently – perhaps as often as every 3 months or so.Ultimately, it’s best to consult your owner’s manual or ask a qualified mechanic for specific advice on how often to rotate your particular brand of tires. But following the general guidelines above should help you get the most out of your Bridgestone tires and keep them running strong for many miles to come.

How to Chain Up Semi Tires
If you’re stuck on the side of the road in bad weather, you’ll need to know how to chain up your semi tires. It’s not as difficult as it sounds, and with a little practice, you’ll be able to do it in no time. Here’s what you’ll need: a pair of heavy-duty gloves, a hammer, and a length of chain that’s long enough to reach around the circumference of the tire.
- Park your truck on level ground and set the emergency brake
- Place chocks in front of and behind the rear tires to prevent the truck from rolling while you’re working
- Raise the trailer’s landing gear to take some of the weight off the axle and make it easier to work with the chains
- Wrap one end of the chain around each tire, making sure that there is an equal amount of chain on each side
- Cross the chains in front of or behind the axle and connect them together with a coupling device such as a hook or a snap link
- Tighten all slack out of the chains so they’re snug against the tires, then lower the trailer’s landing gear back down onto its support pads
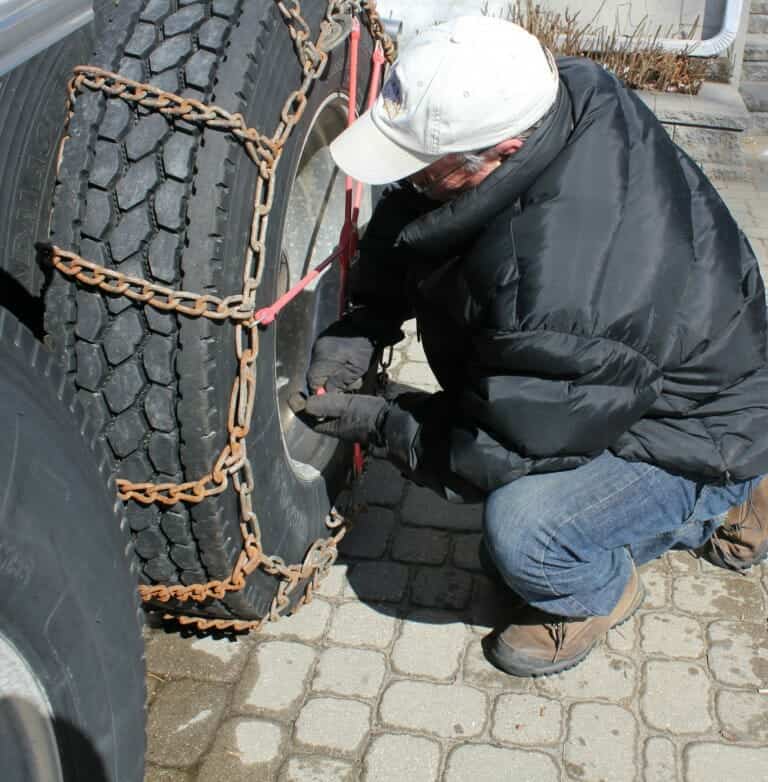
Credit: www.smart-trucking.com
Which Axle Should You Chain Up on a Semi?
If you’re asking which axle should you chain up on a semi, the answer is all of them. All the axles on a typical 18-wheeler are connected by a system of chains and crossbars. When you’re chaining up the truck, you’ll need to put chains on all of the axles.
How Do You Put Snow Chains on a Semi Tire?
Putting snow chains on a semi tire is a bit more involved than putting them on a regular car tire. The first thing you need to do is find a spot where the truck can be safely parked and the wheels can be accessed. Once you have the truck in position, you will need to block the wheels so that they don’t move while you’re working.
You can use blocks of wood or rocks for this purpose.Next, you will need to remove the hubcap from the wheel. This will give you access to the lug nuts.
Using a socket wrench, loosen all of the lug nuts but do not remove them completely. At this point, you can put the snow chain around the tire. Make sure that it is positioned correctly before moving on to tightening it up.
To tighten the chain, start in the middle and work your way out towards each end. As you tighten, make sure that there is no slack in the chain. Once everything is tight, replace the hubcap and lower your truck back down onto its tires.
Drive slowly and carefully until you reach your destination!
What Tires Do You Chain Up on a Semi?
Most trucks that operate in winter weather will have chains for all four tires. Some trailers may only have chains on the drive axle, which is the axle with powered wheels. The type of tire will also dictate what kind of chain can be used.
For example, a studded snow tire can use a different type of chain than a regular all-season or summer tire.There are two main types of chains: twist link and cross-chain. Twist link chains are easier to install but they do not provide as much traction as cross-chains.
Cross-chains have more links that wrap around the tread and provide better gripping power for climbing hills and driving in deep snow.Installing truck chains is not difficult but it does take some time and practice. Most importantly, make sure you follow the manufacturer’s instructions for your specific type of chain and tire.
How Fast Can You Go With Chains on Semi?
There’s no definitive answer to this question since it can vary depending on the truck, the chains and the driver. However, in general, you can expect to travel at a reduced speed when driving with chains on semi. This is because chains add weight and drag to the truck, which can impact its acceleration and top speed.
Additionally, chain installation typically takes place in adverse weather conditions like snow or ice, which can further impede your speed. So while there isn’t a set answer for how fast you can go with chains on semi, it’s important to exercise caution and drive slowly to ensure safety.
How to install tire chains on a semi truck
Which Drive Axle to Chain on Semi
If you own a semi truck, then you know that there are two drive axles. But which one should you chain up? Here is some information to help you make the best decision.
The first thing to consider is the weather. If it is icy or snowy, then you will want to chain up the front axle. This will give you better traction and help keep your truck from sliding.
Another thing to consider is the weight of your load. If you have a heavy load, then chaining up the rear axle will help distribute the weight evenly and prevent your truck from becoming unbalanced.So, which drive axle should you chain up?
It really depends on the situation. But hopefully this information has helped you make a decision!
Conclusion
Chaining up semi-tires is a process that requires careful attention and some specific tools. First, you’ll need to gather chains, binders, and gloves. Next, you’ll need to position the truck so that the chains can be easily attached.
Once the chains are in place, you’ll need to tighten them using the binders. Finally, you’ll need to put on the gloves to protect your hands from the sharp edges of the chain.

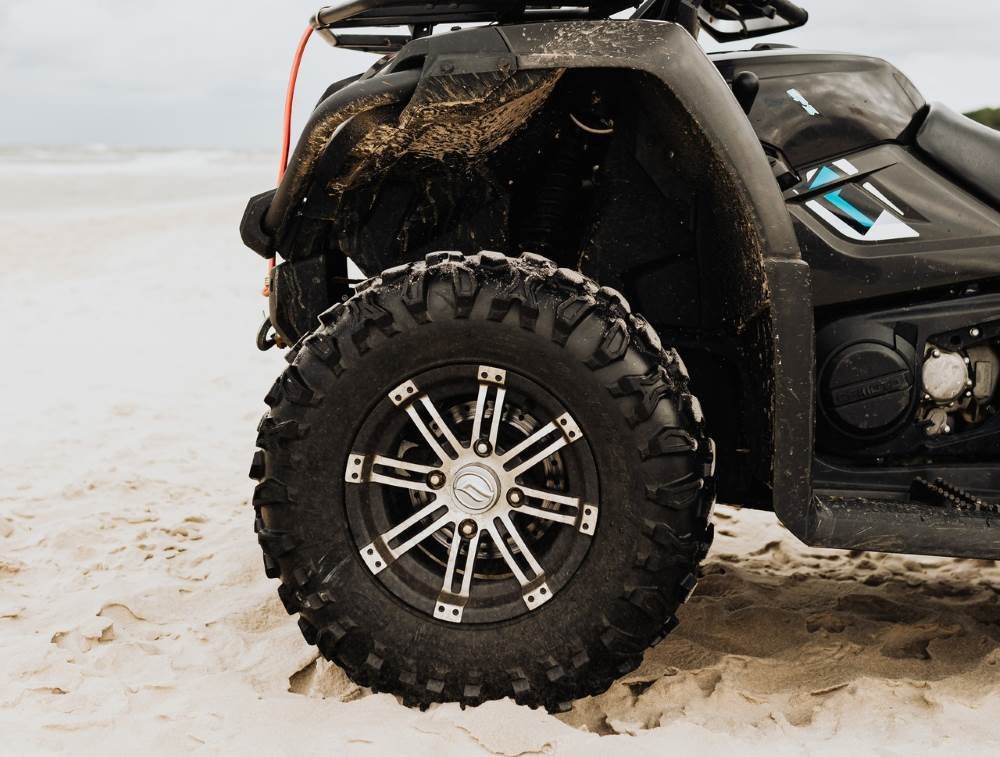
How to Keep Atv Tires from Going Flat
One of the most frustrating things that can happen when you’re out on an ATV ride is having a tire go flat. Not only does it ruin your day, but it can be dangerous if you’re in a remote area. Fortunately, there are some things you can do to help prevent your tires from going flat.
- To keep your ATV tires from going flat, you should do the following:1
- Check the air pressure in your tires regularly
- The ideal air pressure for most ATV tires is between 20 and 30 PSI
- If you notice that one of your tires is starting to look flat, add air to it as soon as possible
- Avoid riding over sharp objects that could puncture your tires
- If you do accidentally ride over something sharp, inspect your tires for any holes or leaks
- Store your ATV in a cool, dry place when not in use
- This will help prevent the rubber from deteriorating prematurely
Tireject
Most people are familiar with the standard tire air pressure of 30-32 psi. But what happens when you need more than that? You may have seen people at the track or on YouTube using TireJect, and wondered what it is and how it works.
TireJect is a product that can be injected into tires to achieve a higher air pressure. It is a gel-like substance that remains liquid at low temperatures, but hardens when exposed to high temperatures. This allows it to fill voids in the tire tread and provide a seal against leaks.
The benefits of using TireJect are twofold: first, it allows you to run a higher air pressure without fear of damaging your tires; and second, it helps prevent flats by sealing up any small punctures or cracks in the tread.If you’re looking for an edge on the competition, or just want to be able to run a higher air pressure without worry, TireJect is definitely worth considering.
Credit: kalinowskipower.com
How Can I Make My Atv Tires Last Longer?
There are a few things you can do to make your ATV tires last longer.One thing you can do is to check the air pressure in your tires regularly. This will help to prevent flats and keep your treads from wearing down too quickly.
Another thing you can do is to avoid driving on excessively rough terrain. This can put a lot of strain on your tires and cause them to wear down prematurely. If you must drive on rough terrain, try to stick to well-worn paths as much as possible.
Finally, be sure to inspect your tires periodically for any signs of damage or excessive wear and tear. If you catch any problems early, you can often fix them before they become serious enough to cause premature tire failure.
How Do You Use Atv Tire Sealant?
If you’ve ever got a flat tire, you know how inconvenient it can be. You have to take the time to change the tire, and then you have to find a place to get it repaired or replaced. But what if there were a way to prevent flat tires in the first place?
That’s where ATV tire sealant comes in.ATV tire sealant is a liquid that you can put in your tires before you go riding. It seals up any small punctures or cracks that might otherwise cause a flat.
And best of all, it’s easy to use! Just follow these simple steps:1. Make sure your tires are clean and dry before adding the sealant.
This will help it adhere better.2. Add the sealant to your tires according to the manufacturer’s instructions. Usually, this means putting about 2 ounces (60 milliliters) into each tire through the valve stem.
3. Ride around for a few minutes so that the sealant can work its way into any punctures or cracks in the tread of your tires.4. Check your tires periodically to make sure they’re still holding air and that there are no new punctures or leaks. If everything looks good, you’re all set!
How Do You Fix-A-Flat on a Four Wheeler?
If you have a flat tire on your four wheeler, don’t panic! There are a few simple steps you can follow to get back on the road quickly and safely.First, use your four wheeler’s jack to lift the vehicle up so that the flat tire is off the ground.
Then, remove the lug nuts from the wheel using a wrench or socket. Once the lug nuts are removed, pull the wheel off of the axle.Now it’s time to fix the flat tire.
Start by removing any debris from the puncture site with a wire brush or similar tool. Then, use a plug kit or patch kit to repair the hole in the tire. Once you’ve repaired the hole, re-install the wheel on the axle and tighten down the lug nuts.
Lower your four wheeler back to the ground and give it a test drive to make sure everything is working properly before heading out on your next adventure!
Does Slime Work in Atv Tires?
Slime is a product that can be used to repair punctures in ATV tires. It is a thick, viscous liquid that is designed to fill holes and seal cracks. While it will not prevent all flats, it can help to reduce the number of punctures that you experience.
Permanently Fix Flat ATV Tires with TireJect ??
Conclusion
If you’re an ATV owner, you know that one of the worst things that can happen is a flat tire. Not only is it a pain to change, but it can also be dangerous if you’re out on the trail. Here are a few tips to help you avoid flat tires:
1. Inspect your tires regularly for any signs of wear and tear. If you see anything that looks like it could cause a problem, address it right away.
2. Make sure your tires are properly inflated at all times.
This will help prevent them from getting too hot and coming apart.
3. If you’re going to be riding in rough terrain, consider investing in some heavy-duty tires specifically designed for off-road use.
4. When changing a tire, be sure to put the new one on the same side as the old one so that the weight is evenly distributed.
5 .

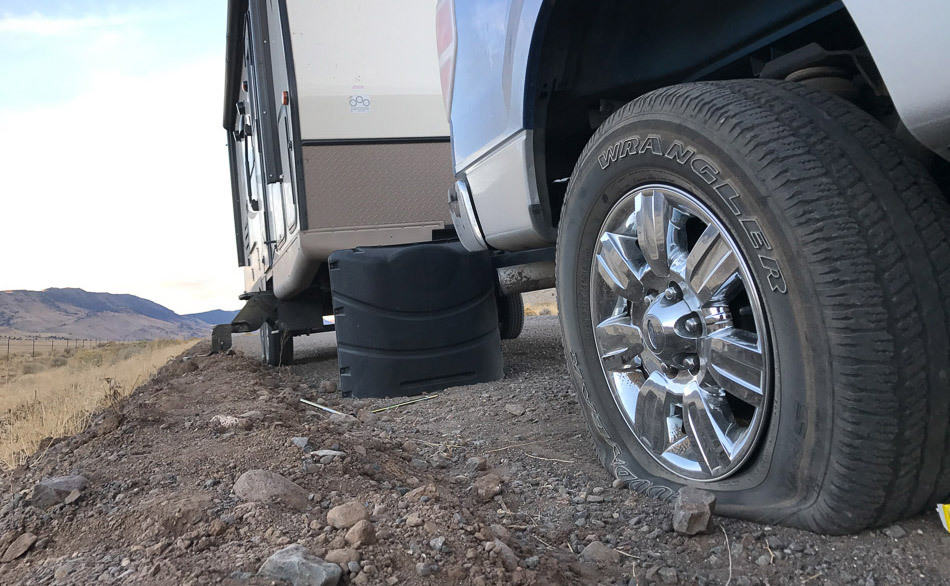
How to Tell If Trailer Tires are Good
If you are wondering how to tell if trailer tires are good, there are a few things that you can look for. The first thing is the tread depth. You can use a ruler or a tire tread depth gauge to measure the tread depth.
If the tread depth is less than 4/32 of an inch, then the tire needs to be replaced. Another thing to look for is cracks in the sidewall of the tire. These cracks can become larger over time and may cause the tire to fail while you are driving.
Finally, you should check for any bulges or uneven wear on the surface of the tire. This can indicate that the tire has been damaged and may not be able to hold up to road conditions.
- The first step is to check the tread depth of the tires
- The second step is to check for any cracks or damage on the sidewalls of the tires
- The third step is to check the air pressure in all of the tires
How to Tell If Trailer Tires are Bad
If you’re like most people, you probably don’t think about your trailer tires until something goes wrong. But just like the tires on your car, trailer tires need to be in good condition to avoid problems on the road. Here are some signs that your trailer tires may be getting bad:
1. Cracks in the sidewall: This is one of the most obvious signs that a tire is getting old and needs to be replaced. If you see cracks forming in the sidewall of your trailer tire, it’s time for a new one.2. Bulges or blisters: These can form on both the sidewall and tread of a tire and indicate that there is internal damage to the structure of the tire.
If you see either of these, replace the tire immediately.3. Excessive wear: Trailer tires typically have a shorter lifespan than car or truck tires due to their heavier load capacity. If you notice that your trailer tires are wearing down faster than usual, they may need to be replaced more frequently.
4. Uneven wear: Uneven wear can be caused by incorrect inflation, overloading, or misalignment. If you notice uneven wear on your trailer tires, have them checked by a professional to determine the cause and make necessary adjustments.5. vibration: If you feel excessive vibration coming from your trailer while driving, it could be a sign that one or more of your tires is out of balance or has other issues.
Credit: camperreport.com
How Do You Check Trailer Tires?
Assuming you are referring to checking the tire pressure, you would use a tire pressure gauge. Insert the metal end of the gauge into the valve stem on the tire until you feel resistance. Then, hold the gauge in place and watch the needle as it rises to indicate the pressure inside the tire.
If it is below the recommended PSI for your tires, then you will need to add air.
How Old Can Trailer Tires Be?
It’s generally not a good idea to use trailer tires that are more than six years old. The rubber compound in the tires begins to break down after about five years, which can lead to cracks and other damage. Once the tires are six years old, they should be inspected regularly and replaced if necessary.
How Long Do Trailer Tires Last Not Used?
It’s hard to say how long trailer tires would last if they weren’t used. Generally speaking, however, trailer tires can last for many years as long as they are properly cared for. This means storing them in a cool, dry place out of direct sunlight and keeping them inflated to the proper pressure.
Additionally, it’s a good idea to inspect trailer tires regularly for any signs of wear or damage. If you notice any issues, it’s best to replace the tire right away. With proper care, your trailer tires should give you years of trouble-free use.
Do Trailer Tires Have an Expiration Date?
Yes, trailer tires have an expiration date. The average lifespan of a trailer tire is between 5 and 7 years. However, this can vary depending on the brand, type of tire, and how often it is used.
For example, a higher-quality tire may last longer than a lower-quality one. Similarly, a tire that is used frequently will likely need to be replaced sooner than one that isn’t used as often.It’s important to note that even if a tire hasn’t reached its expiration date, it may still need to be replaced if it shows signs of wear and tear.
For instance, if the tread depth is low or there are cracks in the sidewall, then it’s time for a new tire. If you’re not sure whether or not your trailer tires need to be replaced, it’s always best to consult with a professional.
Trailer Tires, ST Tires vs LT Tires vs Passenger Car Tires ~ The Right Tires for your Trailer
Conclusion
If you’re not sure how to tell if your trailer tires are in good condition, there are a few things you can look for. First, check the tread depth. If the tread is worn down to less than 1/8 inch, it’s time to replace the tire.
Second, look for cracks or splits in the sidewall of the tire. These can be caused by age or exposure to sunlight and heat, and they can lead to a blowout. Finally, make sure the valves on your tires are in good working order and that the tires are inflated to the proper pressure.

How to Mix Calcium Chloride for Tires
Calcium chloride is an inorganic compound, a salt with the chemical formula CaCl2. It is a white coloured crystalline solid at room temperature, and it is highly soluble in water. Calcium chloride is commonly used as a de-icer or anti-icer for roads and sidewalks.
When mixed with water, it releases heat, which helps to melt ice and snow. It can also be used to dry out tires before driving on them.
- In order to mix calcium chloride for tires, you will need the following supplies: a bucket, a drill with a mixing attachment, water, and calcium chloride
- 1) Fill the bucket with water
- You will need enough water to cover the calcium chloride flakes
- 2) Add the calcium chloride to the bucket of water
- Start with 1 pound per gallon of water and increase as needed
- 3) Stir the mixture until the calcium chloride has dissolved completely
- 4) Pour the mixture into a clean tire and inflate as usual
Calcium Chloride Tire Fill Chart
Calcium chloride is often used as a tire fill material because it has a high density and can be easily applied to tires. However, because calcium chloride is corrosive, it can cause damage to the tires over time. It is important to consult a calcium chloride tire fill chart before using this material in order to ensure that the correct amount is used and that the tires are not damaged.
When using a calcium chloride tire fill chart, it is important to note the following:-Tire size: The size of the tire will determine how much calcium chloride is needed to fill it. For example, a smaller tire will require less calcium chloride than a larger tire.
-Vehicle weight: The weight of the vehicle will also affect how much calcium chloride is needed. A heavier vehicle will require more calcium chloride than a lighter vehicle.-Application rate: The application rate refers to how quickly the calcium chloride should be applied to the tires.
A higher application rate means that more calcium chloride should be used per minute.

Credit: www.mcgill.ca
How Do You Fill Tires With Calcium Chloride?
If your car has low tire pressure, you may need to add calcium chloride to the tires. Calcium chloride is a chemical compound that can be found in powder or liquid form. It’s sometimes used as a de-icer on roads and sidewalks.
When added to water, it forms a brine solution that has a high freezing point, making it useful for keeping tires inflated in cold weather. Here’s how to fill tires with calcium chloride:1. Purchase calcium chloride in either powder or liquid form from a hardware store or online retailer.
2. If using the powder form, mix it with water according to the manufacturer’s instructions to create a brine solution.3. Fill each tire with the desired amount of solution using a funnel. Be sure not to overfill as this could damage the tire or cause leaks.
4. Check the tires’ pressure levels regularly and add more solution as needed to keep them inflated properly.
Is Calcium Chloride Safe in Tires?
Yes, calcium chloride is safe in tires. It is a common salt that is used to de-ice roads and sidewalks and can also be found in some ice creams. When used in tires, it helps to improve traction on icy or snowy roads.
How Much Weight Does Calcium Add to Tires?
It’s a common myth that calcium adds weight to tires. In fact, calcium is one of the lightest elements on the periodic table. So, if you’re looking to add weight to your tires, you’ll need to look elsewhere!
What Do You Put in Tractor Tires for Weight?
If you’re looking to add weight to your tractor tires, there are a few options available. You can either fill the tires with a material like sand or water, or you can purchase wheel weights that attach to the outside of the tires.Adding weight to tractor tires is important for a few reasons.
First, it can help improve traction, especially in slippery conditions. Second, it can help distribute weight more evenly across the tires, which can improve handling and stability. And finally, adding weight can also help protect your tires from wear and tear.
When deciding how much weight to add to your tractor tires, keep in mind that too much weight can actually damage the tire itself. It’s important to find a balance that works for your particular tractor and application.
DIY Tractor tire loading with calcium
Conclusion
If you’re looking to extend the life of your tires, calcium chloride may be a good option. This chemical can help to harden and seal the treads on your tires, making them less likely to wear down over time. However, it’s important to mix the calcium chloride correctly, as too much or too little can cause problems.
To mix calcium chloride for tires, start by dissolving 2 ounces of the chemical in 1 gallon of water. Once the calcium chloride has dissolved, add it to a tire inflator and inflate your tires as usual. You’ll want to check the pressure regularly and top off as needed.
With proper care, your tires should last longer and perform better with this treatment.

How to Get Water Out of Tractor Tires
If you’ve ever driven a tractor, you know that they can be very difficult to maneuver. One of the most challenging things about driving a tractor is dealing with the water that gets trapped in the tires. When water gets into the tractor tires, it can make them very slippery and hard to control.
Here are some tips on how to get water out of tractor tires so that you can keep your tractor running smoothly.
- Park the tractor on a level surface and set the parking brake
- Place a wheel chock behind one of the rear wheels to prevent the tractor from rolling while you work
- Remove the valve cap from the tire that you want to drain
- Insert the end of a tire inflator hose or a similar object into the hole in the center of the wheel where the valve is located
- Push down on the tire inflator hose until it pops back up again, which will allow air to escape from the tire and water to flow in
- Allow all of the water to drain out of the tire before replacing the valve cap and moving on to another tire
Water in Tractor Tires Chart
Water in tractor tires chart. The average weight of a gallon of water is 8.3 pounds. A full-sized truck or SUV tire holds about 10 gallons of water.
That means each tire on your vehicle weighs over 80 pounds more when it’s full of water!Most people don’t realize how much extra weight they’re carrying around when their tires are filled with water instead of air. It’s not just the extra weight that’s a problem, either.
When your tires are low on air, they don’t grip the road as well and can cause you to lose control of your vehicle if you have to brake suddenly or make a sharp turn.If you’re not sure whether your tires have enough air, it’s best to check them with a gauge at least once a month. If you find that they’re regularly low, there could be a leak in one or more of your tires.
Bring your vehicle to a professional to have it checked out and repaired if necessary.In the meantime, make sure you keep an eye on your tire pressure and fill up your tires with air as needed!

Credit: tractoraddict.com
Why are My Tractor Tires Full of Water?
If you notice that your tractor tires are full of water, it’s most likely because they’ve been driven through a puddle or flooded area. While this may not seem like a big deal, driving through water can actually cause serious damage to your tires. The water can seep into the tire and cause the steel belts to rust.
This can lead to tire failure and blowouts. In extreme cases, it can even cause the tread to separate from the tire.If you must drive through water, try to avoid deep puddles and keep your speed low.
If possible, drive in the tracks of another vehicle so you’re less likely to get stuck. And once you’re out of the water, be sure to inspect your tires for any signs of damage. If you see any cracks or bulges, have them checked by a professional as soon as possible.
Are Tractor Tires Supposed to Have Water in Them?
No, tractor tires are not supposed to have water in them. If you notice water in your tractor tire, it is likely due to a leak in the tire or rim. If the leak is severe, it can cause the tire to lose air pressure and eventually go flat.
To fix a leaky tractor tire, you will need to patch or replace the damaged section of the tire.
How Do You Drain a Tractor Tire Ballast?
If your tractor has ballast tires, you may need to drain them at some point. Here’s how to do it:1. Park the tractor on a level surface and set the parking brake.
2. Put on gloves and safety glasses. Use a wrench to loosen the valve cap on the ballast tire.3. Place a bucket under the tire to catch the draining water and mud.
Slowly open the valve to allow the water and mud to drain out. Close the valve when finished.4. Repeat for each ballast tire on your tractor.
How Much Water is in a Tractor Tire?
A tractor tire typically holds between 65 and 85 gallons (250 to 325 liters) of water. The amount of water can vary depending on the size of the tire, but most are between these two extremes.
Easy Way to Fill Your Tractor Tires with Water
Conclusion
If you’re stuck with water in your tractor tires, there are a few things you can do to get it out. You can try using a wet/dry vacuum, an air compressor, or even just a garden hose. Whichever method you choose, make sure you have the right adapters and fittings to avoid any damage to your equipment.

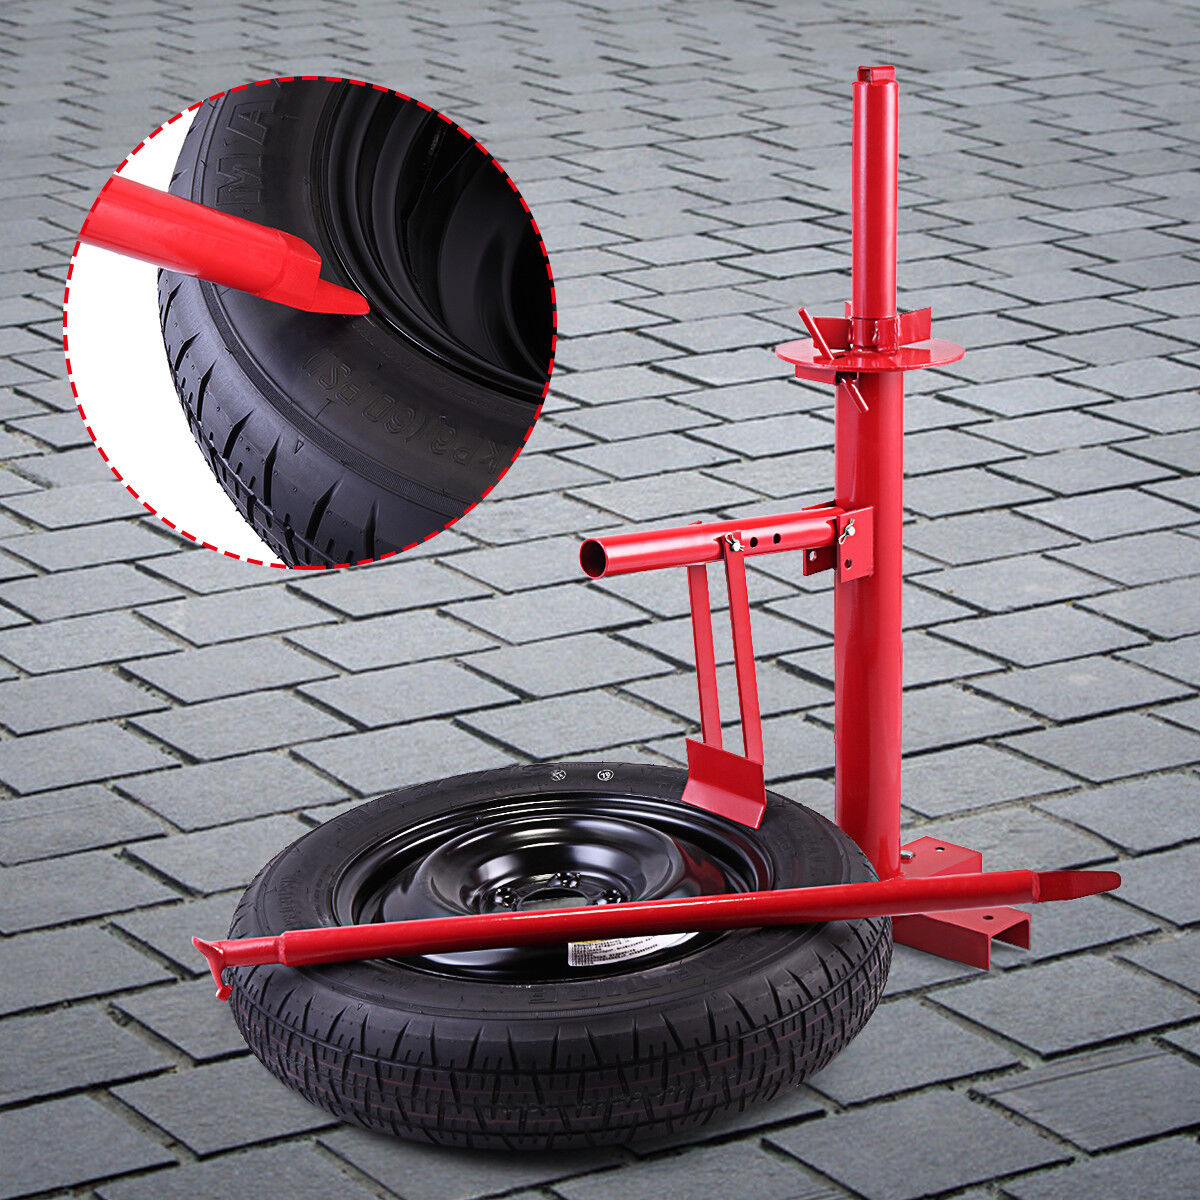
How to Mount Motorcycle Tires at Home
One of the most important aspects of motorcycle maintenance is tire care. Not only do you need to check the pressure and tread on a regular basis, but you also need to know how to change a tire if needed. Many people take their bike to a shop when it needs new tires, but this is something that you can easily do at home with the right tools.
Here’s how to mount motorcycle tires at home.
- There are a few different ways that you can mount motorcycle tires at home
- One way is to use a tire mounting machine
- This is a machine that you can purchase at most auto parts stores
- Another way is to use a hand-operated tire changer
- This is a device that you place the tire on and then use a handle to rotate the tire until it is tight on the rim
- The last way to do it is by using two jacks
- Place one jack under the motorcycle and another under the tire
- Then, use your hands to spin the tire until it is tight on the rim
Motorcycle Tire Mounting
Motorcycle Tire MountingIt is very important to know how to mount motorcycle tires correctly. Incorrect mounting can result in premature tire wear or even dangerous riding conditions.
Here are some tips on how to properly mount motorcycle tires:– Make sure the bead of the tire is seated correctly in the rim. You can do this by gently pushing on the tire at various points around the circumference of the wheel.
If you feel any resistance, the bead is not seated properly and you will need to start over.
– Inflate the tire until it is about halfway between its maximum inflation pressure and its minimum operating pressure. This will make it easier to seat the bead without damaging the tire or rim.
– Once the bead is seated, finish inflating the tire to its proper pressure.
– Double check that everything looks good before you go for a ride!

Credit: www.revzilla.com
How Do You Balance Motorcycle Tires at Home?
One of the most important aspects of maintaining a motorcycle is keeping the tires in good condition. This includes making sure they are properly inflated and balanced. While you can take your bike to a shop to have this done, it is actually quite easy to do at home with the right tools.
To start, you will need a tire pressure gauge and a balancer. You can find these at most auto parts stores. Once you have these, simply remove the valve cap from one of your tires and attach the pressure gauge.
Check the reading and compare it to the recommended PSI for your particular bike model. If it is low, use a hand pump or compressor to add more air until it reaches the correct level.Next, use the balancer to determine where any heavy spots on the tire are located.
You will then need to add weight (usually in the form of lead wheel weights) to these areas until the tire is balanced evenly. Be careful not to put too much weight on as this can throw off other aspects of your bike’s performance.Now that your motorcycle’s tires are properly inflated and balanced, you can enjoy ride without worrying about flats or uneven wear!
How Do You Change a Motorcycle Tire by Hand?
Assuming you don’t have a tire changing stand and need to do it by hand, here are the steps:1. Put your motorcycle on its centerstand or paddock stand.
2. Remove the wheel covers, if there are any.
3. Loosen the axle nut with a wrench (righty-tighty, lefty-loosey). You may need a socket and ratchet for this.
4. Take off the brake caliper by loosening its bolts with a wrench or socket (again, righty-tighty, lefty-loosey).
Be careful not to let the caliper hang by the brake line; support it with something like a bungee cord so that it doesn’t put strain on the line.
5. Take off the wheel by pulling it straight off the axle studs.
6. Deflate the old tire completely using a tire gauge and air compressor or bike pump.
If you don’t have an air compressor or bike pump, you can partially deflate the tire using just a tire gauge; this will make step 7 easier but is not strictly necessary.
7. Break the bead of the old tire away from the rim using either a bead breaker tool or two screwdrivers placed about an inch apart inside the bead near opposite sides of the wheel (one on each side of where you want to place your new tire). You may need to use some force for this step; be careful not to scratch your rim in doing so!
The goal here is simply to break that “seal” between bead and rim so that you can get your new tire on more easily later on in Step 8 below) .If you’re having trouble breaking one particular side of beads free from rims all way around circumference try following method: place one screwdriver as close as possible to inner wall of bead next to valve stem opening at 12 o’clock position then rest bottom part of other screwdriver’s handle against top part of first screwdriver’s handle – now pull both handles towards you while keeping both screwdrivers’ blades firmly seated inside respective beads – once both beads are broken free from rims continue breaking them away from rims all around circumference until they’re sitting loose atop rims like coiled snakes waiting to strike 🙂
How Do You Put a Motorcycle Tire On?
Assuming you don’t have a tire changing stand:1. Park your motorcycle on a level surface and put the kickstand down. You’re going to be working around the bike so make sure it’s not going anywhere.
2. Break the bead of the tire using either a tire iron or bead breaker (a special tool). You’ll need to do this on both sides of the tire. It’s important that you only break one side of the bead at a time because if you were to break both beads simultaneously, the unmounted portion of the tire would collapse in on itself and make it very difficult (if not impossible) to get back on.
3. Once you’ve broken one side of each bead, insert a tube into the tire–but don’t put any air in it yet! Work your way around the circumference of the tire until you can see that the tube is seated properly all around, then apply some lube to both sides of each bead and begin working them back over rim with your hands until they’re seated again. This can be tricky, so take your time and be careful not to pinch or puncture your tube while doing this step!
If everything looks good up to this point, go ahead and inflate your new tube just enough so that it holds its shape inside the tire (overinflating at this stage will make Step 4 more difficult).
4. Now it’s time for what many people consider to be THE most difficult part of changing a motorcycle tire: getting those darned beads reseated over rim under pressure! The best way to do this is with an air compressor–but if you don’t have access to one, a hand pump will work in a pinch (just know that it’ll probably take quite awhile longer).
Hook up your compressor hose (or start pumping away) and direct airflow into ONE side of rim while moving slowly around circumference; eventually that bead should start creeping its way over edge until finally seated completely. Repeat process on other side and voila!
How Do You Take a Motorcycle Tire off the Rim?
Assuming you would like a step-by-step guide on how to take a motorcycle tire off the rim:1. You will need a few tools before getting started – a socket wrench, an impact wrench, a mallet or hammer, and tire irons. Make sure you have all of these ready before beginning.
2. Start by loosening the bolts that hold the wheel in place. You may need to use the impact wrench for this if the bolts are particularly tight.
3. Once the bolts are loose, remove them completely and set them aside; then gently pull the wheel away from the motorcycle.
4. Take your first tire iron and hook it under the lip of the tire near one side of the wheel. Use your other hand to hold onto the end of the iron so that it doesn’t slip while you’re working.
5. Insert your second tire iron into the tire at about a 10 o’clock position relative to where your first iron is positioned; then pry outwards on both irons until you hear a popping noise – this means that one side of the tire has come off of the bead (the metal ring around edge of wheel).
How To Change & Balance Your Own Motorcycle Tires | MC GARAGE
Conclusion
If you’re a motorcycle enthusiast, you know that one of the most important parts of maintaining your bike is keeping your tires in good condition. Not only do they provide traction and stability while riding, but they also play a big role in the overall handling of your motorcycle. While you can take your bike to a shop to have new tires mounted, it’s actually not that difficult to do it yourself at home.
With a few basic tools and some patience, you can mount motorcycle tires like a pro in no time.The first thing you’ll need to do is remove the old tire from the wheel. You’ll need a tire iron or lever to help pry the old tire off the rim.
Once it’s loose, carefully pull it away from the wheel until it’s completely off. Next, clean the rim of any debris or dirt using a brush or cloth. Once the rim is clean, line up the new tire with the rim and start pushing it onto the wheel.
Again, you may need to use a tire iron or lever to get it started. Once the new tire is on about halfway, begin inflating it with an air compressor or pump until it’s nice and firm. Finally, replace any Wheel Weights that were on the old tire before putting everything back on your motorcycle and hitting the road!

How Much to Unmount And Remount Tires
How much does it cost to unmount and remount a tire? This is a common question that many people have. The answer may vary depending on the type of vehicle you own and the shop you take it to.
However, there are some tips that can help you determine how much it should cost.The first thing to consider is the type of vehicle you have. If you have a car, the process will be less expensive than if you have an SUV or truck.
This is because cars typically have smaller tires. The second thing to consider is the shop you take your vehicle to. Some shops may charge more for this service than others.
If you’re like most people, you probably don’t think much about your tires. But did you know that properly maintaining your tires can not only improve your gas mileage, but also keep you safe on the road?One important part of tire maintenance is knowing how much to unmount and remount them.
If you don’t do this correctly, it can lead to uneven wear and tear on your tires, which can ultimately shorten their lifespan.So how often should you unmount and remount your tires? It depends on a few factors, such as how often you drive and what kind of roads you typically drive on.
However, a good rule of thumb is to do it every 5,000 miles or so.If you’re not sure how to properly unmount and remount your tires, there are plenty of resources available online or at your local auto parts store. With a little bit of effort, you can help extend the life of your tires – and keep yourself safe on the road!
How Much Does It Cost to Mount And Balance 4 Tires
If you’re looking to get new tires for your vehicle, you’re probably wondering how much it’s going to cost. Mounting and balancing 4 tires can range in price, depending on a few factors. Here’s a look at what you can expect to pay:
Tire Size: The size of your tires will impact the cost of mounting and balancing. Larger tires generally cost more to mount and balance than smaller ones.Type of Tire: The type of tire you choose can also affect the price.
High-performance or specialty tires may be more expensive to mount and balance than regular passenger car tires.Number of Tires: Obviously, mounting and balancing 4 tires will cost more than just 2. If you’re only looking to replace 2 tires, expect to pay less than if you need all 4 done.
Location: Where you have your tires mounted and balanced can also play a role in the cost. Some tire shops charge more than others, so it’s worth shopping around for the best price.Overall, expect to pay anywhere from $40-$100+ to have 4 new tires mounted and balanced on your vehicle.
Credit: www.ebay.com
How Much Does Walmart Charge to Dismount And Mount Tires?
Walmart charges $12 per tire to dismount and mount tires. This price does not include the cost of the tire itself.
How Much Does It Cost to Mount a Set of Tires?
It generally costs between $25 and $45 to have a new set of tires mounted and balanced. The cost will depend on the type of tire, the size of the tire, and the make and model of your vehicle. You can typically get this done at a local tire shop or at a dealership.
How Much Does It Cost to Get 4 Tires Installed?
When it comes to the cost of getting new tires installed, there are a few things to keep in mind. First, the type of vehicle you have will play a role in the overall cost. Secondly, the size and style of tire will also affect the price.
And finally, where you have the work done will also be a factor. With all that being said, on average, it will cost between $100 and $200 to have four new tires installed.
Can You Unmount And Remount a Tire?
If you need to change a tire, you may be wondering if you can unmount and remount it. The answer is yes, but there are a few things to keep in mind.First, make sure that the new tire is the same size and type as the old one.
If not, the new tire may not fit properly or work well with your car.Second, when you unmount a tire, be careful not to damage the rim. The rim is what holds the tire in place, so if it’s damaged, the tire may not stay on correctly.
Third, when you remount the tire, make sure that it’s seated properly on the rim. Again, an improperly seated tire could come off while you’re driving.Finally, remember to tighten the lug nuts securely before driving away.
Loose lug nuts could cause the wheel to come off completely while you’re driving!
how to dismount a tire and remount by hand (Easy way)
Conclusion
If you’re wondering how much it costs to unmount and remount tires, the answer is that it depends on the tire size and type. The average cost for a passenger car tire is $20-$40, while a truck or SUV tire can cost $60-$100.