
Unraveling the Mystery: How Do Tires Attach to Rims
Tires are an essential component of any vehicle, and they play a crucial role in ensuring a safe and comfortable ride. However, many people may not be aware of how tires attach to rims. The process of attaching tires to rims is a critical step in the assembly of any vehicle, and it requires precision and attention to detail.
In this article, we will explore how tires attach to rims and the different methods used to secure them. We will also discuss the importance of proper tire and rim installation and the potential risks associated with improper installation. Understanding how tires attach to rims is not only important for vehicle owners but also for those who work in the automotive industry, including mechanics, tire technicians, and engineers. So, let’s dive in and explore the fascinating world of tire and rim installation.
Tires attach to rims in one of two ways: with a bead or with a rim band. A bead is a hoop of steel or other metal that fits around the outside edge of the wheel and holds the tire in place. A rim band is a strip of metal or other material that goes around the inside edge of the wheel and also holds the tire in place.
How to Put a Tire Back on the Rim by Hand
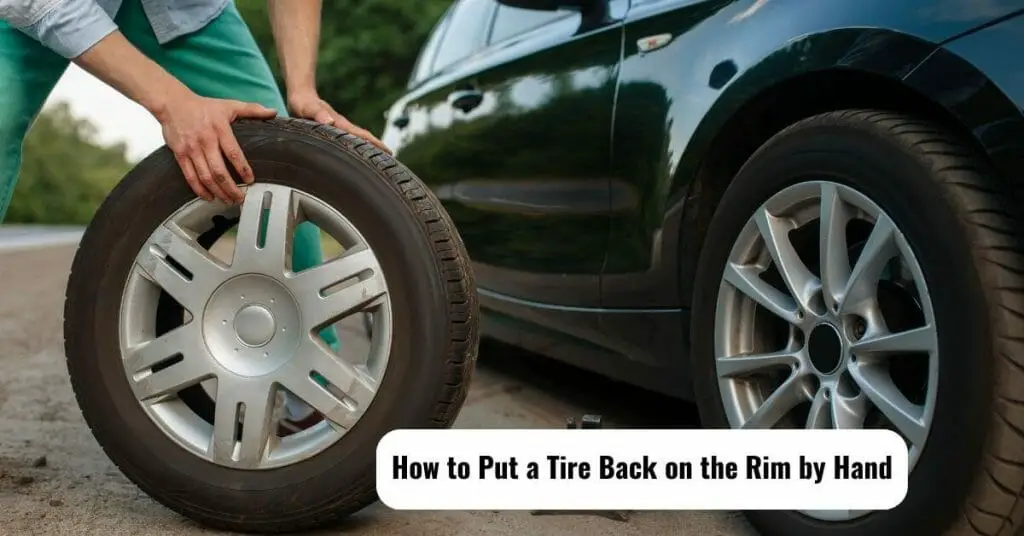
If you’ve ever had a flat tire, you know the feeling of frustration that comes with it. Not only do you have to deal with the inconvenience of having a tire that needs to be fixed, but you also have to worry about how you’re going to get it fixed. If you don’t have a spare tire or can’t afford to call a tow truck, you may be wondering how you’re going to put your tire back on the rim by hand.
Luckily, it’s not as difficult as it may seem. With a little patience and some elbow grease, you can get your tire back on the rim and be on your way in no time. Here’s what you need to do:
Start by taking off the hubcap or wheel cover. This will give you access to the bolts that hold the tire in place.
Use a wrench to loosen the bolts until they are loose enough to remove by hand. Be careful not to remove them completely – just loosen them so that they can be removed easily later on.
Once the bolts are loosened, gently tap around the edge of the tire with a mallet or other tool until it pops off of the rim. You may need someone else to help guide it off if it’s being stubborn.
Take a look at both the rim and the tire for any damage or debris that may be present. If everything looks good, go ahead and start putting your new Tire onto The Rim. Line up one side of The Tire with The Rim, then work your way around until The Tire is fully seated on The Rim.
It may take some wiggling and maneuvering, but eventually, The Tire will pop into place. Make sure That It’s seated evenly all The Way around before proceeding To Step 5! sk5!
5! Once The Tire Is In Place, Replace each Of The Bolts One At A Time And Tighten Them Down With Your Wrench. Start In The Middle And Work Your Way Outward In A Star Pattern Until All Of The Bolts Are snugged Up Nice And Tight!
6!6!Now That All Of The Bolts Are tightened Down, GiveThe Wheel A Spin To Make Sure That It’s Seated Properly OnThe Hub, Then PutThe Hubcap Or Wheel Cover Back OnAnd You ‘Re Ready To Go!
How to Put Tire Back on Rim Bike
If you’ve ever had a flat tire on your bike, you know how frustrating it can be. You’re either stuck walking your bike home or if you’re lucky enough to have a spare tire with you, changing the tire can be a real pain. But there’s an easy way to change a tire that doesn’t require taking the wheel off the bike and that’s by putting the tire back on the rim.
Here’s how to do it:
Start by loosening the bolts that hold the wheel in place. You don’t need to remove them completely, just loosen them enough so that you can slide the wheel out.
Once the wheel is out, take a look at the inside of the tire. You’ll see where it sits on the rim and how it’s held in place by small metal wires (called “spokes”).
Carefully pull one side of the tire away from the rim, being careful not to damage either one. Then do the same on the other side until the entire tire is free from the rim.
Take your new tube and insert it into one side The most difficult part of this process is getting air into your new tube – which we’ll cover next time! For now, simply put some air into The easiest way to do this is with an air compressor or a hand pump designed for bicycle tires will work as well).
Put enough air into 5-10 PSI should be fine). If all goes according to plan, your new tube should seat itself properly inside The final step is re-installing The wheel back onto your bicycle frame. Align The dropouts (the slots on The frame where The axle goes through) with The axle, then slide The axle through until both sides are seated properly.
Once everything looks lined up, begin tightening down each bolt, working in a crisscross pattern (. e . , tighten down bolt 1 halfway, then bolt 2 halfway, etc .) until all four bolts are tight. That’s it!
Mount Tire on Rim Near Me
If you’re looking to mount a tire on a rim near you, there are a few things you’ll need to know. First, it’s important to find a reputable shop that can do the job correctly. Many tire shops will offer this service, but not all of them have the proper equipment or experience.
Make sure to ask around and get recommendations before taking your vehicle in. Once you’ve found a good shop, they’ll usually start by mounting the tire onto the rim using a machine. This process can vary depending on the size and type of tire, but generally speaking, it involves inflating the tire and then spinning it on the machine until it’s seated correctly on the rim.
After the tire is mounted, the next step is to balance it. This ensures that the weight of the tire is evenly distributed so that it rolls smoothly down the road. The balancing process usually involves adding weights to either side of the wheel until it’s perfectly balanced.
Finally, once everything is checked and double-checked, your new tires should be ready to go! Mounting tires isn’t always easy, but with a little bit of research and patience, you should be able to find a reputable shop near you that can handle the job quickly and efficiently.
How to Mount And Balance Tires Yourself
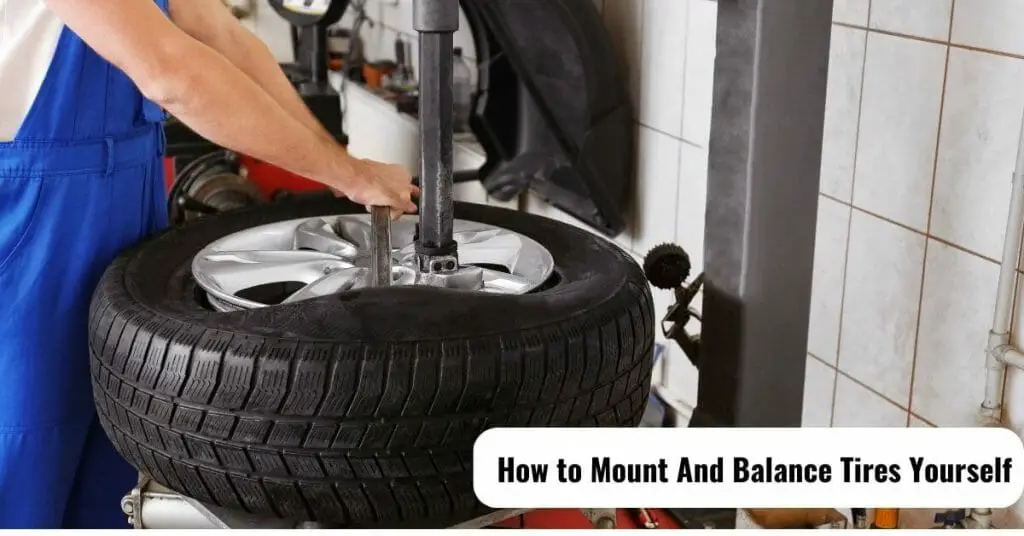
If you’re a car owner, it’s important to know how to mount and balance your own tires. This way, you can avoid overspending on tire mounting and balancing services at a shop. Plus, it’s not as difficult as it may seem!
Here’s a step-by-step guide on how to do it yourself:
Make sure you have the right tools. You’ll need an air compressor, an impact wrench, and a tire balancer. If you don’t have access to an air compressor, you can borrow one from a friend or neighbor.
Start by removing the old tires from your car. Use the impact wrench to loosen the lug nuts, then carefully pull the tire off of the wheel. Repeat this process for all four tires.
Once the old tires are off, clean the wheels with soapy water and a rag. This will help ensure that the new tires adhere properly to the wheels.
Now it’s time to mount the new tires onto the wheels. Again, use the impact wrench to loosely secure the lug nuts onto each wheel. Then fit each tire onto its respective wheel and hand-tighten each lug nut until it’s snug against the tire bead. At this point, don’t worry about making them super tight – we’ll do that later.
The next step is to inflate each tire until it reaches its recommended pressure level (you can find this information on either side of your tire). Once all four tires are inflated, use your tire balancer to check for any imbalances. If there are any imbalances, add weight accordingly until they’re balanced out.
Finally, use your impact wrench to tighten each lug nut down until it’s finger-tight, then give each nut an extra 1/4 – 1/2 turn with the wrench. That’s it – you’re done!
How to Mount a Small Tire on a Rim
Assuming you have the tools and materials needed, it is not difficult to mount a small tire on a rim. The process is as follows:
First, make sure the tire is clean and free of any debris.
Next, use a bead breaker to loosen the beads of the tire from the rim.
Once the beads are loose, carefully remove the tire from the rim. Take care not to damage either the tire or the rim in this process.
Now that the tire is off of the rim, it is time to prepare it for mounting onto a new rim. If there is any old glue or sealant on the bead of the tire, be sure to remove it completely before proceeding.
5a. For tubeless tires, apply a generous amount of fresh sealant around both beads of the tire before mounting them onto the new rim.
5b. For tires with inner tubes, inflate both tubes and then insert them into Tire so that the tube lies flat between the bead and sidewall without being pinched anywhere inside the Tire cavity; reinflate the tube until firm but pliable (do not over-inflate).
6a. For tubeless tires: Seat one bead at a time by hand while simultaneously adding air pressure through the valve stem until Bead “snaps” into place atop Rim’s drop center well all way around the circumference (360 degrees).
OR 6b. For tires with inner tubes: Seat first Bead by hand while simultaneously adding air pressure through the valve stem until Bead “snaps” into place atopRim’s drop center well all way around the circumference (360 degrees); repeat for second Bead on the opposite side of Tire/Tube assembly 7 Using either method described in Step 5 above (with or without fresh Sealant), finish seating both Beads all way around the circumference (360 degrees) while maintaining air pressure in Valve stem; check that no gaps exist between Bead and Rim well anywhere around the entire circumference. If necessary, add more air pressure until no gaps remain anywhere.
Remove the Valve core using the Valve tool provided with most Pump head attachments; allow the remaining air pressure to escape slowly through the now open valve hole.
How Does a Tire Connect to a Rim?
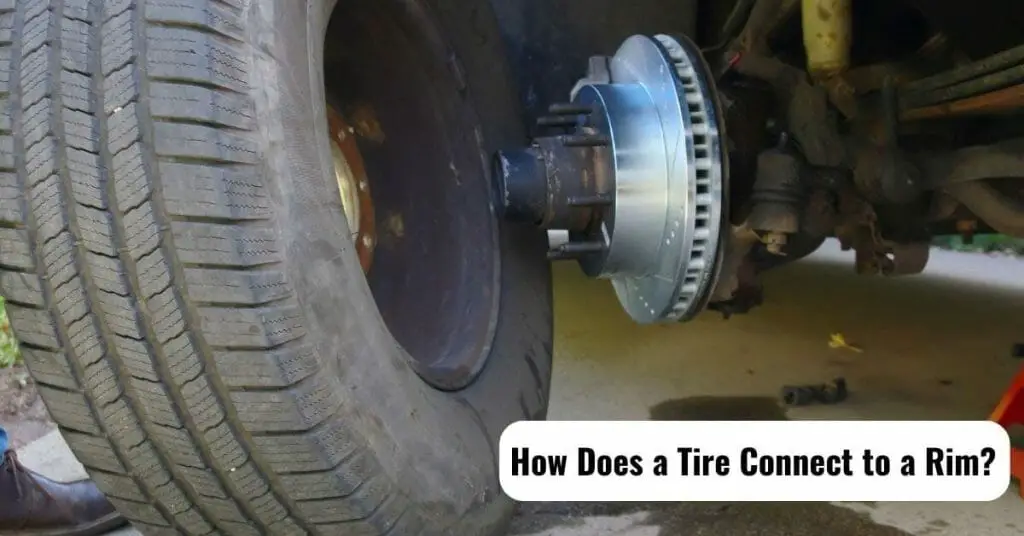
The connection between a tire and a rim is crucial to the function of a vehicle. The two parts work together to provide support for the weight of the vehicle, as well as grip on the road surface. There are several different ways that tires can be connected to rims, but the most common method is by using tire beads.
Tire beads are made from a variety of materials, but they all serve the same purpose. They are designed to fit snugly around the rim of a wheel and hold the tire in place. Most tire beads are made from metal or rubber, and they can either be rigid or flexible.
Rigid tire beads are typically made from steel or aluminum, and they’re often used on heavy-duty vehicles like trucks and buses. Flexible tire beads are usually made from rubber, and they’re often used on lighter vehicles like cars and motorcycles. No matter what material they’re made from, all tire beads have one thing in common: They need to be strong enough to keep the tire securely attached to the rim under all conditions.
That means that when you’re driving down the highway at high speeds, your tires will stay firmly in place even if you hit a pothole or make a sharp turn. So how do tire beads actually work? When you inflate a tire, the air pressure inside forces the bead against the wall of the rim.
This creates a seal that prevents air from escaping through gaps between the bead and rim. The bead also needs to be able to grip something so it doesn’t just slip out of place when you start driving. To do this, most bead designs include some kind of tread pattern that helps keep them locked into position.
So there you have it: That’s how tires connect to rims! The next time you take a close look at your wheels pay attention to those little details like tread patterns and material choices – they play an important role in keeping you safe on the road.
How are Tires Installed on Wheels?
Installing tires on wheels is a pretty simple process that anyone can do with the right tools. You’ll need a few things before you get started:
- A floor jack
- A lug wrench (or impact gun)
- A tire iron
- A torque wrench (optional, but recommended)
Once you have all of your tools gathered, follow these steps to get the job done:
Jack up the car and remove the wheel: Use your floor jack to raise the car off the ground, and then remove the wheel using your lug wrench or impact gun. If your car has hubcaps, you’ll need to remove those first before accessing the lug nuts.
Break loose the old tire’s bead: Place your tire iron on one of the beads near the valve stem and pry it loose. Work your way around the entire circumference of the tire until both beads are broken loose. This will make it easier to remove the old tire from the wheel.
Remove the old tire: Grab hold of one side of the tire and pull it straight off of the wheel. The other side may pop off on its own or you may need to use a little bit more force depending on how tight it was mounted originally.
Mounting new tires onto wheels is essentially just reversing this process: Start by placing one side of the new tire onto the wheel and then working your way around to seat both beads completely before moving on to the next step
Inflate new tires common: Use an air compressor or hand pump to inflate each new tire to their common ded PSI(pounds per square inch). Don’tforgettoseatbothbeadsbeforeinflating!
Do They Glue Tires to Rims?
When you get a new tire, it will need to be mounted on a rim. This is usually done at a tire shop or garage. The process of mounting a tire on a rim is called “tire mounting.”
There are three different ways that tires can be mounted on rims: with glue, with bolts, or with clamps. Each method has its own advantages and disadvantages.
Glue:
Advantages – Glue provides the best possible hold between the tire and the rim. This ensures that the tire will not come off of the rim while you are driving.
Disadvantages – Applying glue to mount a tire is a very messy process. It is also difficult to remove a glued-on tire from a rim if you ever need to change it.
Bolts:
Advantages – Bolts provide a strong hold between the tire and the rim. They are also easy to remove if you ever need to change your Tire size or type.
Disadvantages – Applying bolts to mount a tire takes more time than other methods.
Clamps:
Advantages – Clamps are quick and easy to apply. They also allow you to easily change your Tire size or type if necessary.
Disadvantages – Clamps do not provide as strong of a hold as other methods (such as bolts).
How Do Tires Attach to Cars?
Tires are the round, black rubber things that most cars have on their four corners. They attach to the car via the wheel and axle assembly. The average passenger car has four tires (two in front, two in back), although some cars have more or fewer depending on their design.
The term “tire” actually refers to the tire tread and not the entire tire/wheel assembly. The tread is the part of the tire that comes into contact with the road surface. The rest of the tire is made up of several different layers, including an inner liner, reinforcing cords, body plies, and an outer rubber layer.
The connection between a tire and wheel is actually quite simple. Tires typically have a bead around their inner circumference that mates with a corresponding bead seat on the wheel rim. The beads are held in place by friction and pressure from being mounted on the wheel.
Once inflated, the air pressure inside the tire keeps everything in place so that it doesn’t come off while driving.
Frequently Ask & Questions
How do tires attach to rims?
It’s like a match made in automotive heaven! Tires are attached to rims using a method called “mounting.” This involves carefully placing the tire onto the rim and securing it in place using a combination of air pressure and mechanical force.
What is the purpose of the rim in tire attachment?
The rim is like the sturdy backbone of the tire. Its main purpose is to provide a strong base for the tire to sit on and ensure a secure attachment. Without the rim, Of course! When mounting a tire, it starts with lubricating the rim and tire bead to ease the process. Then, the tire is carefully placed onto the rim, making sure the tire bead (the inner edge of the tire) fits snugly into the rim groove. Finally, air pressure is applied to inflate the tire, causing it to expand and lock itself onto the rim.the tire would just be a floppy mess!
Can you explain the mounting process in more detail?
Of course! When mounting a tire, it starts with lubricating the rim and tire bead to ease the process. Then, the tire is carefully placed onto the rim, making sure the tire bead (the inner edge of the tire) fits snugly into the rim groove. Finally, air pressure is applied to inflate the tire, causing it to expand and lock itself onto the rim.
Are there different methods of tire attachment?
Absolutely! The most common method is known as “bead seating,” where air pressure pushes the tire’s bead against the rim. However, some tires, especially those used in heavy-duty applications, may require additional reinforcement, such as using mechanical fasteners or bead locks to ensure a more secure attachment.
How important is it to have tires properly attached to the rims?
Very important! The proper attachment of tires to rims ensures not only a smooth and safe ride but also optimal handling and performance. Improperly attached tires can lead to tire blowouts, loss of control, and other hazardous situations on the road. So, always make sure your tires are securely attached to their rims before hitting the pavement!
Conclusion
Tires attach to rims in one of two ways: with a bead or with a rim. A bead is the part of the tire that contacts the wheel, and it is held in place by air pressure. A rim is a metal ring that the tire sits on, and it is held in place by friction.
