
How to Mount Atv Tires by Hand
One of the most common questions we get here at Rocky Mountain ATV/MC is how to mount ATV tires by hand. While it may seem like a daunting task, it’s actually not that difficult – as long as you have the right tools and know-how. In this blog post, we’re going to walk you through everything you need to know about mounting ATV tires by hand, from what tools you need to how to do it step-by-step.
- Park the ATV on a level surface and set the parking brake
- Place a jack under the ATV frame, near one of the rear tires
- Lift the rear end of the ATV off the ground with the jack, until the tire is free from contact with the ground
- Remove the cap from the valve stem on each tire to be mounted, using a Phillips screwdriver
- Insert one end of an inflation hose onto each valve stem and screw it on tightly by hand
- Fill each tire with air to its maximum recommended pressure, using an air compressor or hand pump connected to the inflation hoses
- 6Remove each inflation hose and quickly replace each tire’s valve stem cap before any air can escape from the tires
How to Change ATV Tires Yourself at Home!
How Do You Change Atv Tires by Hand?
Assuming you don’t have a tire changing machine and are doing it by hand:Tools needed:
-Lug nut wrench
-Socket wrench
-Ratchet
-Jack
-Penetrating oil or WD40
-Sturdy block of wood1. Park your ATV on a level surface and engage the parking brake.
Place the block of wood in front of the tire you will be changing to keep the ATV from rolling while you work.
2. Remove the wheel cover, if there is one. Using the lug nut wrench, loosen each lug nut about a turn but do not remove them yet.
3. Place the jack under the frame near the tire you are changing. Pump the jack handle until the tire just clears the ground. 4. Finish removing the lug nuts and pull the wheel off of the axle 5. Inspect old tire for any nails or other objects that may have causedthe puncture 6. If reusing old tire, use penetrating oil or WD40on each side of bead where it meets rim to help break seal 7. Align new tire with opening in fender well and press onto hub, being careful not to pinch your fingers 8 .
Hand tightening each lug nut as much as possible, lower vehicle to ground 9 . Once all four tires are on ground, use socket wrench to finish tightening each lug nut in a star pattern 10 .
How Hard is It to Mount Atv Tires?
It’s not hard to mount ATV tires if you have the right tools and know-how. You’ll need an air compressor, a tire iron, and some patience. First, make sure your ATV is on a level surface.
Second, loosen the lug nuts with the tire iron. Third, use the air compressor to inflate the tire. Fourth, use the tire iron to tighten the lug nuts back onto the wheel.
Finally, check that the pressure in the tire is correct before you ride off.
How Do You Put a Tire on a Rim Without a Machine?
One of the most common questions we get here at Discount Tire is how to put a tire on a rim without using a machine. While it may seem like a daunting task, it’s actually quite easy to do with just a few tools and some patience. Here’s a step-by-step guide on how to put a tire on a rim without using a machine:
1. Start by placing the rim upside down on a clean, flat surface. If you’re working with an aluminum alloy rim, be careful not to scratch or damage the finish.2. Next, take your tire and place it over the top of the rim.
Make sure that the bead of the tire is seated evenly all the way around the circumference of the rim.3. Once the tire is in place, begin inflating it with an air compressor or hand pump. As you’re inflating, keep an eye on the bead of the tire to make sure that it’s staying seated properly on the rim.
If it starts to come off, simply deflate and start over again from step 2.
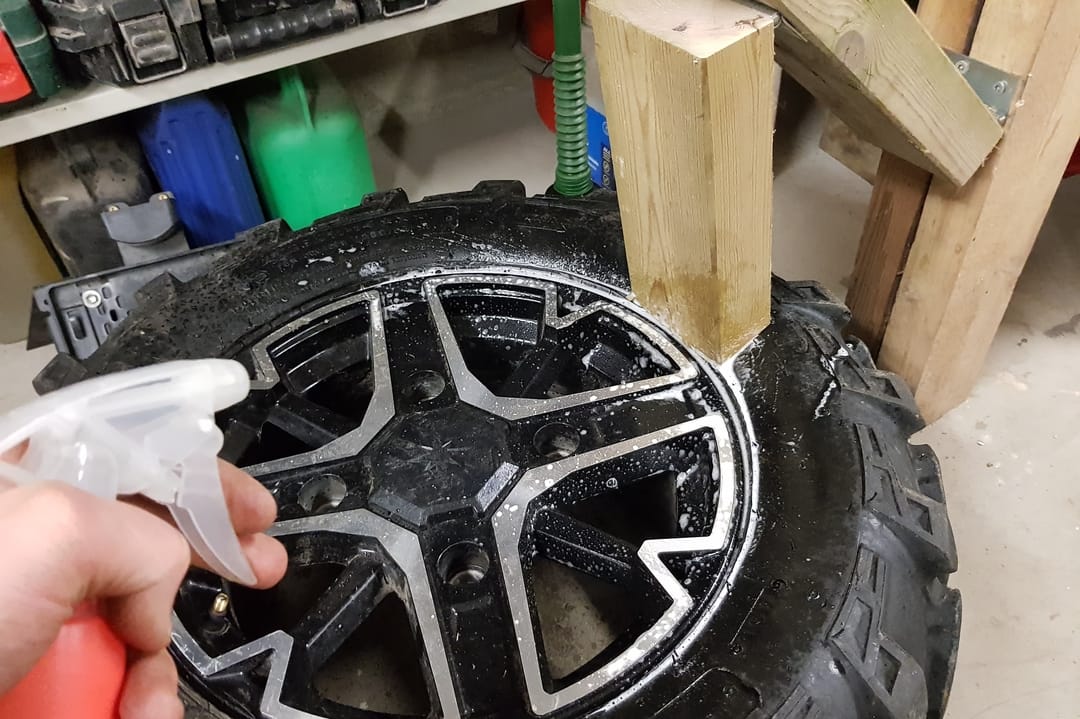
How Do You Mount a Tire by Hand?
In order to mount a tire by hand, you will need the following supplies: a rim, a bead breaker, a tire lever, and soapy water. You will also need access to an air compressor in order to inflate the tire once it is mounted.1. Begin by breaking the bead on the rim with the bead breaker.
This will allow you to get the tire levers under the lip of the tire.2. Use the tire levers to pry the rest of the bead over the rim. Work your way around the entire circumference of the tire until it is completely off of the rim.
3. Inspect both the rim and tire for any damage that may have occurred during removal. If everything looks good, proceed to step 4. If not, consult a professional before continuing.4. Apply some soapy water to both sides ofthe new Tire tube .
This will help lubricate it as you work it onto the rim . Inflate The tube slightly , just enough so that It holds Its shape .
Credit: boostatv.com
Walmart Atv Tire Mounting
If you’re in the market for a new ATV, you might be wondering about the best place to buy one. You might also be wondering about the best place to get your ATV tires mounted. Walmart is a great option for both of these things!
Walmart offers a wide selection of ATVs from top brands like Yamaha, Honda, and Polaris. They also offer competitive pricing on tire mounting services. So whether you’re looking for a new ATV or just need your tires mounted, Walmart is a great option!
Conclusion
If you’re looking to save some money, you can mount your ATV tires by hand. It’s not a difficult process, but it does require a little bit of patience and effort. Here’s how to do it:
1. Start by inflating the tire to its recommended pressure. This will make it easier to work with.2. Position the tire on the rim and line up the valve stem with the hole in the rim.
3. Use your hands to push the tire over the rim until it’s seated all the way around. You may need to use a rubber mallet to help get it started.4. Once the tire is in place, finish inflating it to its proper pressure and check for leaks around the bead area.
